


November 12th, 2020
Evaluating Rasa NLU Models in Jupyter
Vincent Warmerdam

Training and evaluating NLU models from the command line offers a decent summary, but sometimes you might want to evaluate the model on something that is very specific. In these scenarios, you can load the trained model in a Jupyter notebook and use other open-source tools to fully explore and evaluate it. In this blog post, we'll explain how you can do this.
Note! This blogpost was written with Rasa Open Source 2.x in mind. It's possible that the code no longer runs in Rasa Open Source 3.0 onward.
Loading in the NLU model
To demonstrate the use case, we've created a small project here. It contains a subset of chit-chat intents from our rasa demo project. You can clone the repository to follow along, but you can also run the steps shown here on your own project.
We're assuming that you have Rasa Open Source 2.0.2 installed and that you're in a virtual environment that also has Jupyter installed. Assuming you've got a notebook running, you can begin loading in a pre-trained NLU model by using the utility function found below.
from rasa.cli.utils import get_validated_pathfrom rasa.model import get_model, get_model_subdirectoriesfrom rasa.nlu.model import Interpreter
def load_interpreter(model_path):  """  This loads the Rasa NLU interpreter. It is able to apply all NLU  pipeline steps to a text that you provide it.  """  model = get_validated_path(model_path, "model")  model_path = get_model(model)  _, nlu_model = get_model_subdirectories(model_path)  return Interpreter.load(nlu_model)
nlu_interpreter = load_interpreter("models/nlu-20201029-130124.tar.gz")
The nlu_interpreter now represents the pre-trained pipeline. It contains all the NLU components that were defined in the config.yml file. In our case we have this NLU configuration in our config.yml file:
language: en
pipeline:  - name: WhitespaceTokenizer  - name: RegexFeaturizer  - name: LexicalSyntacticFeaturizer  - name: CountVectorsFeaturizer  - name: CountVectorsFeaturizer    analyzer: char_wb    min_ngram: 1    max_ngram: 4  - name: DIETClassifier    epochs: 10  - name: EntitySynonymMapper
And this is what the pipeline in the interpreter looks like:
> nlu_interpreter.pipeline[<rasa.nlu.tokenizers.whitespace_tokenizer.WhitespaceTokenizer>,<rasa.nlu.featurizers.sparse_featurizer.regex_featurizer.RegexFeaturizer>,<rasa.nlu.featurizers.sparse_featurizer.lexical_syntactic_featurizer.LexicalSyntacticFeaturizer>,<rasa.nlu.featurizers.sparse_featurizer.count_vectors_featurizer.CountVectorsFeaturizer>,<rasa.nlu.featurizers.sparse_featurizer.count_vectors_featurizer.CountVectorsFeaturizer>,<rasa.nlu.classifiers.diet_classifier.DIETClassifier>,<rasa.nlu.extractors.entity_synonyms.EntitySynonymMapper>]This interpreter object contains all the trained NLU components, and it will be the main object that we'll interact with. One of the main features of this component is the ability to parse new texts. This will give us a dictionary with detected intents and entities as well as some confidence scores.
> nlu_interpreter.parse("where can i order food"){ 'entities': [], 'intent': { 'confidence': 0.24416136741638184, 'id': -4128445325565526836, 'name': 'restaurant' }, 'intent_ranking': [ {'confidence': 0.24416136741638184, 'id': -4128445325565526836, 'name': 'restaurant'}, {'confidence': 0.1281890720129013, 'id': -4983000514276781972, 'name': 'what_can_you_do'}, {'confidence': 0.11336586624383926, 'id': -3972949401205344651, 'name': 'birthday'}, {'confidence': 0.1038997694849968, 'id': 7099550352156415993, 'name': 'how_are_you'}, {'confidence': 0.10174094140529633, 'id': 4161254064319938302, 'name': 'what_is_rasa'}, {'confidence': 0.08190736174583435, 'id': -8364265110686283794, 'name': 'weather'}, {'confidence': 0.06975438445806503, 'id': 4103042733970985572, 'name': 'who_are_you'}, {'confidence': 0.06401239335536957, 'id': -1422585048149541803, 'name': 'are_you_real'}, {'confidence': 0.05419585108757019, 'id': -4084360636064318903, 'name': 'how_made'}, {'confidence': 0.03877299651503563, 'id': -7520032782244504615, 'name': 'joke'} ], 'text': 'where can i order food'}This is very useful because it allows us to make predictions on any text we like! We can also use it to make predictions on data stored in a nlu.yml file.
NLU data and messages
To load your local NLU data, you can use another utility from Rasa.
import rasa.shared.nlu.training_data.loading as nlu_loadingtrain_data = nlu_loading.load_data("data/nlu.yml")There are a lot of properties attached to the train_data variable, but the most interesting one for our use case is train_data.intent_examples. It contains a list of all the intent examples found in our training data. These examples are represented as a Message object that Rasa uses internally as a container for any relevant information attached to an utterance.
To inspect the contents of these messages it can be helpful to retrieve them as dictionaries.
# This `train_data` object contains intent_examples. This is a# list of `Message` objects. These are containers that can# contain intents, entities but also other information that# is relevant to a NLU pipeline.> [m.as_dict() for m in train_data.intent_examples][:5][{'text': 'are you a real person', 'intent': 'are_you_real'}, {'text': 'Ar you a bot ?', 'intent': 'are_you_real'}, {'text': 'hey are you human', 'intent': 'are_you_real'}, {'text': 'are you a real bot?', 'intent': 'are_you_real'}, {'text': 'Are you human ?', 'intent': 'are_you_real'}]If you're interested to see what properties the pipeline adds to the message, you can iterate over each component in the interpreter and see the effect.
from pprint import pprint
message = train_data.intent_examples[0]for component in nlu_interpreter.pipeline:    # Every component in the pipeline is adding information to the message.    component.process(message)pprint(message.as_dict_nlu())
You can now see that tokens have been added as well as predictions.
{'entities': [], 'intent': {'confidence': 0.8422146439552307, 'name': 'are_you_real'}, 'intent_ranking': [{'confidence': 0.8422146439552307, 'name': 'are_you_real'}, {'confidence': 0.04479081928730011, 'name': 'how_made'}, {'confidence': 0.021328529343008995, 'name': 'how_are_you'}, {'confidence': 0.019935669377446175, 'name': 'what_can_you_do'}, {'confidence': 0.013976013287901878, 'name': 'languages'}, {'confidence': 0.013974795117974281, 'name': 'weather'}, {'confidence': 0.013861254788935184, 'name': 'what_time'}, {'confidence': 0.013021928258240223, 'name': 'who_made_you'}, {'confidence': 0.011181396432220936, 'name': 'birthday'}, {'confidence': 0.005714914295822382, 'name': 'restaurant'}], 'intent_tokens': [<rasa.nlu.tokenizers.tokenizer.Token>], 'text': 'are you a real person', 'text_tokens': [<rasa.nlu.tokenizers.tokenizer.Token>, <rasa.nlu.tokenizers.tokenizer.Token>, <rasa.nlu.tokenizers.tokenizer.Token>, <rasa.nlu.tokenizers.tokenizer.Token>, <rasa.nlu.tokenizers.tokenizer.Token>]}If you're really interested and want to go further, you could even retrieve the machine learning features that were generated.
sparse_token_feats, sparse_utterance_feats = message.get_sparse_features("text")sparse_token_feats, dense_utterance_feats = message.get_dense_features("text")Explore and evaluate with Python tools
While exploring the inner workings of Rasa NLU is fun, you're probably more interested in using the Jupyter notebook to evaluate the model. That means that you probably want to get your data into a pandas data frame so you can analyse it from there. The script below will do just that.
import pandas as pd
def add_predictions(dataf, nlu):    """This function will add prediction columns based on `nlu`"""    pred_blob = [nlu.parse(t)['intent'] for t in dataf['text']]    return (dataf            [['text', 'intent']]            .assign(pred_intent=[p['name'] for p in pred_blob])            .assign(pred_confidence=[p['confidence'] for p in pred_blob]))
# First make a list of dictionaries that contain the utterances.data_list = [m.as_dict() for m in train_data.intent_examples]# Turn this list into a dataframe and add predictions using the nlu-interpreterdf_intents = pd.DataFrame(data_list).pipe(add_predictions, nlu=nlu_interpreter)
Having data in a data frame allows you to write specific queries that calculate exactly what you're interested in. Here's a simple aggregation that calculates the confidence scores per intent.
df_summary = (df_intents .groupby('pred_intent') .agg(n=('pred_confidence', 'size'), mean_conf=('pred_confidence', 'mean')))This summary will look something like this:
n mean_confpred_intentare_you_real 73 0.835666birthday 66 0.284392happy_to_meet 49 0.781069how_are_you 107 0.456159how_made 65 0.663902joke 43 0.666984languages 64 0.898767restaurant 56 0.751922weather 76 0.733560what_can_you_do 84 0.376587what_is_rasa 86 0.766364what_time 50 0.622744whats_you_name 74 0.487030whatsup 3 0.168439who_are_you 92 0.572122who_made_you 86 0.714087The main benefit of having this information in a data frame is that you can easily interact with other tools in the Python ecosystem. You can zoom in on a particular intent and you can make whatever charts you like. For example, you can use scikit-learn to generate classification reports.
from sklearn.metrics import classification_reportreport = classification_report(y_true=df_intents['intent'], y_pred=df_intents['pred_intent'])print(report)This is what our generated report looks like.
precision    recall  f1-score   support   are_you_real       1.00      0.99      0.99        74       birthday       0.98      0.64      0.77       102  happy_to_meet       0.98      1.00      0.99        48    how_are_you       0.79      0.92      0.85        91       how_made       0.71      0.98      0.82        47           joke       0.95      1.00      0.98        41      languages       0.97      1.00      0.98        62     restaurant       0.98      1.00      0.99        55        weather       0.96      0.99      0.97        74what_can_you_do       0.96      0.90      0.93        90   what_is_rasa       0.93      1.00      0.96        80      what_time       0.98      0.91      0.94        54 whats_you_name       0.97      0.97      0.97        74        whatsup       1.00      0.25      0.40        12    who_are_you       0.82      0.89      0.85        84   who_made_you       0.99      0.99      0.99        86
       accuracy                           0.92      1074      macro avg       0.94      0.90      0.90      1074   weighted avg       0.93      0.92      0.92      1074
You can also use Python's ecosystem of visualisation tools, like Altair.
import altair as altbars = alt.Chart(df_intents).mark_bar().encode(    x='pred_confidence:Q',    y="pred_intent:O")
(bars).properties(height=100)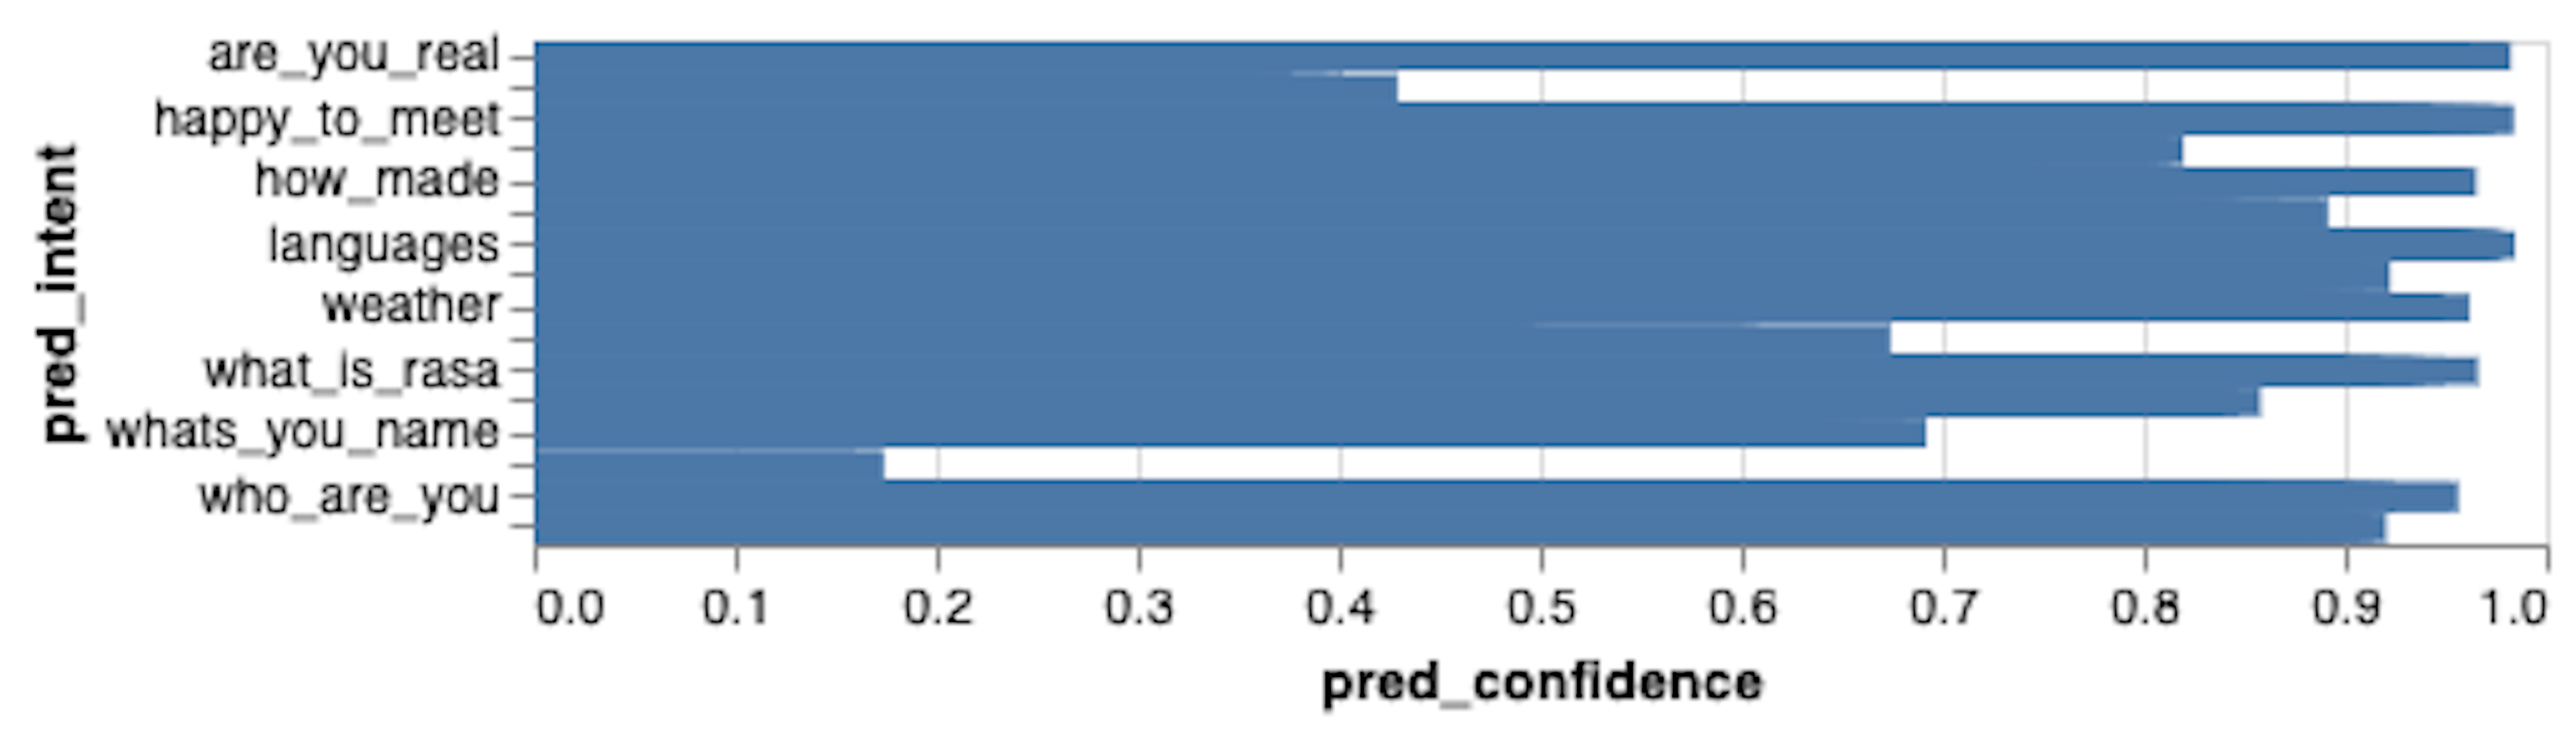
You can combine your pandas analysis with visualizations to construct whatever view you're interested in. Just to give one example, the chart below creates an interactive confusion matrix. A nice property of Altair is that you can export the charts to the front end natively and give it an interactive toolbar.
df_conf_mat = (df_intents  .groupby(["intent", "pred_intent"])  .agg(n_pred=("pred_confidence", "size"))  .reset_index())
df_plot = df_conf_mat.merge(df_summary.reset_index()).assign(p=lambda d: d['n_pred']/d['n'])
alt.Chart(df_plot).mark_rect().encode(  x='intent:O',  y='pred_intent:O',  color='p:Q')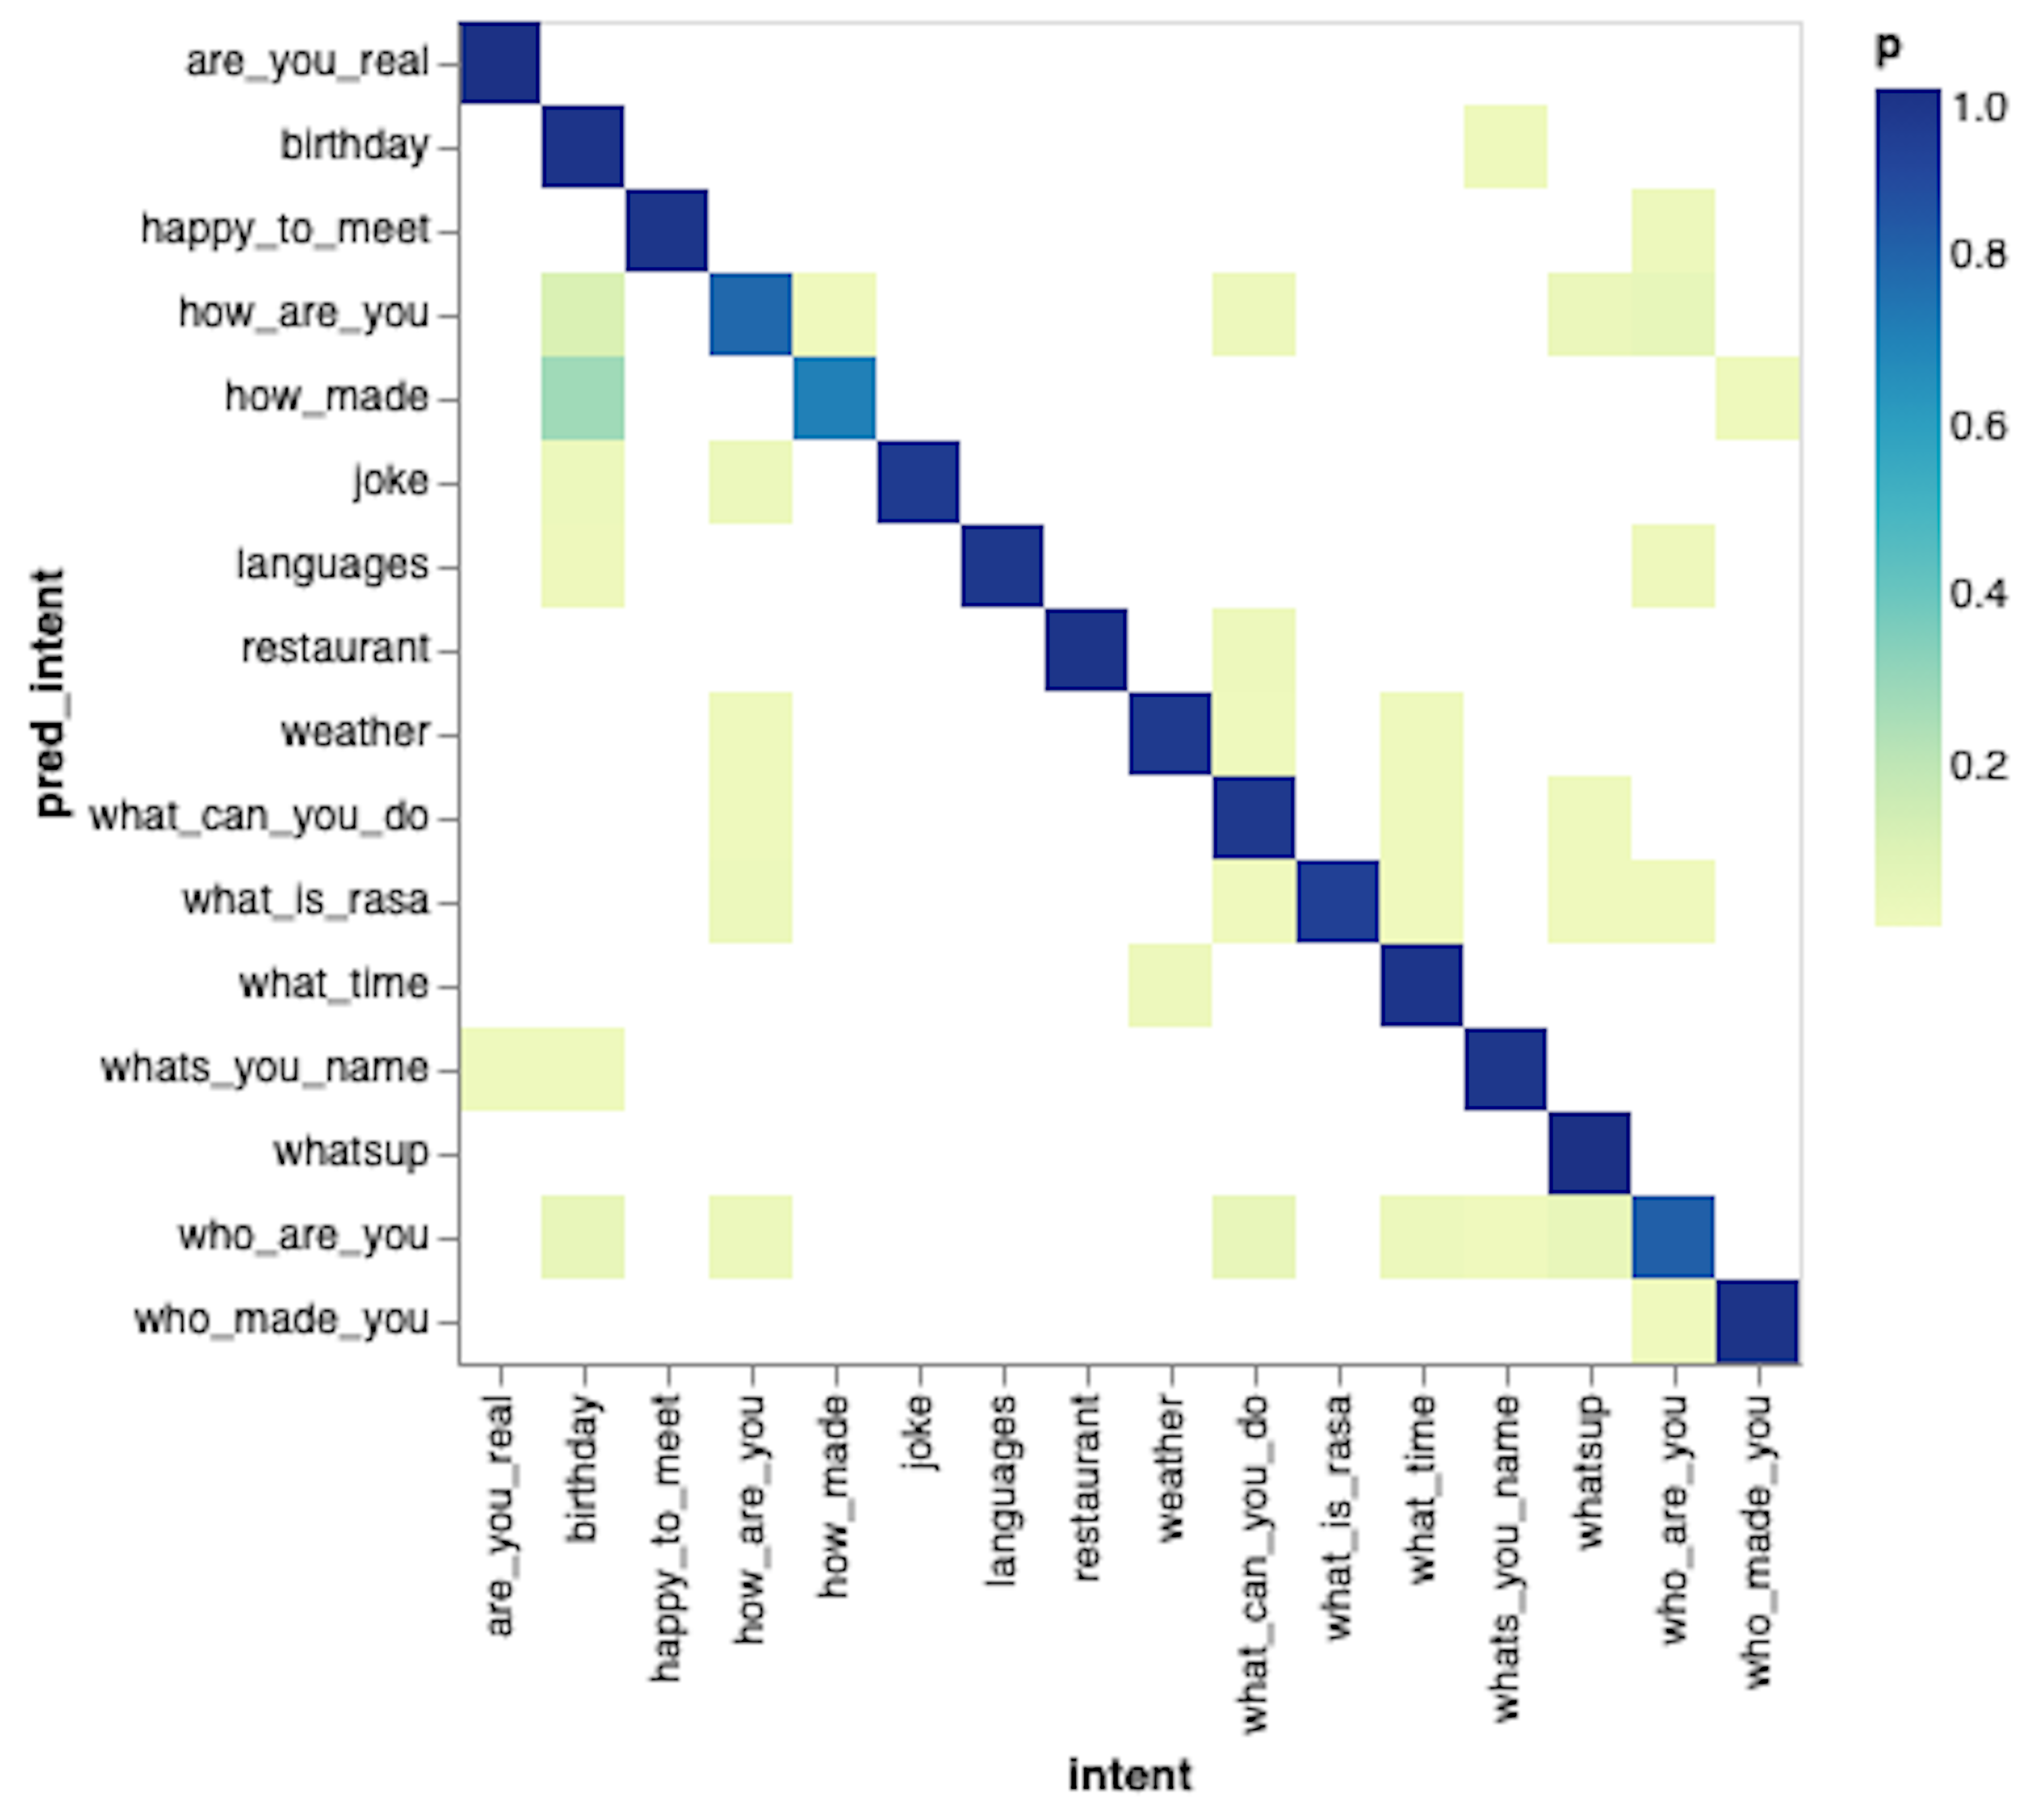
Conclusion
By exploring some of the internal APIs of Rasa Open Source we're reminded of a core feature: the ability to customise. It's possible to load a custom Rasa pipeline into Jupyter so you can use other open-source tools to fully explore and evaluate a trained model. You're free to explore and interact with these models as you see fit.
Happy hacking!