


Update: A lot of things have changed since this post was written. Rasa X, the freemium companion tool to Rasa Open Source, is no longer supported or maintained, and we are currently focused on the development of the Rasa Enterprise platform. To learn more about this, you can check out this blog post
In this blog post, we'll discuss how to get started using Rasa X when you already have an assistant running in production. With the rasa export CLI command released with Rasa Open Source 1.8.0, it's now easier than ever to import conversation data from a standalone Rasa deployment into Rasa X.
But before we get into the technical details, let's do a quick review of what Rasa X does and how it can help you build more resilient AI assistants.
Rasa X is a browser-based tool that layers on top of Rasa Open Source. It collects your assistant's conversation history so you can sort, filter, and analyze user interactions. You can use this data to understand where your assistant is successful and where it still needs work, and you can convert conversations into high quality training data by annotating messages and adding stories.
We built Rasa X because AI assistants are different from traditional software. Machine learning systems need training data based on real-world input so they can handle real-world situations. Models need adjustment and correction to perform well over time. And spotting patterns in large amounts of conversation data isn't something humans are particularly good at. Rasa X is a tool that helps you review, maintain, and grow your data set, improving your assistant.
If you have a Rasa AI assistant running in production, it's never too late to start using Rasa X to maintain and improve your assistant. Best of all, it requires just a few lines of code and won't disrupt your existing architecture. Let's walk through what you'll want to consider and the step-by-step process for connecting Rasa X to a live assistant.
Deploying Your Assistant + Rasa X
If you're building a brand new assistant, our recommended method for deploying your assistant is to deploy it through Rasa X. That's because using the Rasa X deployment script also spins up a production-ready container, configured with everything your Rasa assistant needs, at the same time. To make your assistant live and available to connect to public-facing messaging channels, the only thing you need to do is connect your assistant's Git repository using Integrated Version Control.
Deploying your assistant at the same time you deploy Rasa X also has the advantage of making sure all the conversations your assistant has with users are collected in Rasa X from day one.
But if you're reading this post, you probably already have an assistant live and running on a system separate from Rasa X. If your assistant has already been having conversations with users, you won't want to lose any of that data. The solution is to import historical conversation data into Rasa X and set up event forwarding so all future messages are captured.
How Data Flows from Rasa Open Source to Rasa X
To understand the process of connecting Rasa X to an assistant that's already running, it helps to take a look at the architecture of Rasa X and how the services interact. In the architecture diagram below, we've highlighted the components that are important for understanding the relationship between Rasa and Rasa X.
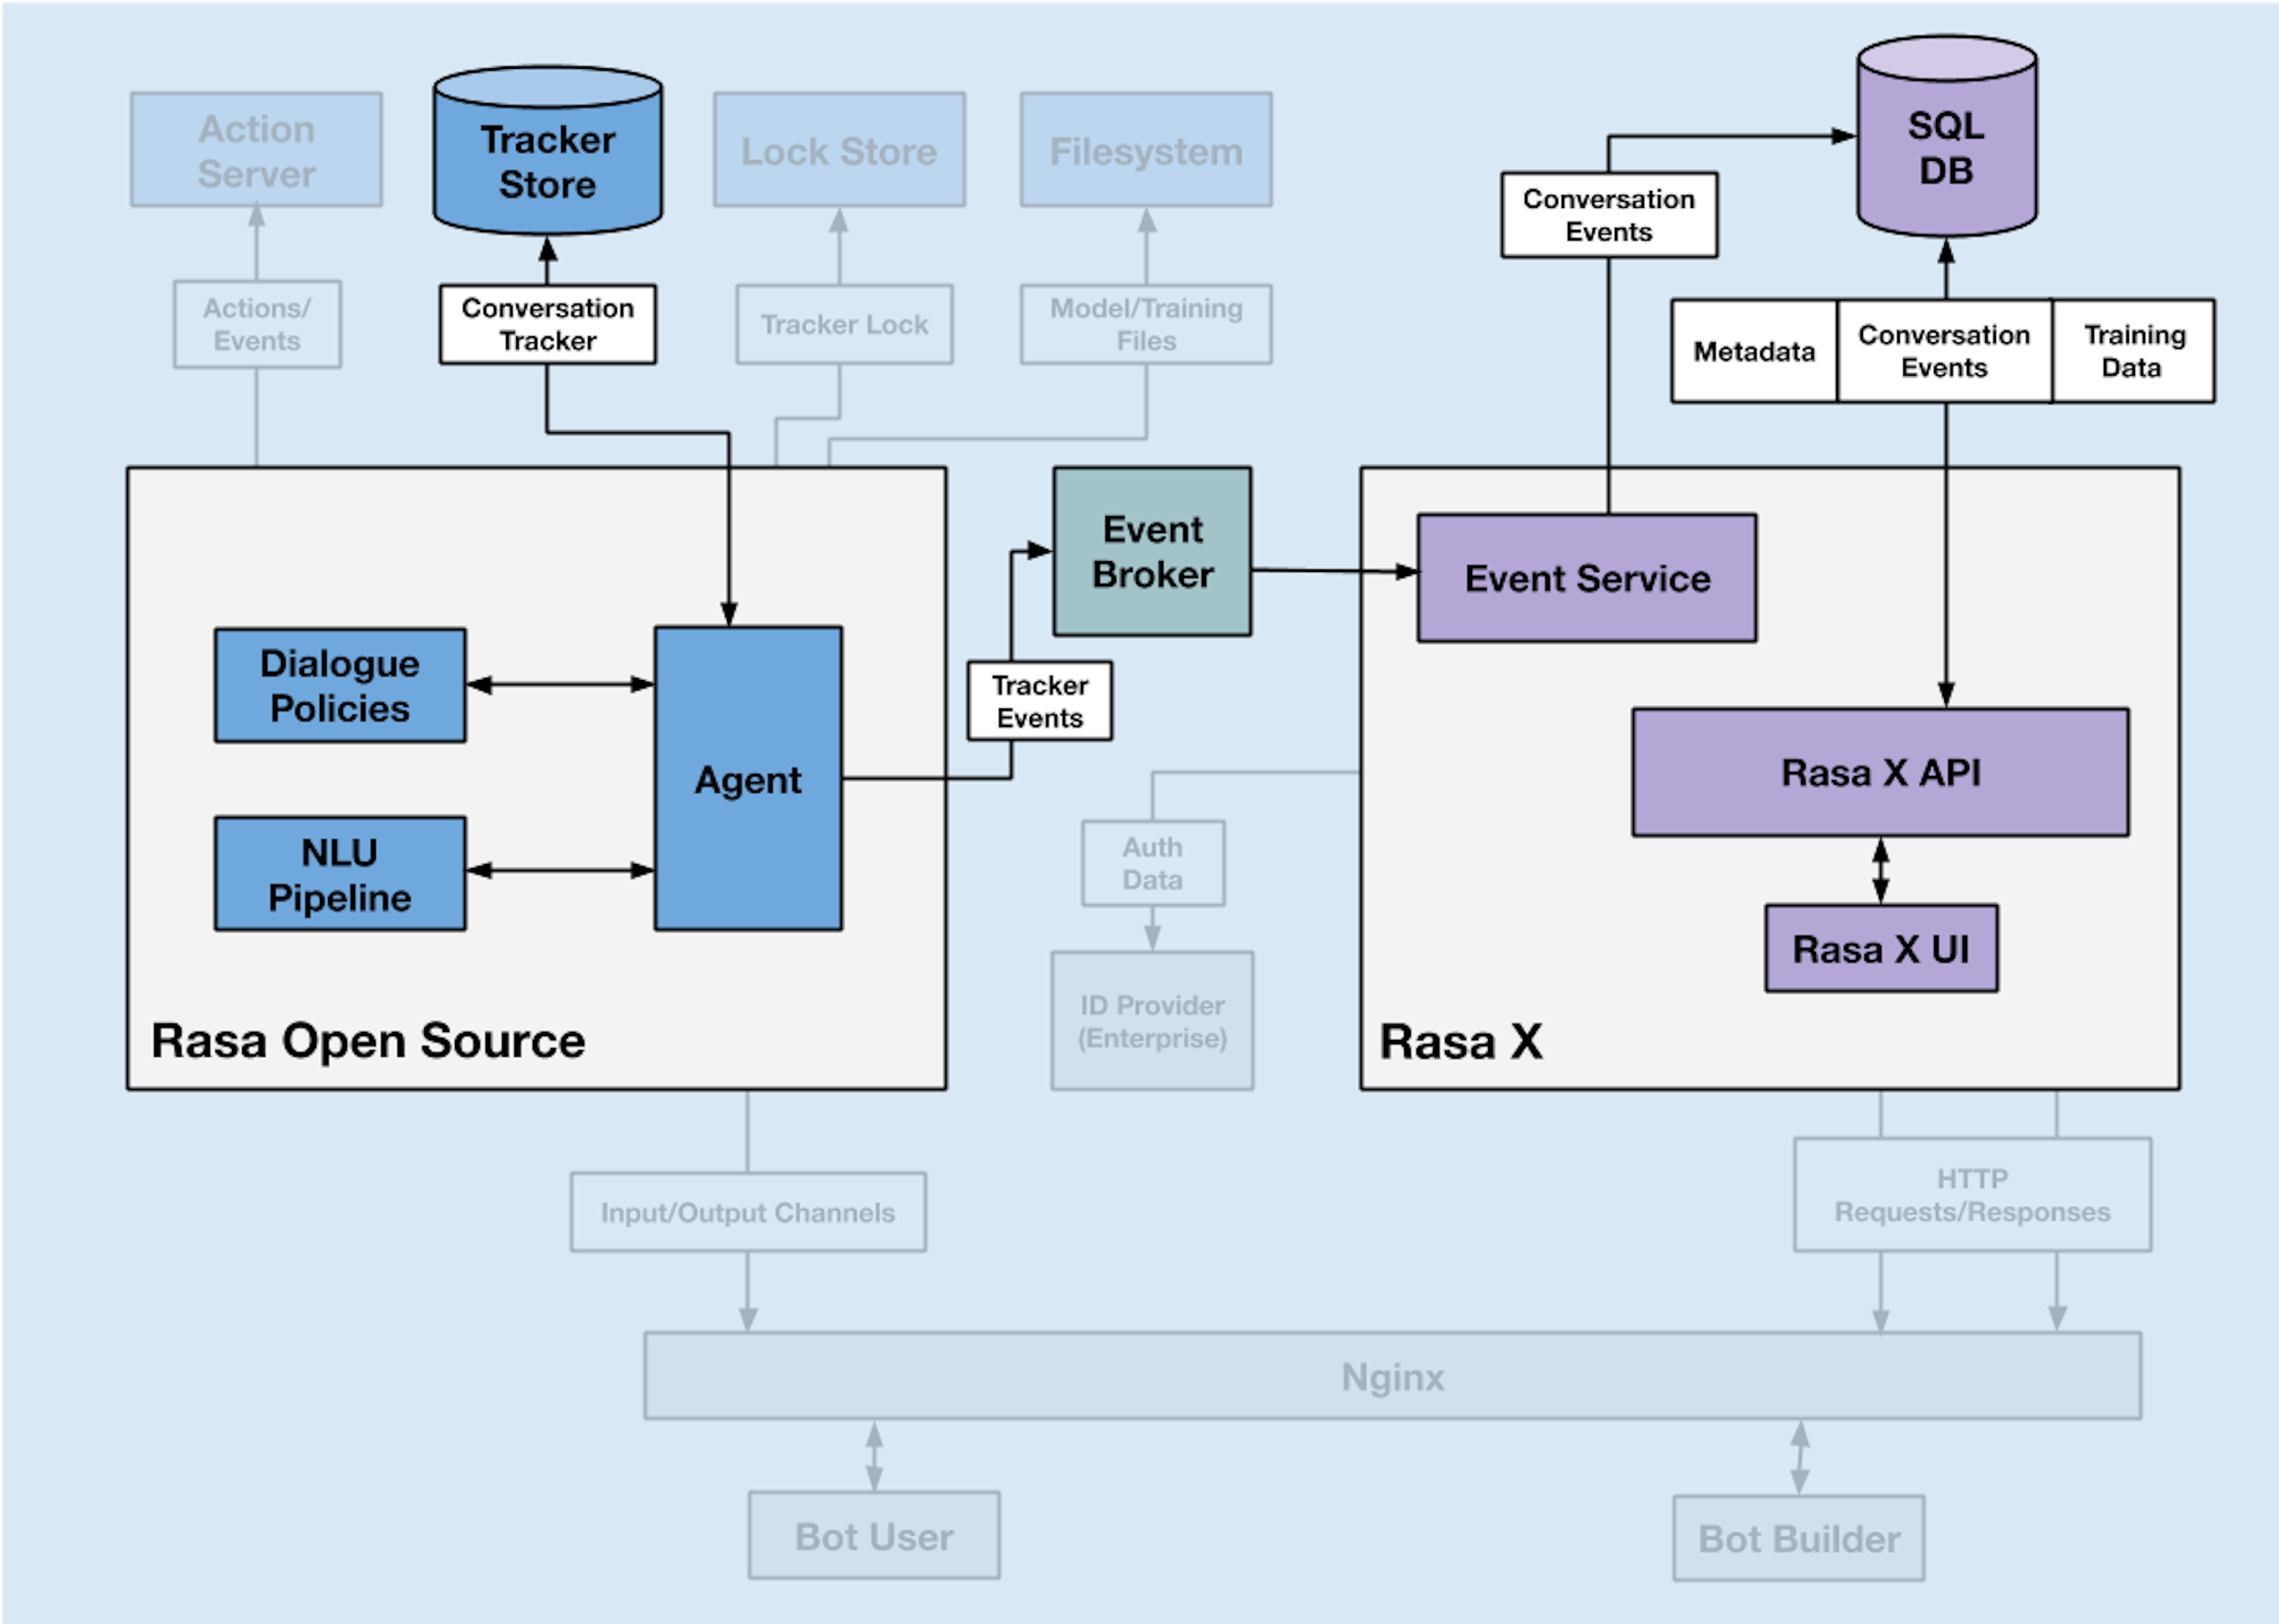
The event broker is the bridge. It uses a message streaming service, also known as a message broker, to forward events from the Rasa Open Source server to Rasa X. Event brokers accept messages (packets of data) from a producer and send them through a queue to a consumer.
The tracker store is the database where conversations are saved on the Rasa Open Source server. When Rasa X is connected, events are streamed from the Rasa agent (the producer) to the Rasa X event service (the consumer) and stored in the SQL database. From there, conversations can be accessed through the Rasa X API and viewed in the Rasa X UI.
To connect a live Rasa assistant to Rasa X, there are two considerations to take into account: 1) moving historical conversation data from the tracker store into Rasa X, and 2) making sure future conversation events are forwarded to Rasa X and stored.
Before you get started, you'll need to deploy Rasa X to a server. You can find the one-line deploy script for Rasa X here. This installation method automatically creates a k3s Kubernetes cluster on your machine (or you can use it to deploy to an existing cluster).
Forwarding Events
First we'll forward events to Rasa X by pointing Rasa Open Source to the Rasa X event broker.
The event broker used by Rasa X is RabbitMQ. Rabbit MQ's Python client is called Pika, and it's already built into Rasa Open Source. To forward events using Pika, all we need to do is supply the credentials and location of the Rasa X server's RabbitMQ service, which we'll configure in the assistant's endpoints.yml file.
On the Rasa X server: Get your RabbitMQ password and expose the port
The instructions below apply to Rasa X deployed on Kubernetes using either the one-line deploy script or the Helm chart. Used docker-compose to install Rasa X? You can find detailed instructions for locating your RabbitMQ credentials in the docs.
When you create a new Rasa X deployment using the one-line script, you'll see your RabbitMQ password printed to the terminal during the installation. After installation, the RabbitMQ password is saved as an encoded Kubernetes secret. You can retrieve it at any point using this terminal command:
secret=rabbit
namespace=<your namespace>
release_name=<your release name>
kubectl --namespace ${namespace} \
    get secret ${release_name}-${secret} -o yaml | \
    awk -F ': ' '/password/{print $2}' | base64 -d
If you deployed Rasa X using the one-line deployment script, your release_name and namespace are rasa. If you deployed using the Helm chart, you can find your namespace by running kubectl get namespaces. Then run helm list --namespace <your namespace> to get the releases under a particular namespace.
Expose the RabbitMQ port
Before RabbitMQ can accept external events, we need to expose the port. Run the following in your terminal to expose the RabbitMQ service as a load balancer on port 5672:
kubectl expose service rasa-rabbit -n rasa --name rabbit-mq-load-balancer --type LoadBalancer --port 5672 --target-port 5672
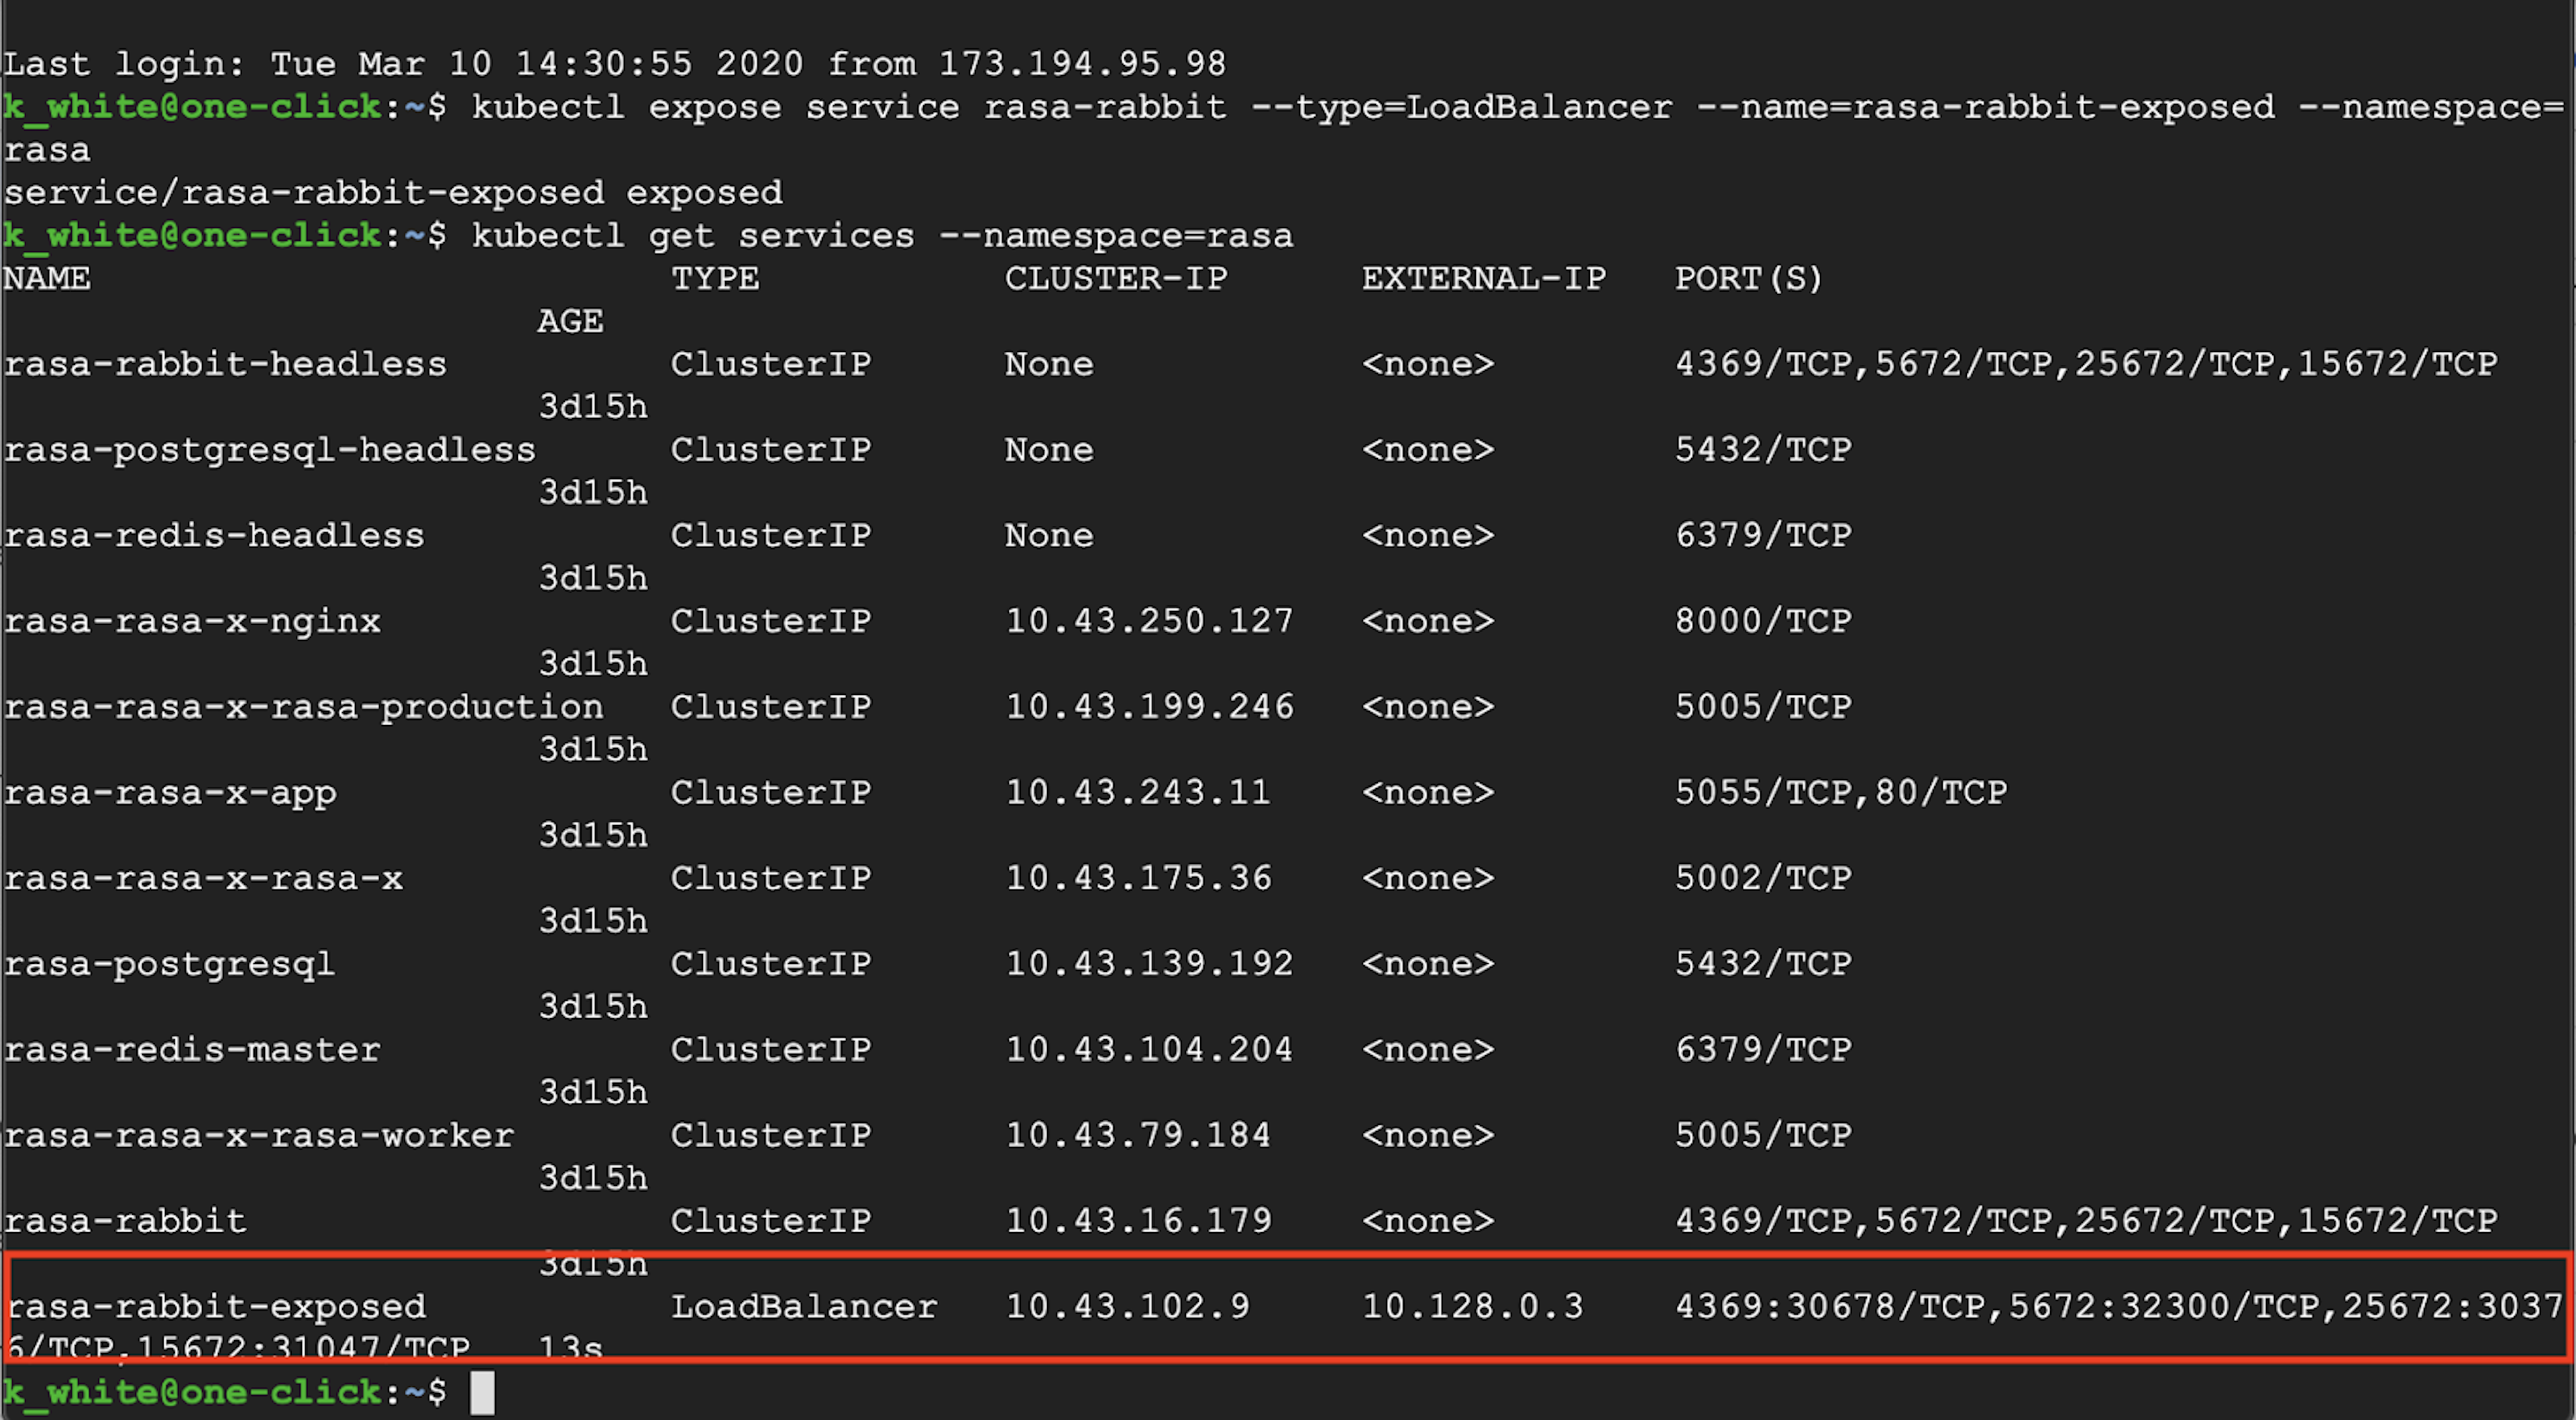
Make sure the port was exposed by running the following command, checking for an external IP address assigned to the RabbitMQ service. You'll provide this external IP as the URL of the exposed RabbitMQ service in your endpoints.yml file:
kubectl get services --namespace=rasa
On the Rasa Open Source server: Forward events
Next, we need to point the assistant to the Rasa X event broker. We'll do this by adding the RabbitMQ credentials from Rasa X to endpoints.yml, the file where messaging channels and external services are configured.
Add the following to your Rasa assistant's endpoints.yml file:
event_broker:
  type: "pika"
  url: ${RABBITMQ_HOST}
  username: ${RABBITMQ_USERNAME}
  password: ${RABBITMQ_PASSWORD}
  queue: ${RABBITMQ_QUEUE}
Then, add the following environment variables to your assistant's .env file, replacing the placeholders for RABBITMQ_PASSWORD and RABBIT_MQ_HOST:
RABBITMQ_PASSWORD=<password copied from Rasa X>
RABBITMQ_HOST=<the URL (or IP address) of your Rasa X server>
RABBITMQ_USERNAME=user
RABBITMQ_QUEUE=rasa_production_events
Save your files and restart the Rasa Open Source server:
sudo docker-compose down
sudo docker-compose up -d
Migrating Conversation Data
Now we have events from new conversations streaming into Rasa X, but we still need to import all of the data from conversations that happened before we connected.
With Rasa Open Source 1.8.0, we released a new CLI command: rasa export. This command migrates data from the Rasa assistant's tracker store => to the event broker => to the Rasa X database.
To use it, make sure you've configured your RabbitMQ credentials as described in the Forwarding Events section of this post. Then, run the command from your project directory on the Rasa Open Source server:
rasa export

You can set additional arguments, like a minimum and maximum timestamp to export data from a specific date range. For full details, see the docs.
Conclusion
Even if you're running your assistant on a separate server, connecting Rasa X and importing your conversations requires changing just a few lines of code and running the rasa export CLI command. Now is a great time to explore how Rasa X can help you take your assistant to the next level.
Want to learn more about what you can do with Rasa X? Check out a few of these resources:
- Using Conversation Tags to Measure Carbon bot's Success Rate (Rasa blog)
- Rasa Open Source + Rasa X: Better Together (Rasa blog)
- How to Use Integrated Version Control in Rasa X (webinar)
Keep up with the latest updates by joining us in the forum and following us on Twitter.