


The Rasa Masterclass is a weekly video series that takes viewers through the process of building an AI assistant, all the way from idea to production. Hosted by Head of Developer Relations Justina Petraityte, each episode focuses on a key concept of building sophisticated AI assistants with Rasa and applies those learnings to a hands-on project. At the end of the series, viewers will have built a fully-functioning AI assistant that can locate medical facilities in US cities.
To supplement the video content, we'll be releasing handbooks to summarize each episode. You can follow along as you watch to reinforce your understanding, or you can use them as a quick reference. We'll also include links to additional resources you can use to help you along your journey.
Introduction
In Episode 9 of the Rasa Masterclass, we introduce Rasa X, a toolset for improving AI assistants. We'll discuss why you should use Rasa X, demonstrate how to deploy Rasa X to a server, and connect the Rasa X instance to the medicare locator assistant.
Before beginning this tutorial, use the exercises in the previous 8 episodes to build the medicare locator assistant, a contextual assistant that can find the addresses of nearby hospitals, home health agencies, and nursing homes. You can also fast track by downloading the completed medicare locator assistant code on GitHub.
To follow along, you'll need to push your medicare locator project files to GitHub.
Let's get started!
The challenge: getting good training data is hard
Up until this point, we've been creating training data for the medicare locator assistant by imagining things users might say and writing them down as training examples.
That's a fine way to start, but it has some major limitations. The data set we've generated is pretty small, and it's inherently biased-our real users are likely to say things to the assistant that we didn't anticipate. Because of this, the assistant will have a hard time generalizing. It can handle utterances and story paths that are pretty close to what we have in our training data, but it's likely to fall down if presented with an unexpected user message.
The best training data we could use would be a large data set made up of real conversations. There are publicly available conversational data sets, but they tend to be general purpose: they're not conversations with yourusers, and they don't relate to yourdomain.
Rasa X solves this problem by helping you build the ideal data set: a large body of conversations that have happened between your users and your assistant. It allows you to share the assistant with test users to collect their conversations, and later on, when the assistant has been deployed, collect conversations from real users. Rasa X converts these conversations into high quality data which can be used to re-train and improve the assistant.
It's important to get your assistant into the hands of real users to start collecting this training data as soon as possible. The perfect time to start using Rasa X is when you've built an assistant that can handle what we call the most basic happy paths, meaning the assistant can handle some basic conversations and accomplish its main purpose: in our case, to look up medical facilities in the United States. The medicare locator is still a simple application at this point, but it's far enough along to start benefiting from real-world data.
What is Rasa X?
Rasa X is a UI tool for developers, used to improve assistants built with Rasa Open Source. It's intended to solve two problems:
- First, to make it easier to leverage real conversations as training data.
- Second, to provide a way to review past conversations for patterns or errors.
Without a UI tool, these workflows can be challenging. Rasa X collects conversations with users so you can review how they went and make decisions about the best way to improve the assistant. For example, if you see a conversation where the assistant performed particularly well, you can save it directly to your training stories. If you see an intent that was mis-classified, you can correct the classification and save the annotated data to your training file.
But, not every type of update should be made directly in Rasa X. While reviewing past conversations, you might conclude that two intents should be merged into one or the behavior of a custom action needs to change. In these cases, Rasa X is a useful tool for identifying which changes need to happen, but it's easier to make major updates like these in a text editor on your local machine, rather than in Rasa X.
Deploying Rasa X
Now that we've discussed why Rasa X is an important part of the assistant-building workflow, let's move on to installation. The proper way to run Rasa X is to deploy it to a server. It's possible to run it in local mode, but in order to really start collecting conversations with users, Rasa X needs to be accessible on the public internet and running at all times.
In this tutorial, we'll be using Google Cloud Platform (GCP). You can sign up for a GCP account (and get $300 free credit) here.
It's also possible to deploy Rasa X to other hosting services, like Azure, Digital Ocean, AWS, or your own dedicated server. You'll just want to make sure your machine meets the minimum requirements:
At least 4GB RAM
2-6 vCPUs
100 GB disc space
Linux distribution that can run Docker (e.g. Debian 9, Ubuntu 16.04 / 18.04)
Docker-compose
The most lightweight method for installing Rasa X is to use docker-compose, which is the method we'll be using today. For larger-scale assistants running in production, Rasa X also provides Helm charts for deploying to Kubernetes/Openshift. We'll cover cluster deployments in a later episode of the Masterclass.
Configure the VM instance
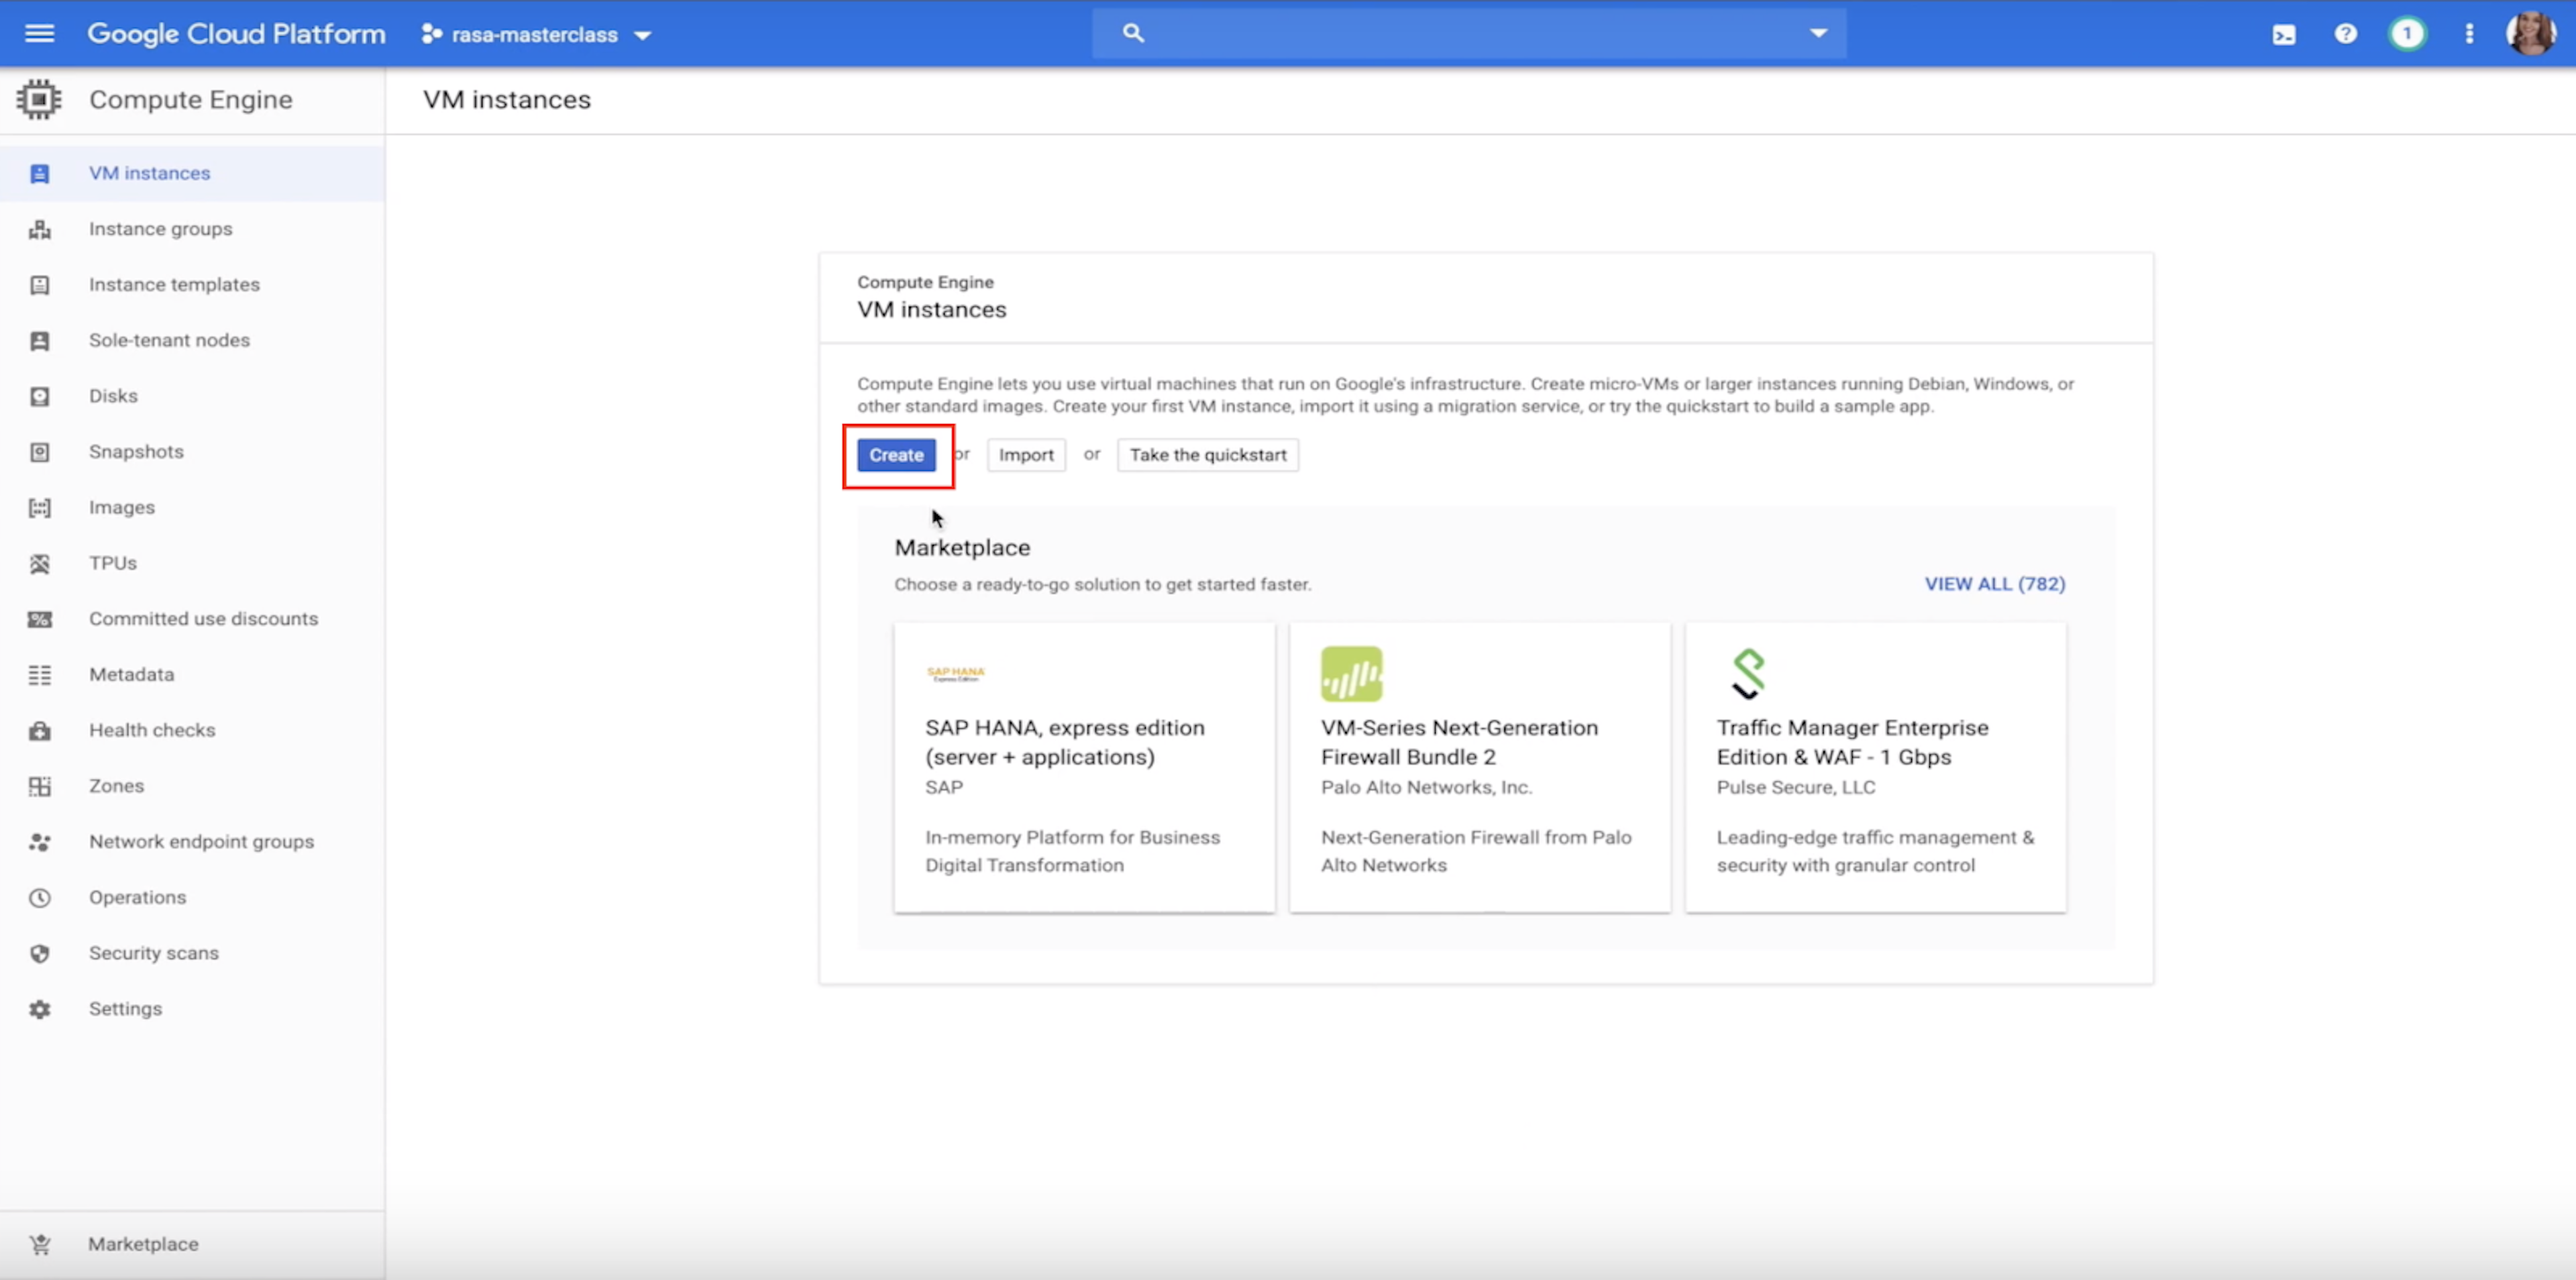
Log in to your GCP Console and navigate to Compute Engine>VM instances. Click Create.
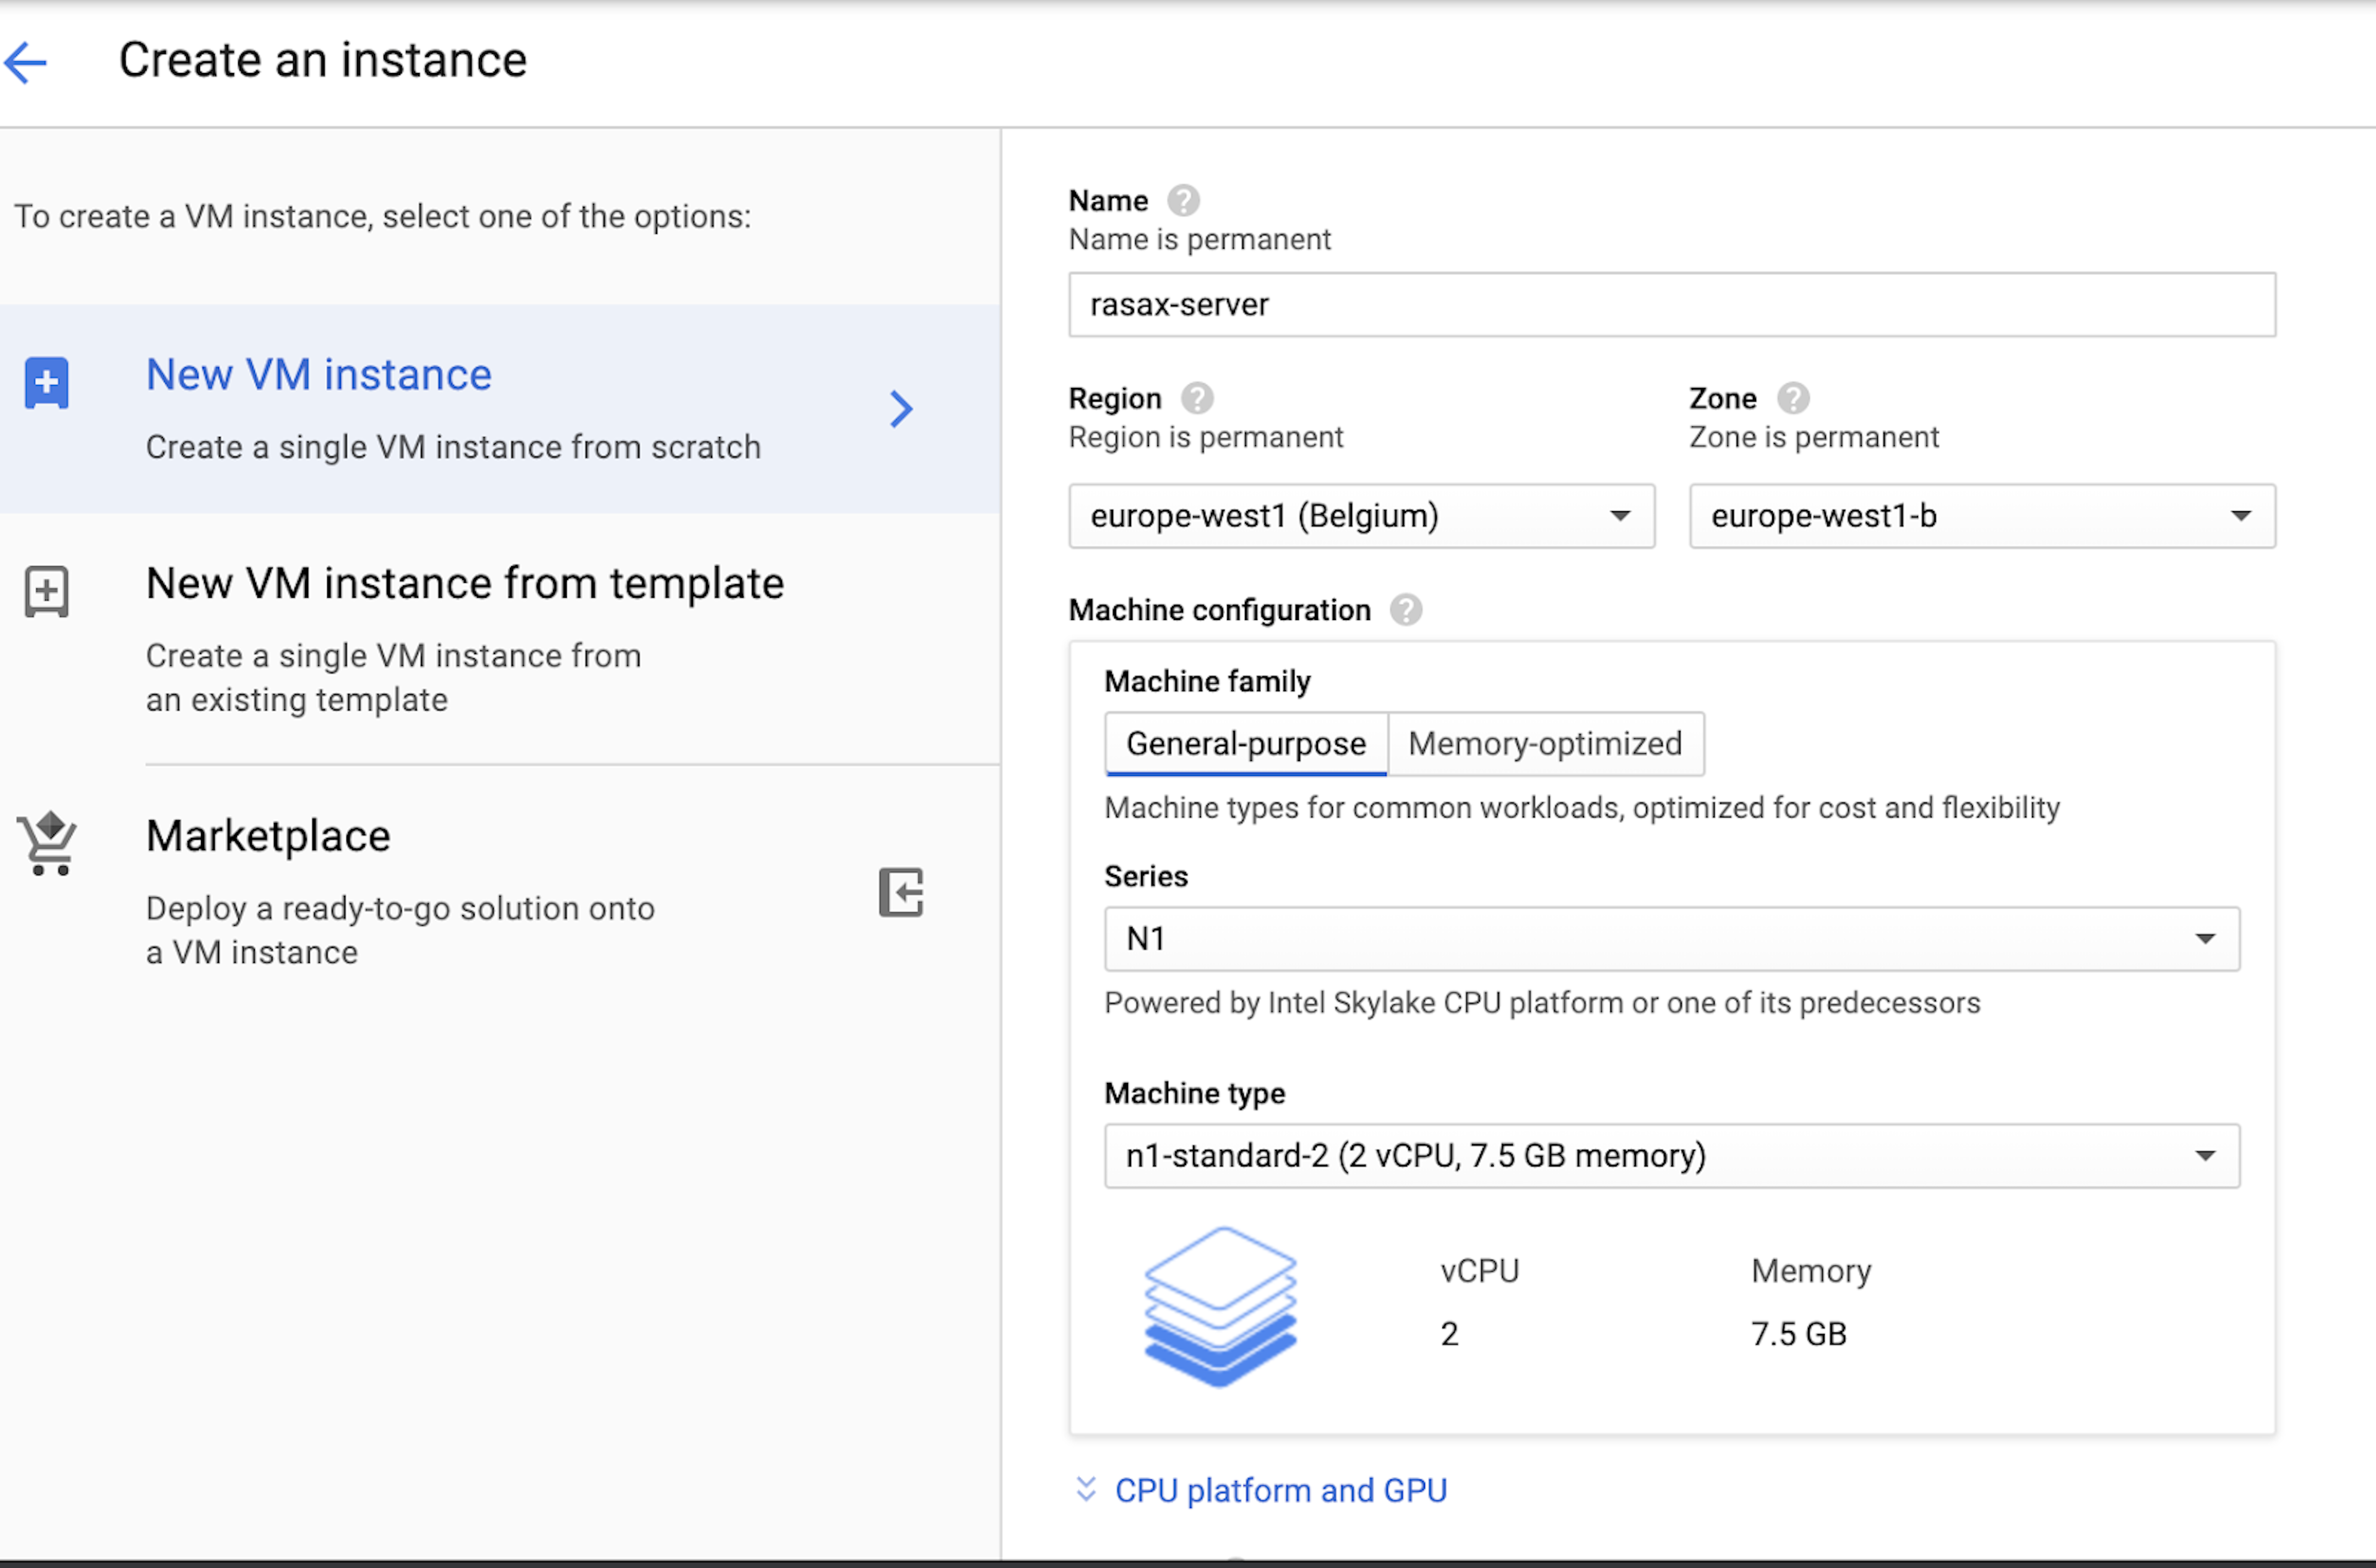
On the configuration page, specify a name for the instance. We'll call ours rasax-server. Then, choose a region near where you are located. In our case, that's Belgium.
Under Machine configuration>Machine type, choose the standard option with 2 CPUs:
n1-standard-2 (2 vCPU, 7.5 GB memory)
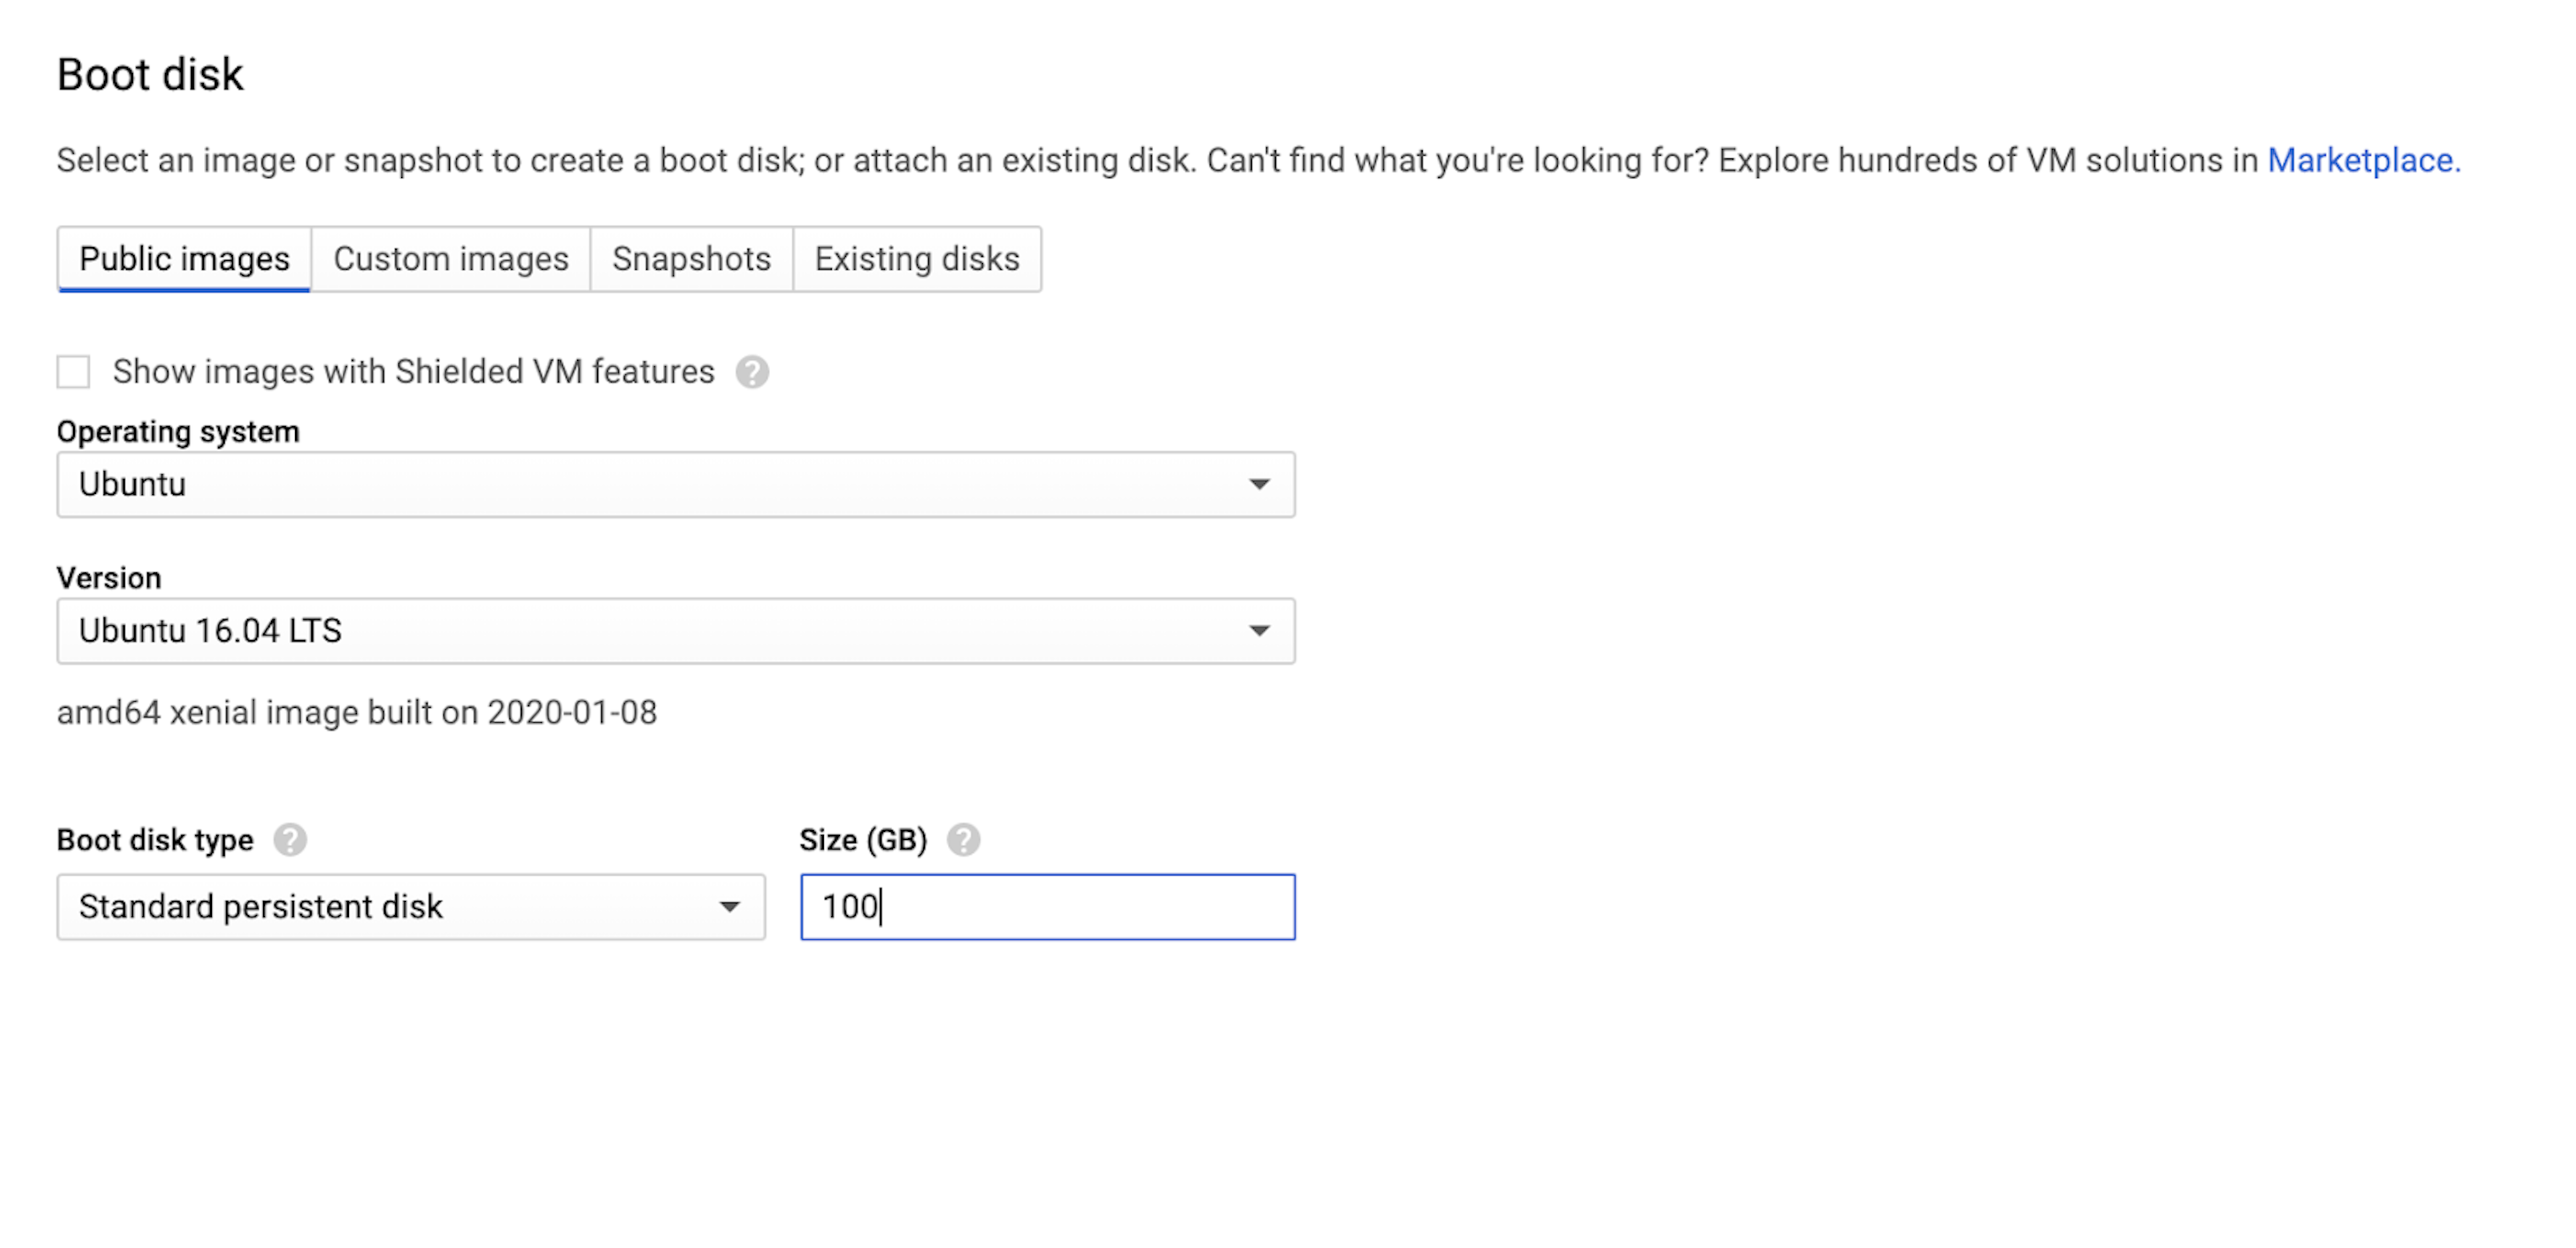
Next, specify the boot disk. You'll need to be running a modern Linux distribution that can run Docker, like Debian 9 or Ubuntu 16.04 / 18.04. We'll go with Ubuntu 16.04 LTS. Increase the disc size to 100 GB.
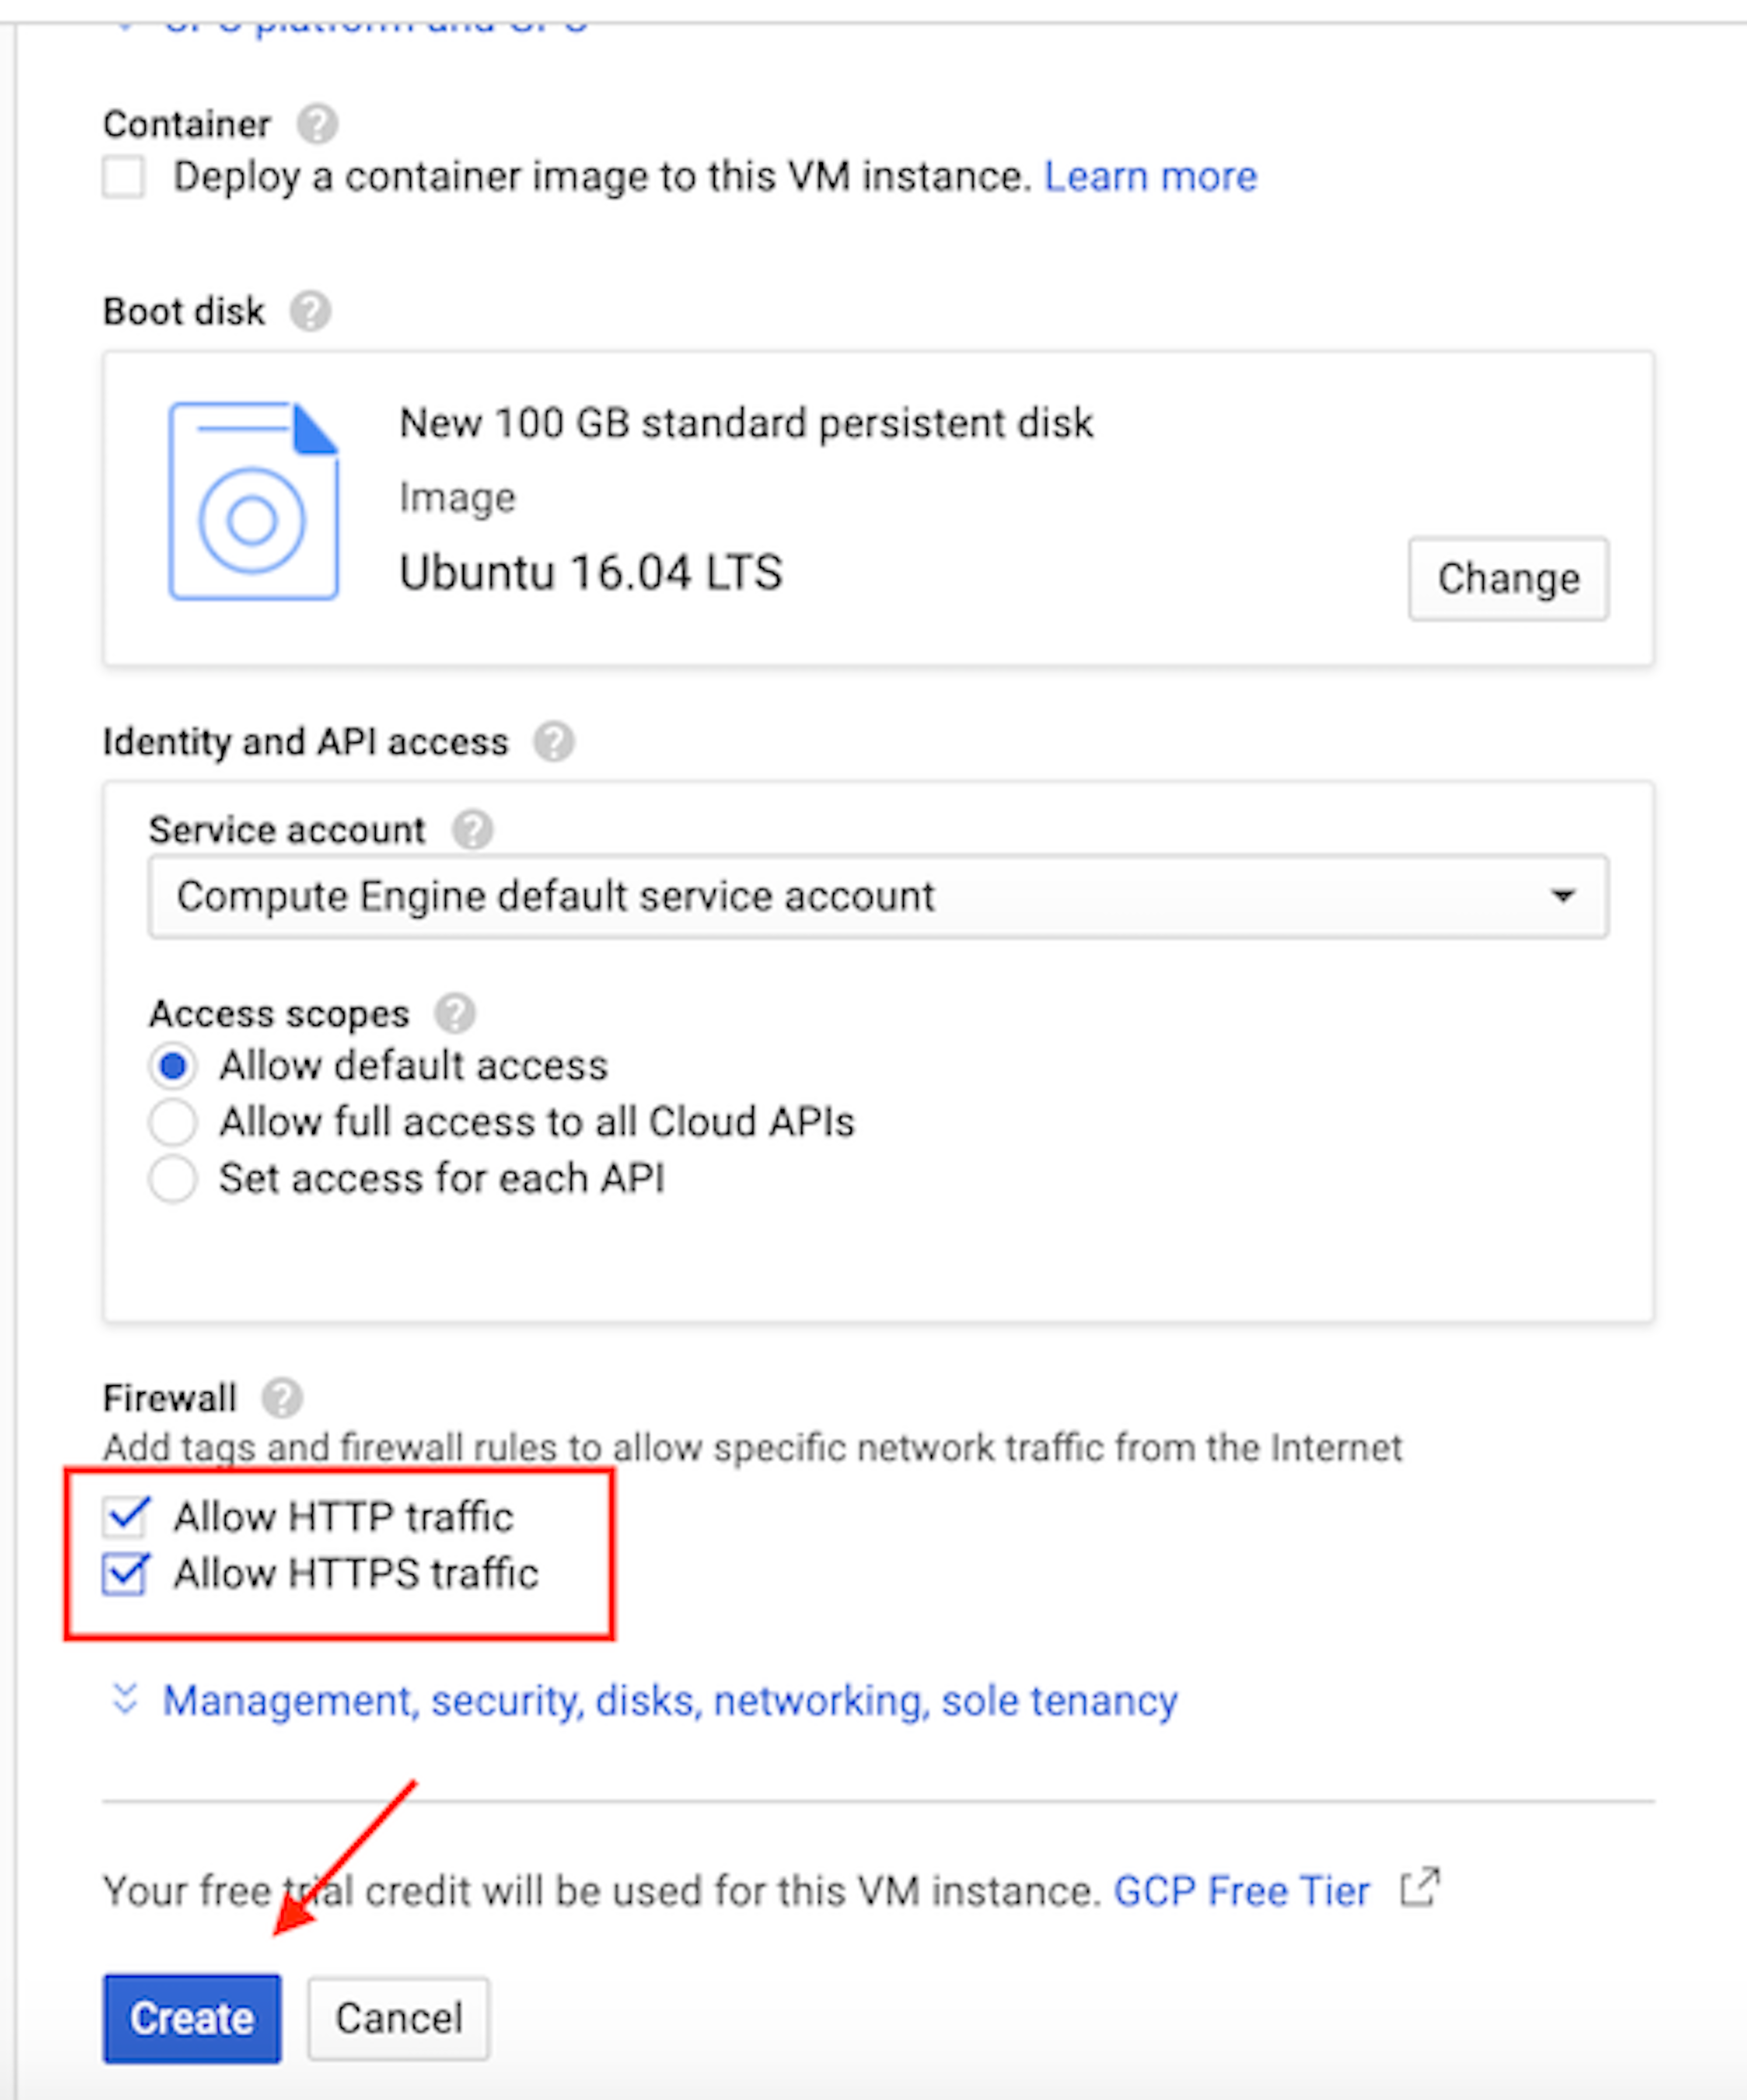
Finally, under the Firewall settings, check the boxes to allow both HTTP and HTTPS traffic, and click Create.
Install Rasa X
We've created our VM, but right now, it's empty. Let's connect to the new instance using SSH, so we can download and install Rasa.
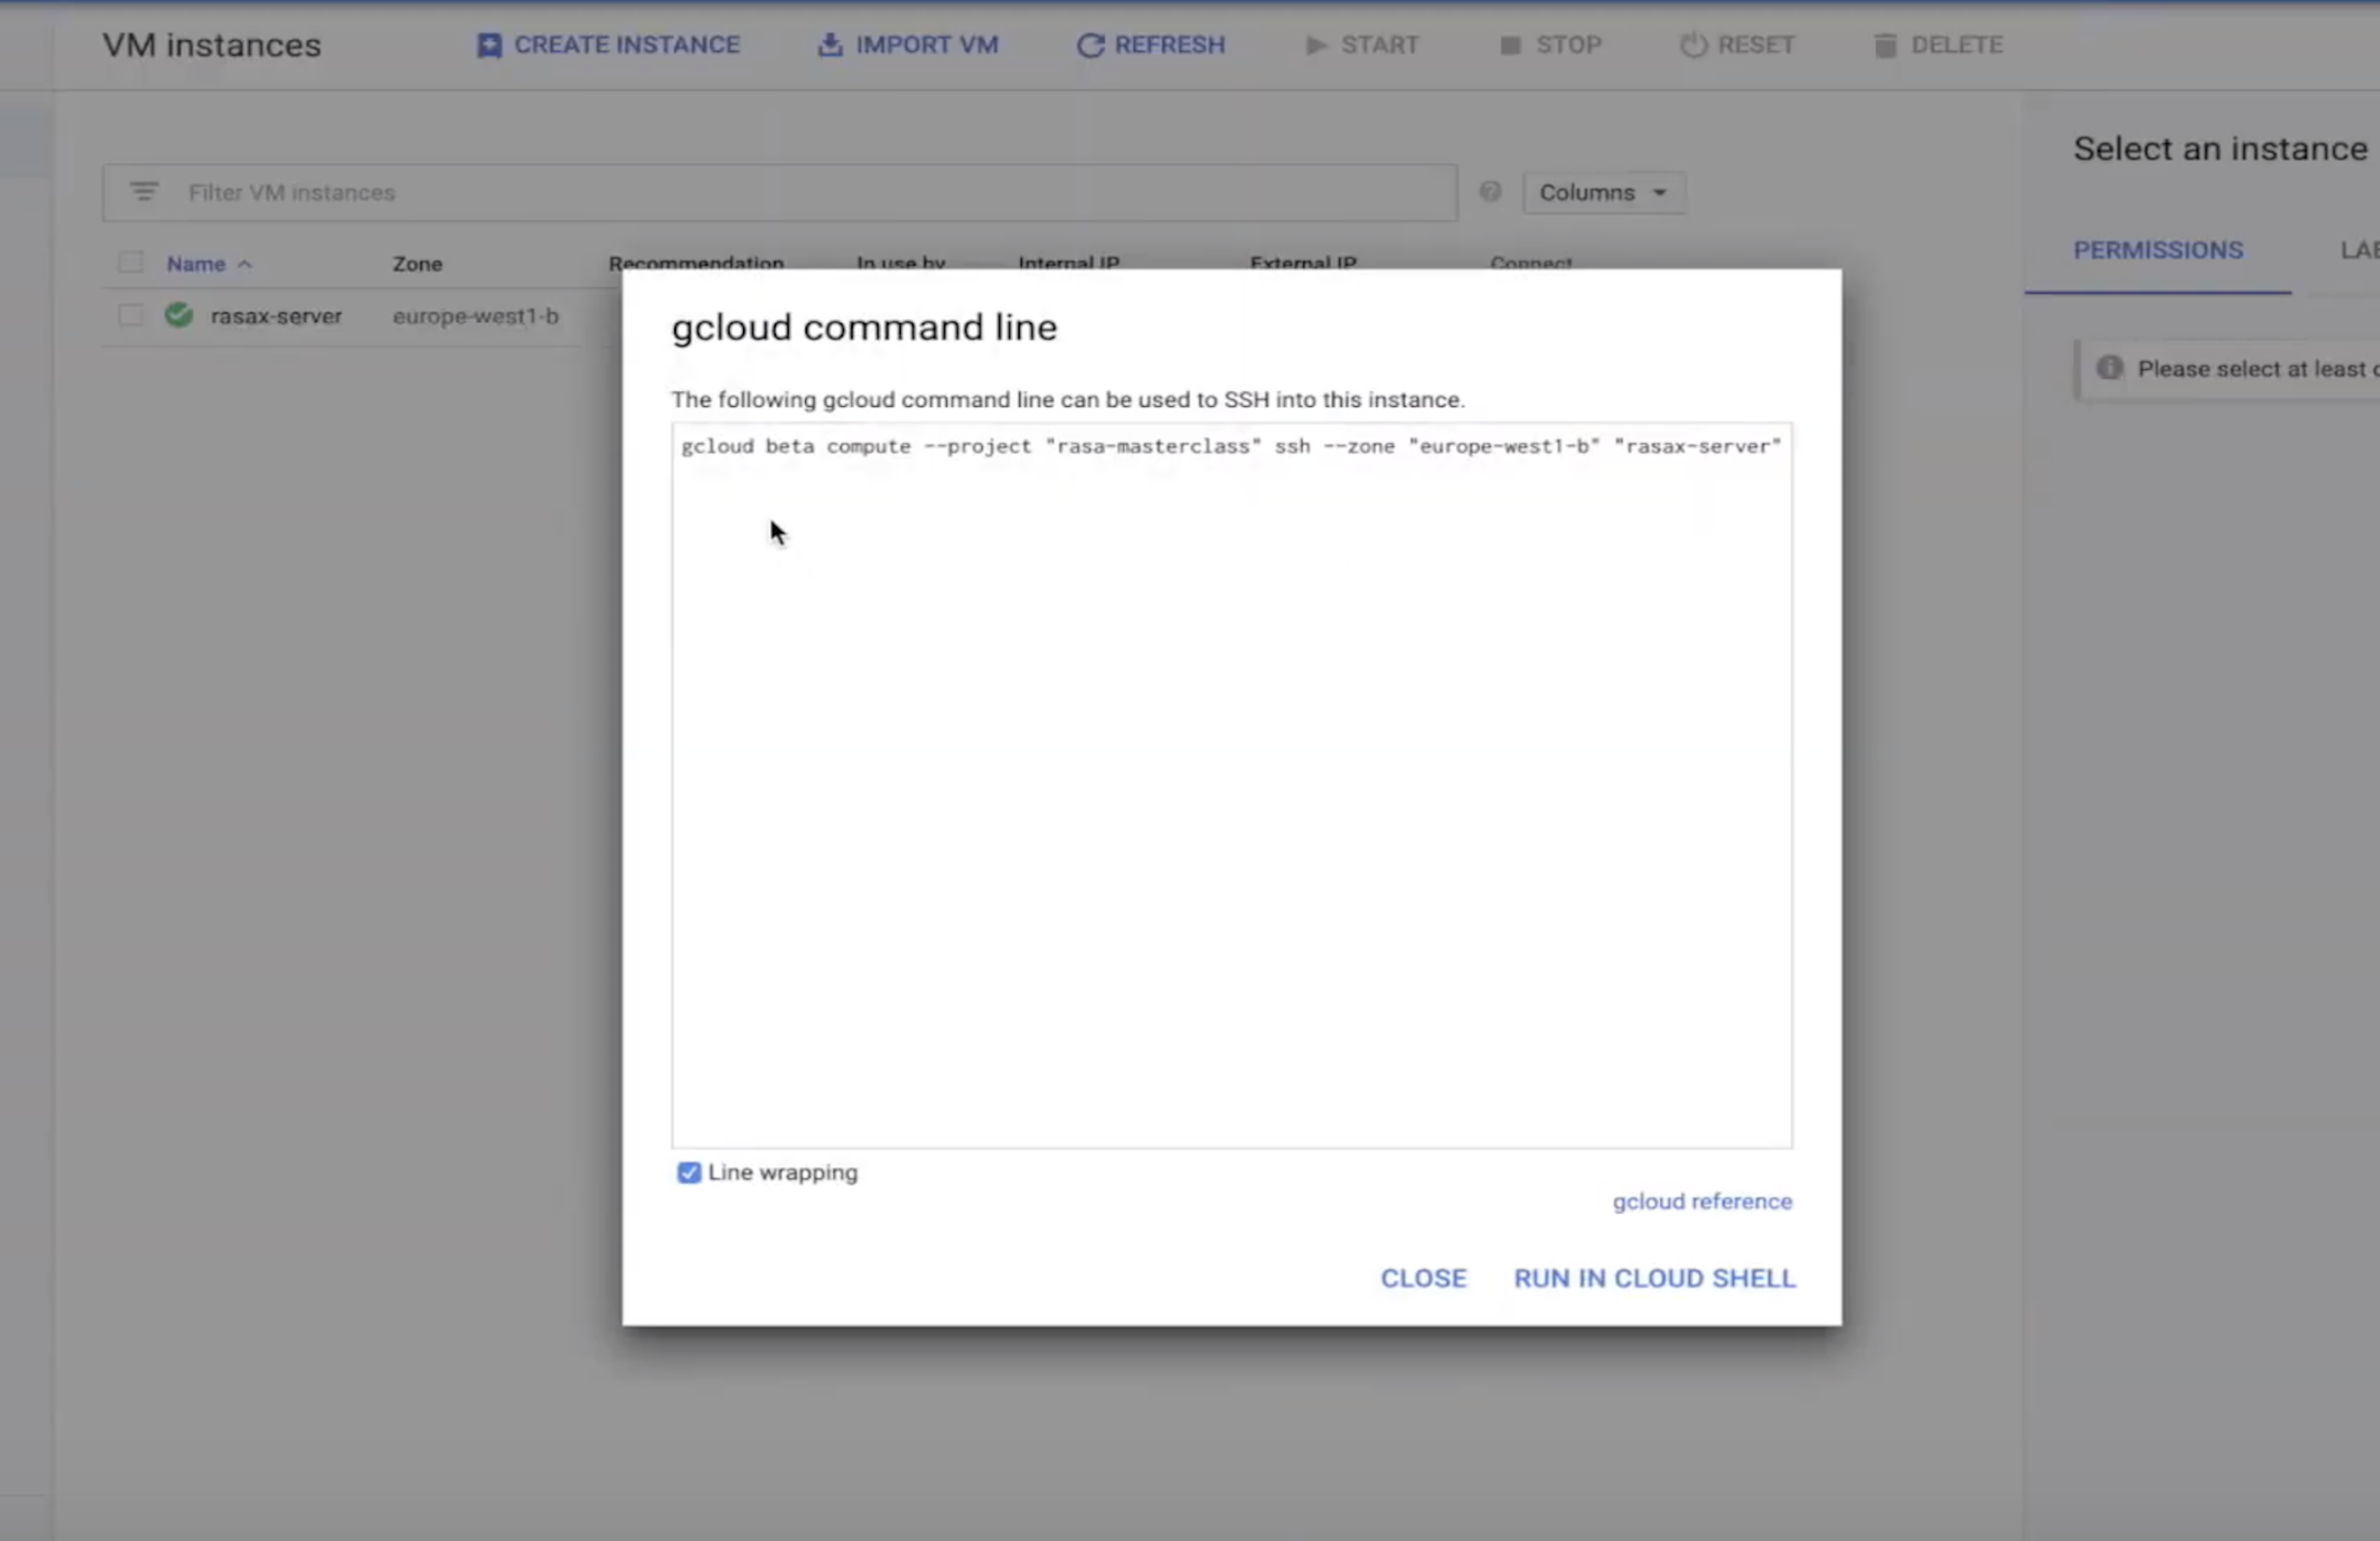
If you've installed the Google Cloud SDK, you can run the following command in your terminal to connect to the VM instance.
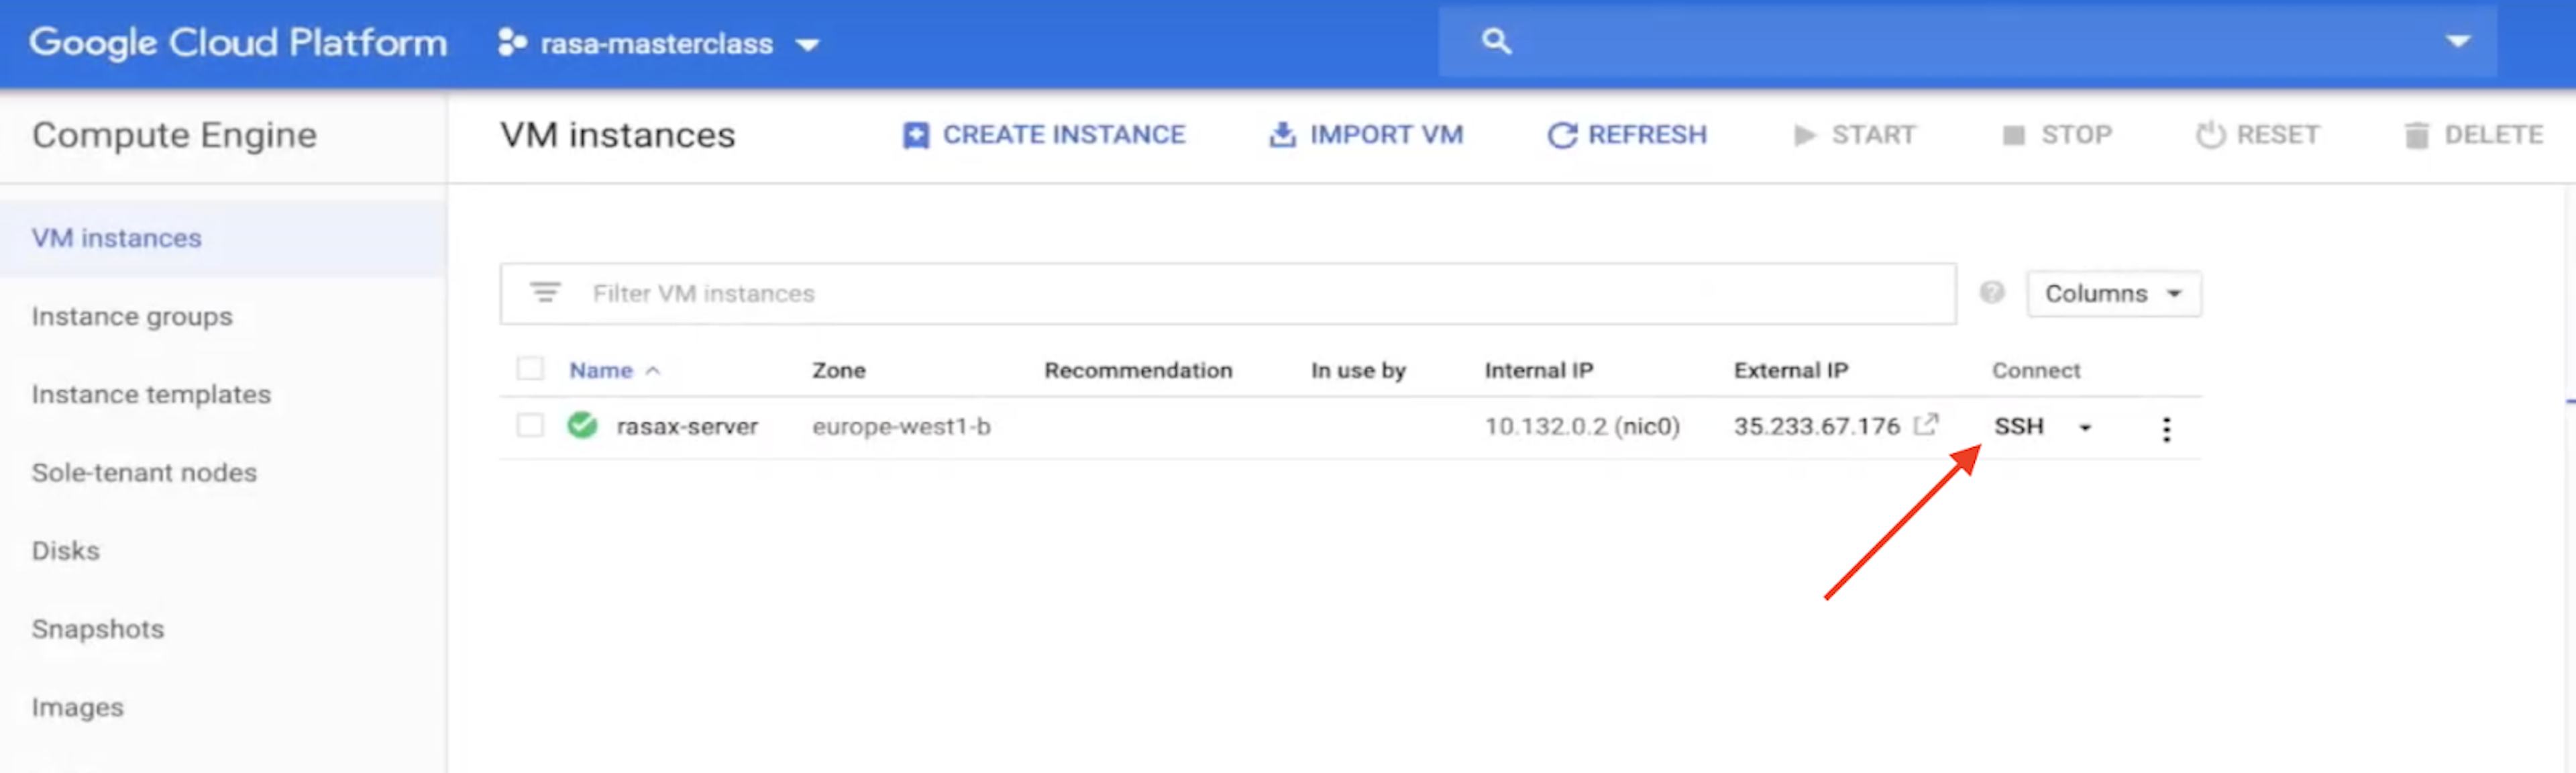
Otherwise, you can click the SSH button next to your newly created instance to start a new shell session and connect.
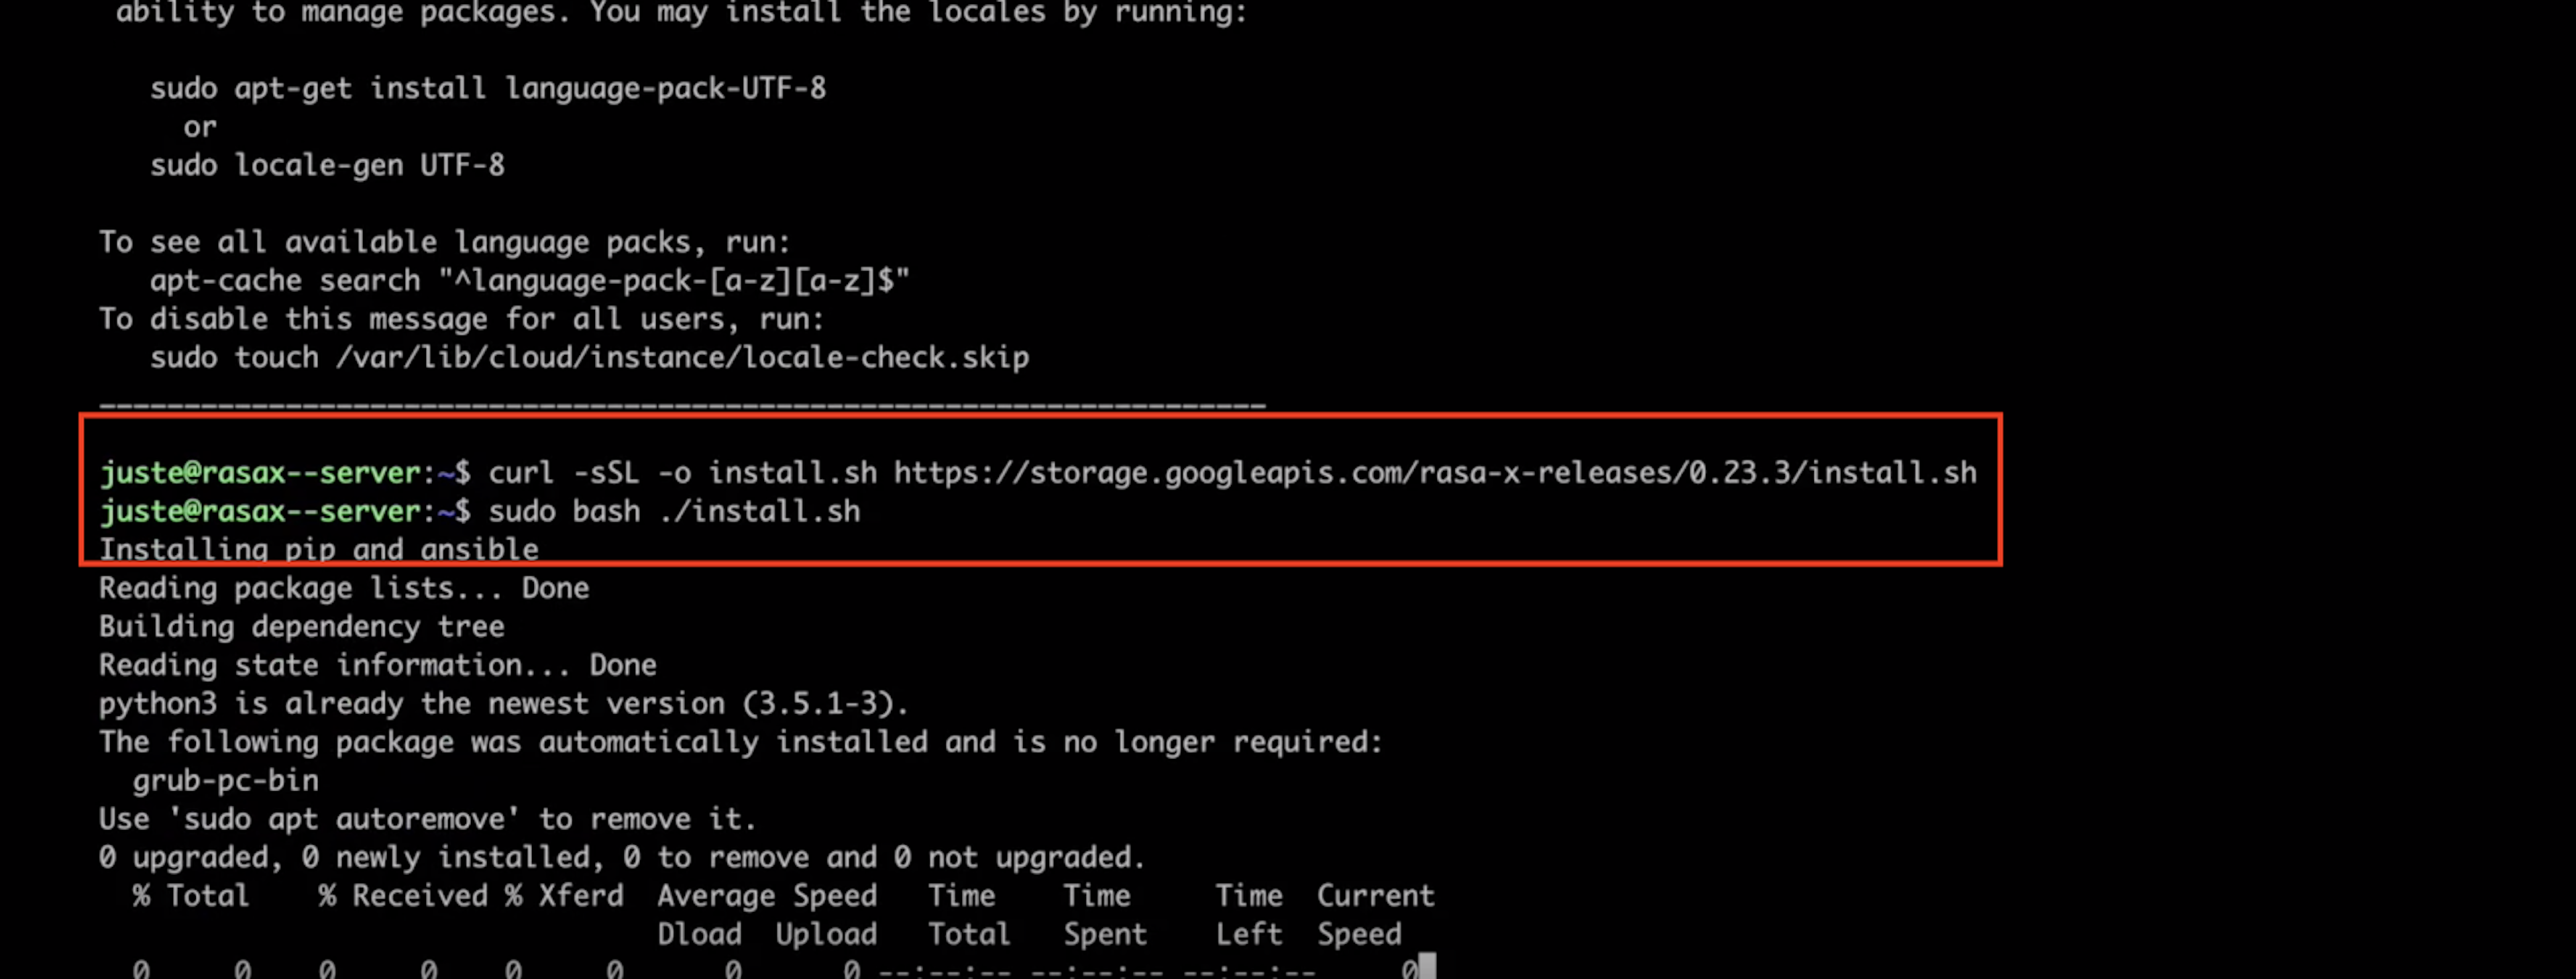
In your terminal, run the install script using the following commands. First, run:
curl -sSL -o install.sh [https://storage.googleapis.com/rasa-x-releases/0.23.3/install.sh](https://storage.googleapis.com/rasa-x-releases/0.23.3/install.sh)
Note that we're specifying version 0.23.3. At the time this video was made, this is the latest version. Be sure to update to the most recent Rasa X version number if you're watching at a later date.
Then, run:
sudo bash ./install.sh
The installation will take a few minutes to complete. Agree to the terms and conditions when prompted in the terminal.
By default, the installation folder for Rasa X is the /etc/rasa directory. Navigate into this directory using the following command:
cd /etc/rasa
We can run the ls command to take a look at the files contained in this directory.

We see everything Rasa X needs to run properly: credentials, the models directory, a database file (which will be used to store the conversations between users and the assistant), container logs, and a docker-compose file.
Let's start Rasa X with the following command:
sudo docker-compose up -d

Once the container is up and running, set the password for the admin user with the following command. In this example, we're setting the password to rasarasa.
sudo python rasa_x_commands.py create --update admin me rasarasa
Launch Rasa X
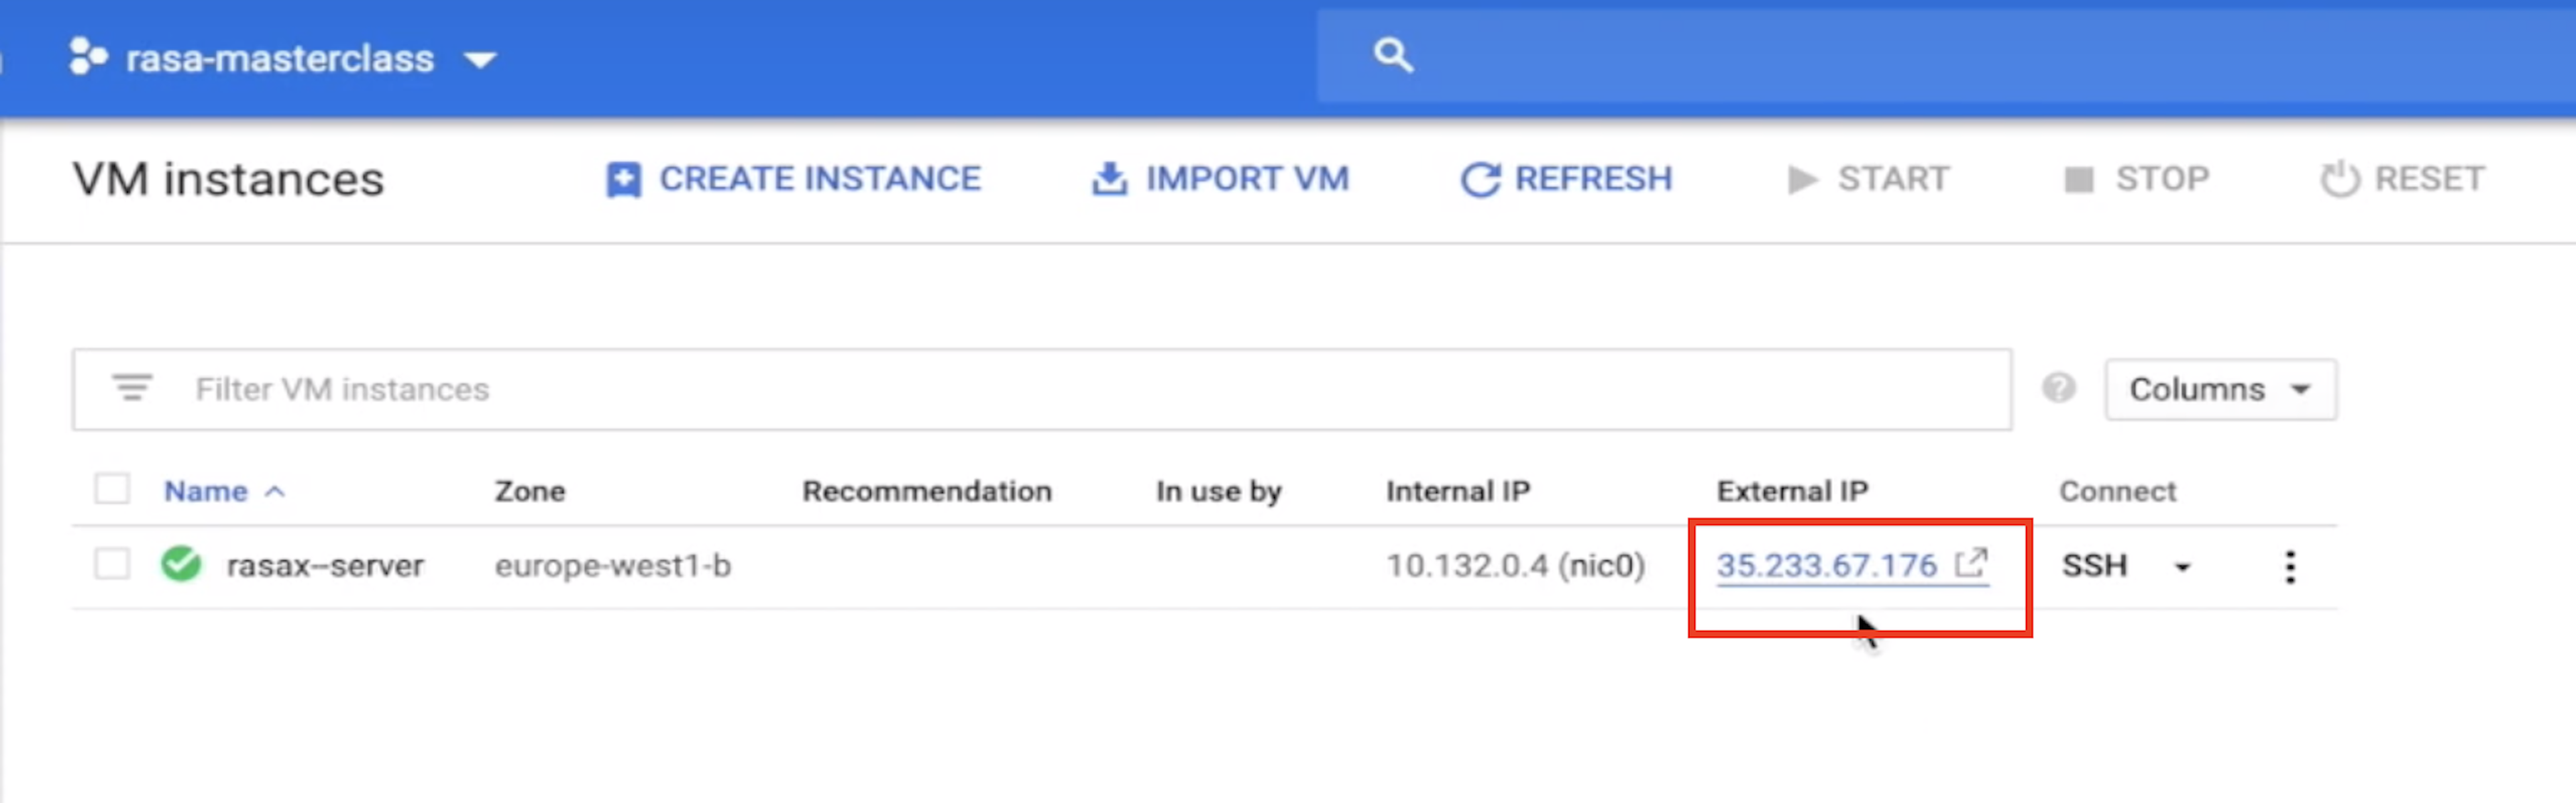
We're now ready to launch Rasa X in the browser. Head back to your GCP console and click the external IP address for your VM instance.
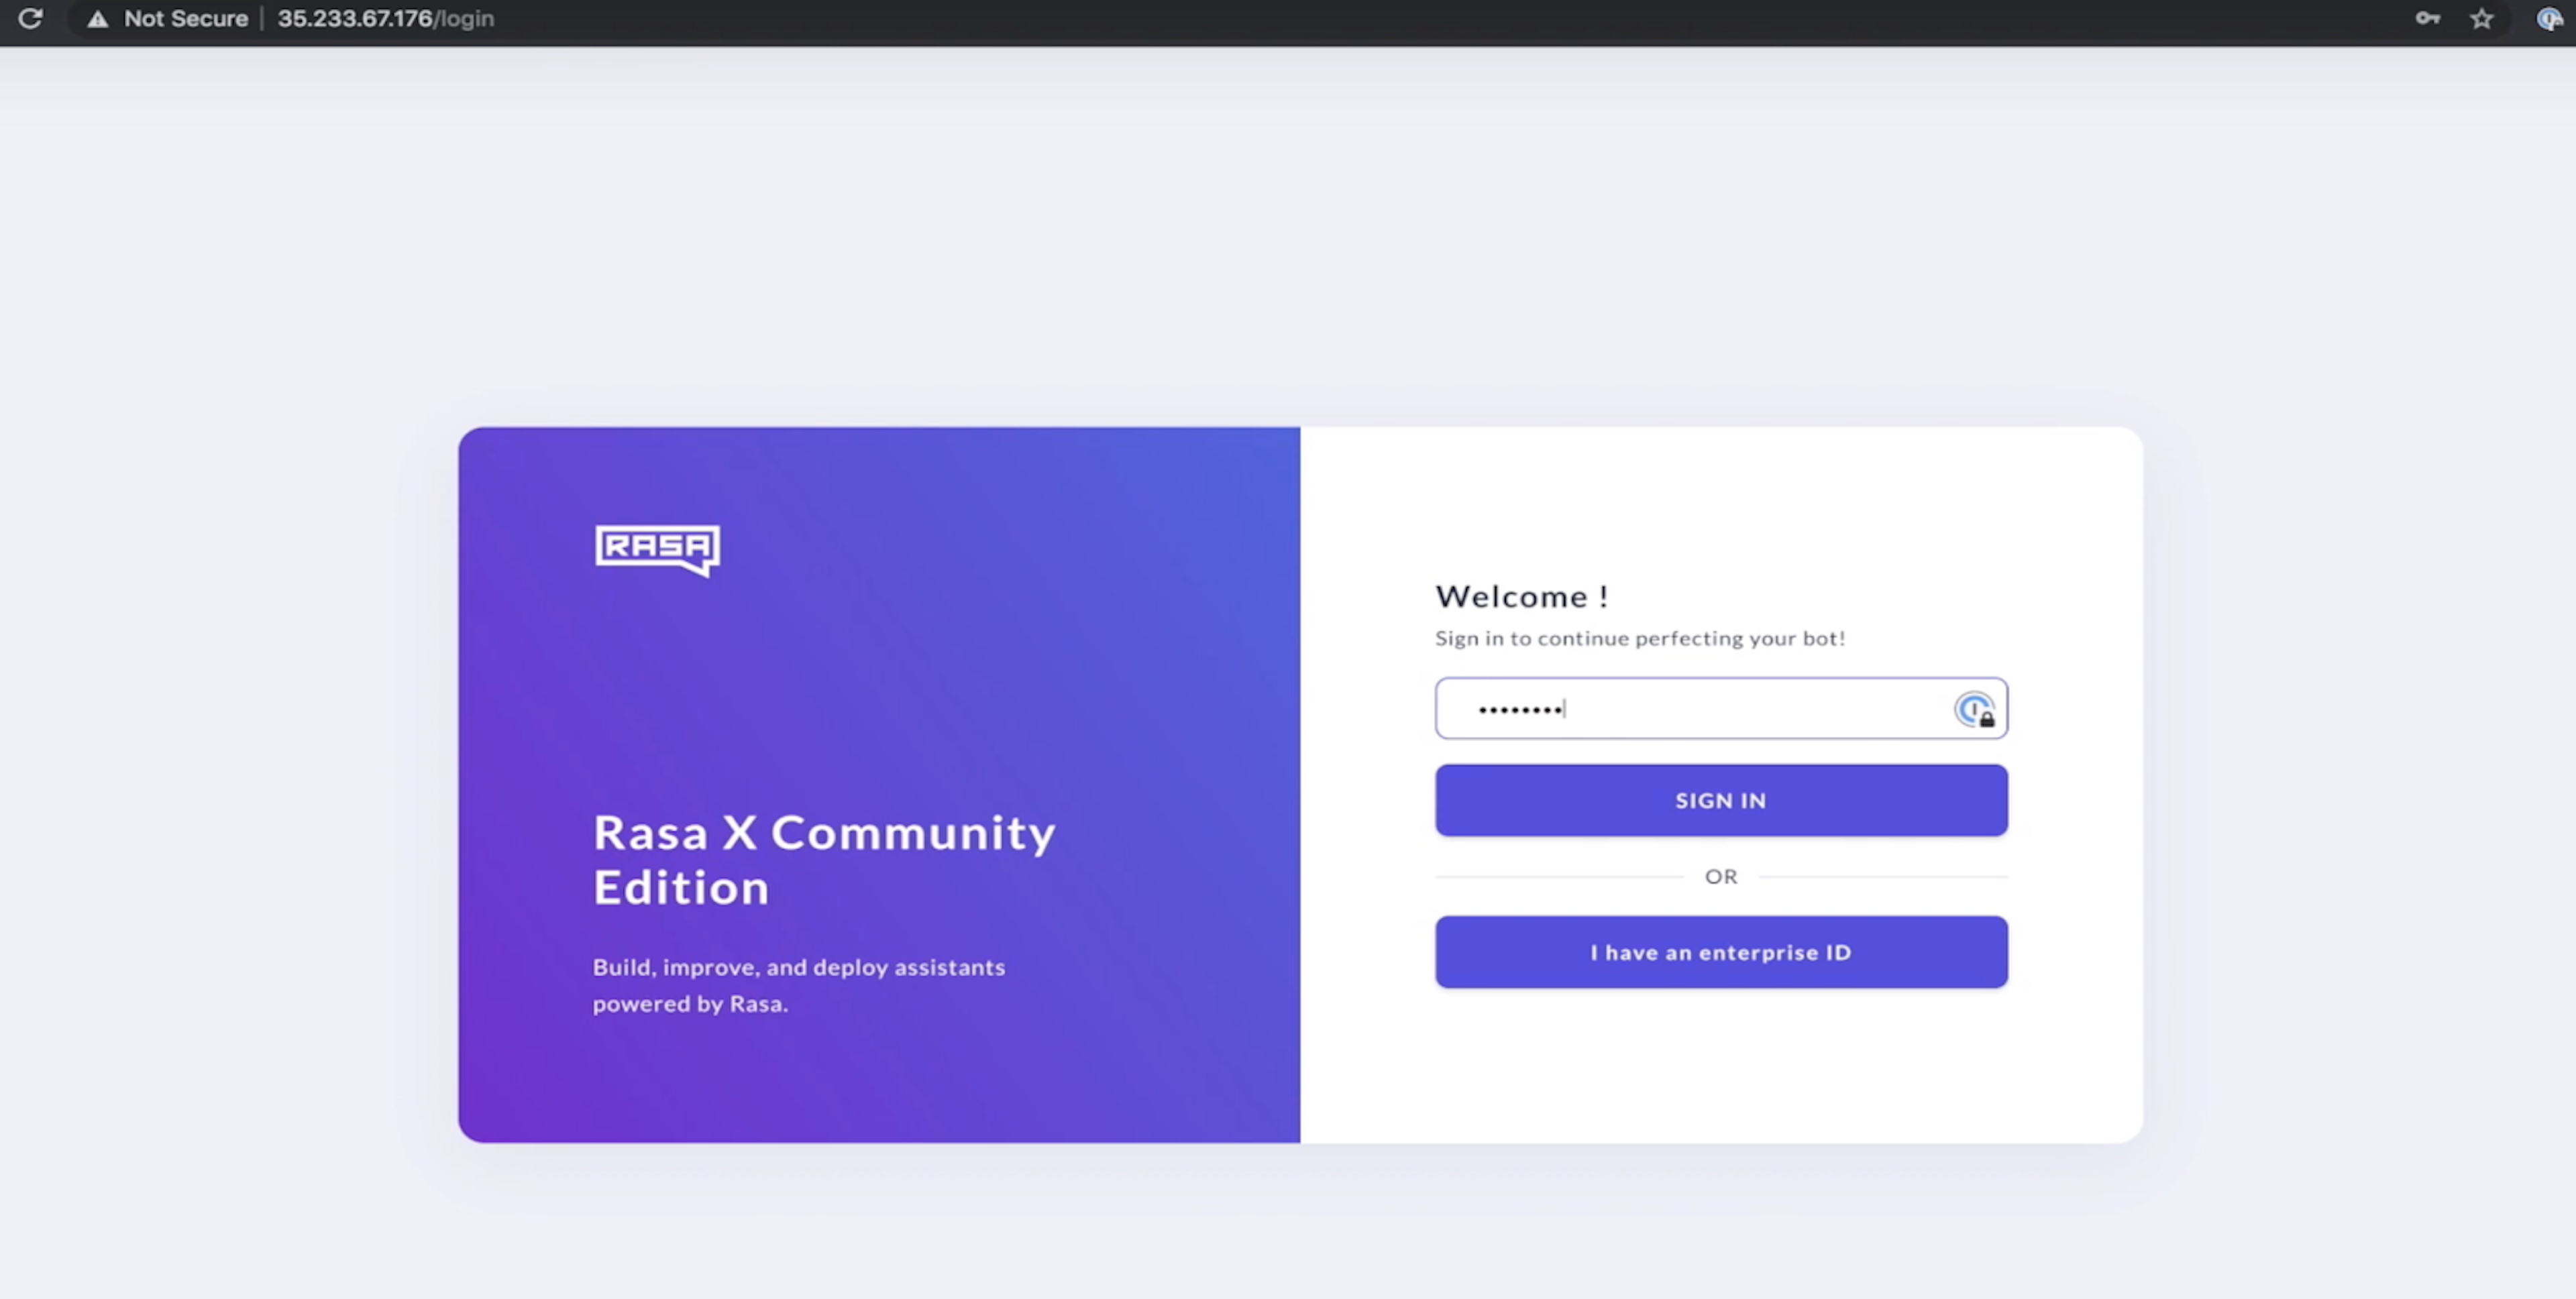
At first, the page will appear to be broken, but not to worry-that's expected at this stage. By default, the link opens with HTTPS, but we haven't installed an SSL certificate on the server. We'll change the URL to __http__://<your_External_IP> in the address bar for now.
Now we see the Rasa X login page and can enter the password we just set for the admin user.
Connecting the Assistant to Rasa X
Integrated Version Control allows you to connect your Rasa X instance to a remote git repository, like GitHub, to keep track of the version history for your training data. In addition to keeping a record of all changes, Integrated Version Control allows teams to take advantage of the downstream benefits of a git-based development workflow: reviewing changes before they go into production, integrating CI/CD, and running tests on proposed changes.
Integrated Version Control works by performing a two-way sync with a remote Git repository. When Integrated Version Control is connected for the first time, all of the files in the GitHub repository will be pulled into Rasa X. Later, if changes exist in Rasa X that haven't been pushed to the remote repository, Integrated Version Control lets you commit those changes to an existing branch or create a new one. Read more about Integrated Version Control on the Rasa blog and in the documentation.
Project Structure
To set this up, we first need to upload our medicare locator project files to a remote GitHub repository. See GitHub's documentation for step-by-step instructions.
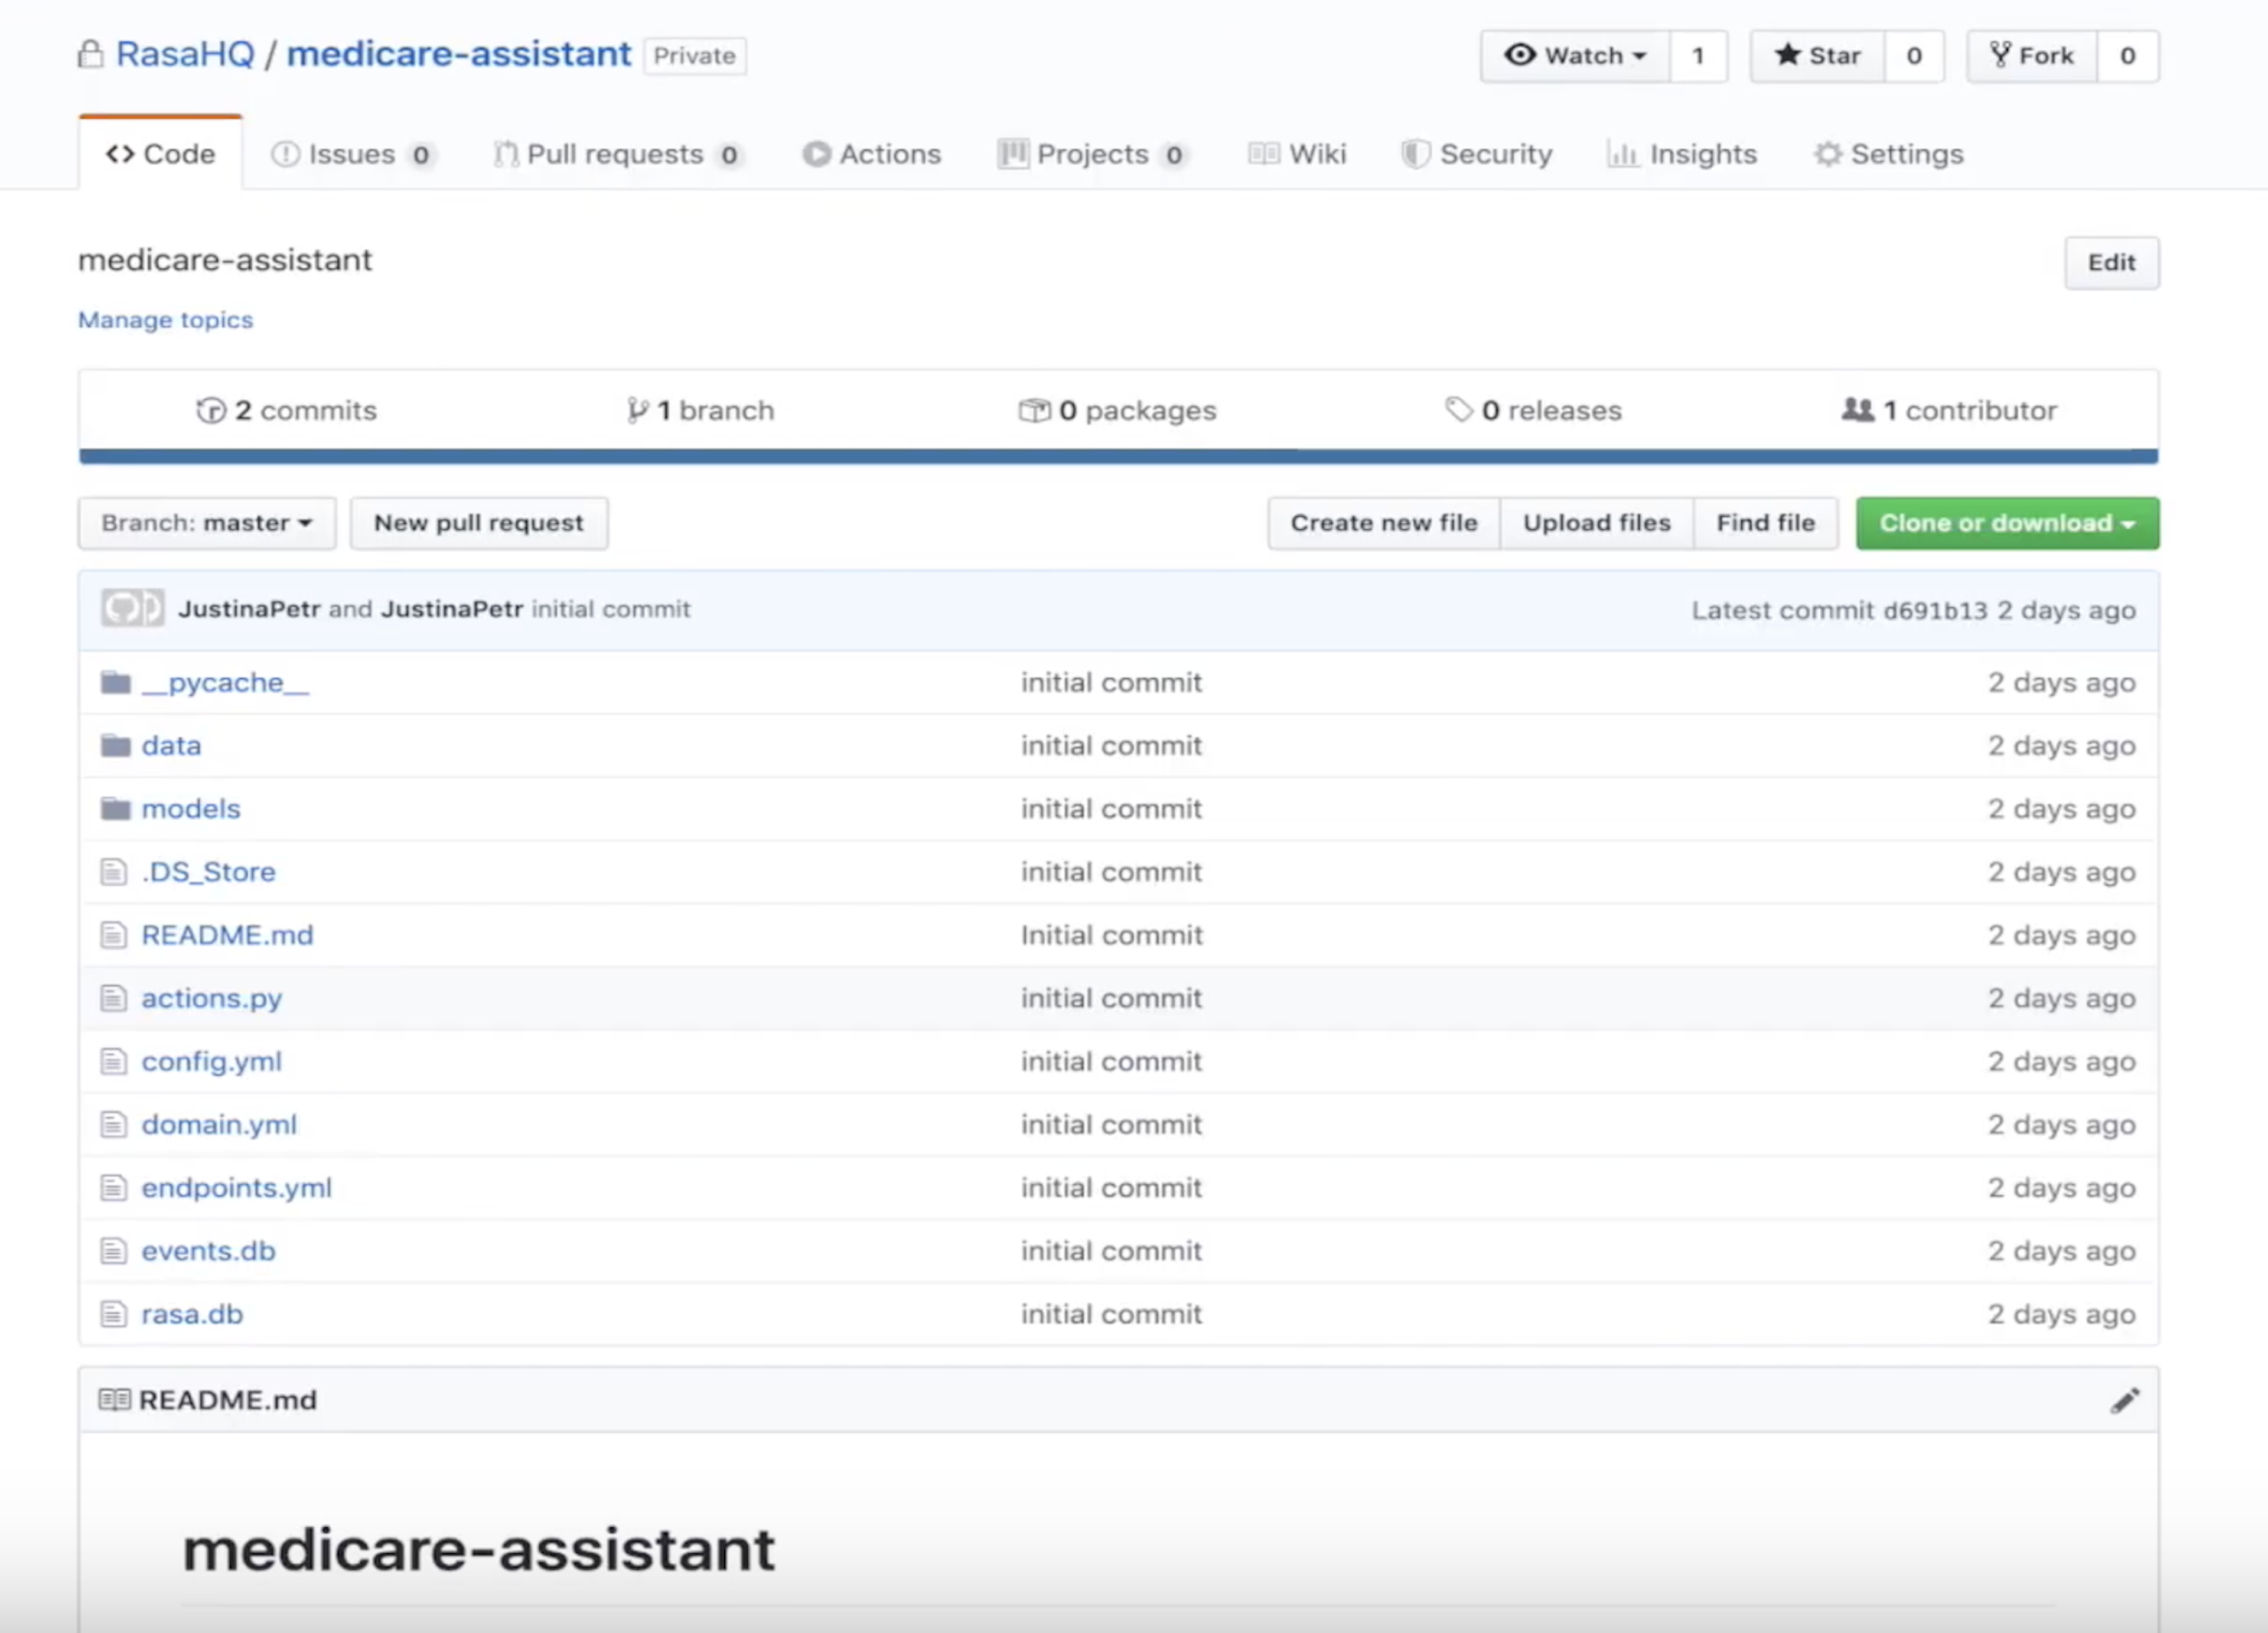
In order for Integrated Version Control to sync with the remote repository, the file structure needs to follow the same structure generated when you create a new project using the rasa init command. If you've been following along with this series to build your assistant, you should be good to go.

Activate Integrated Version Control
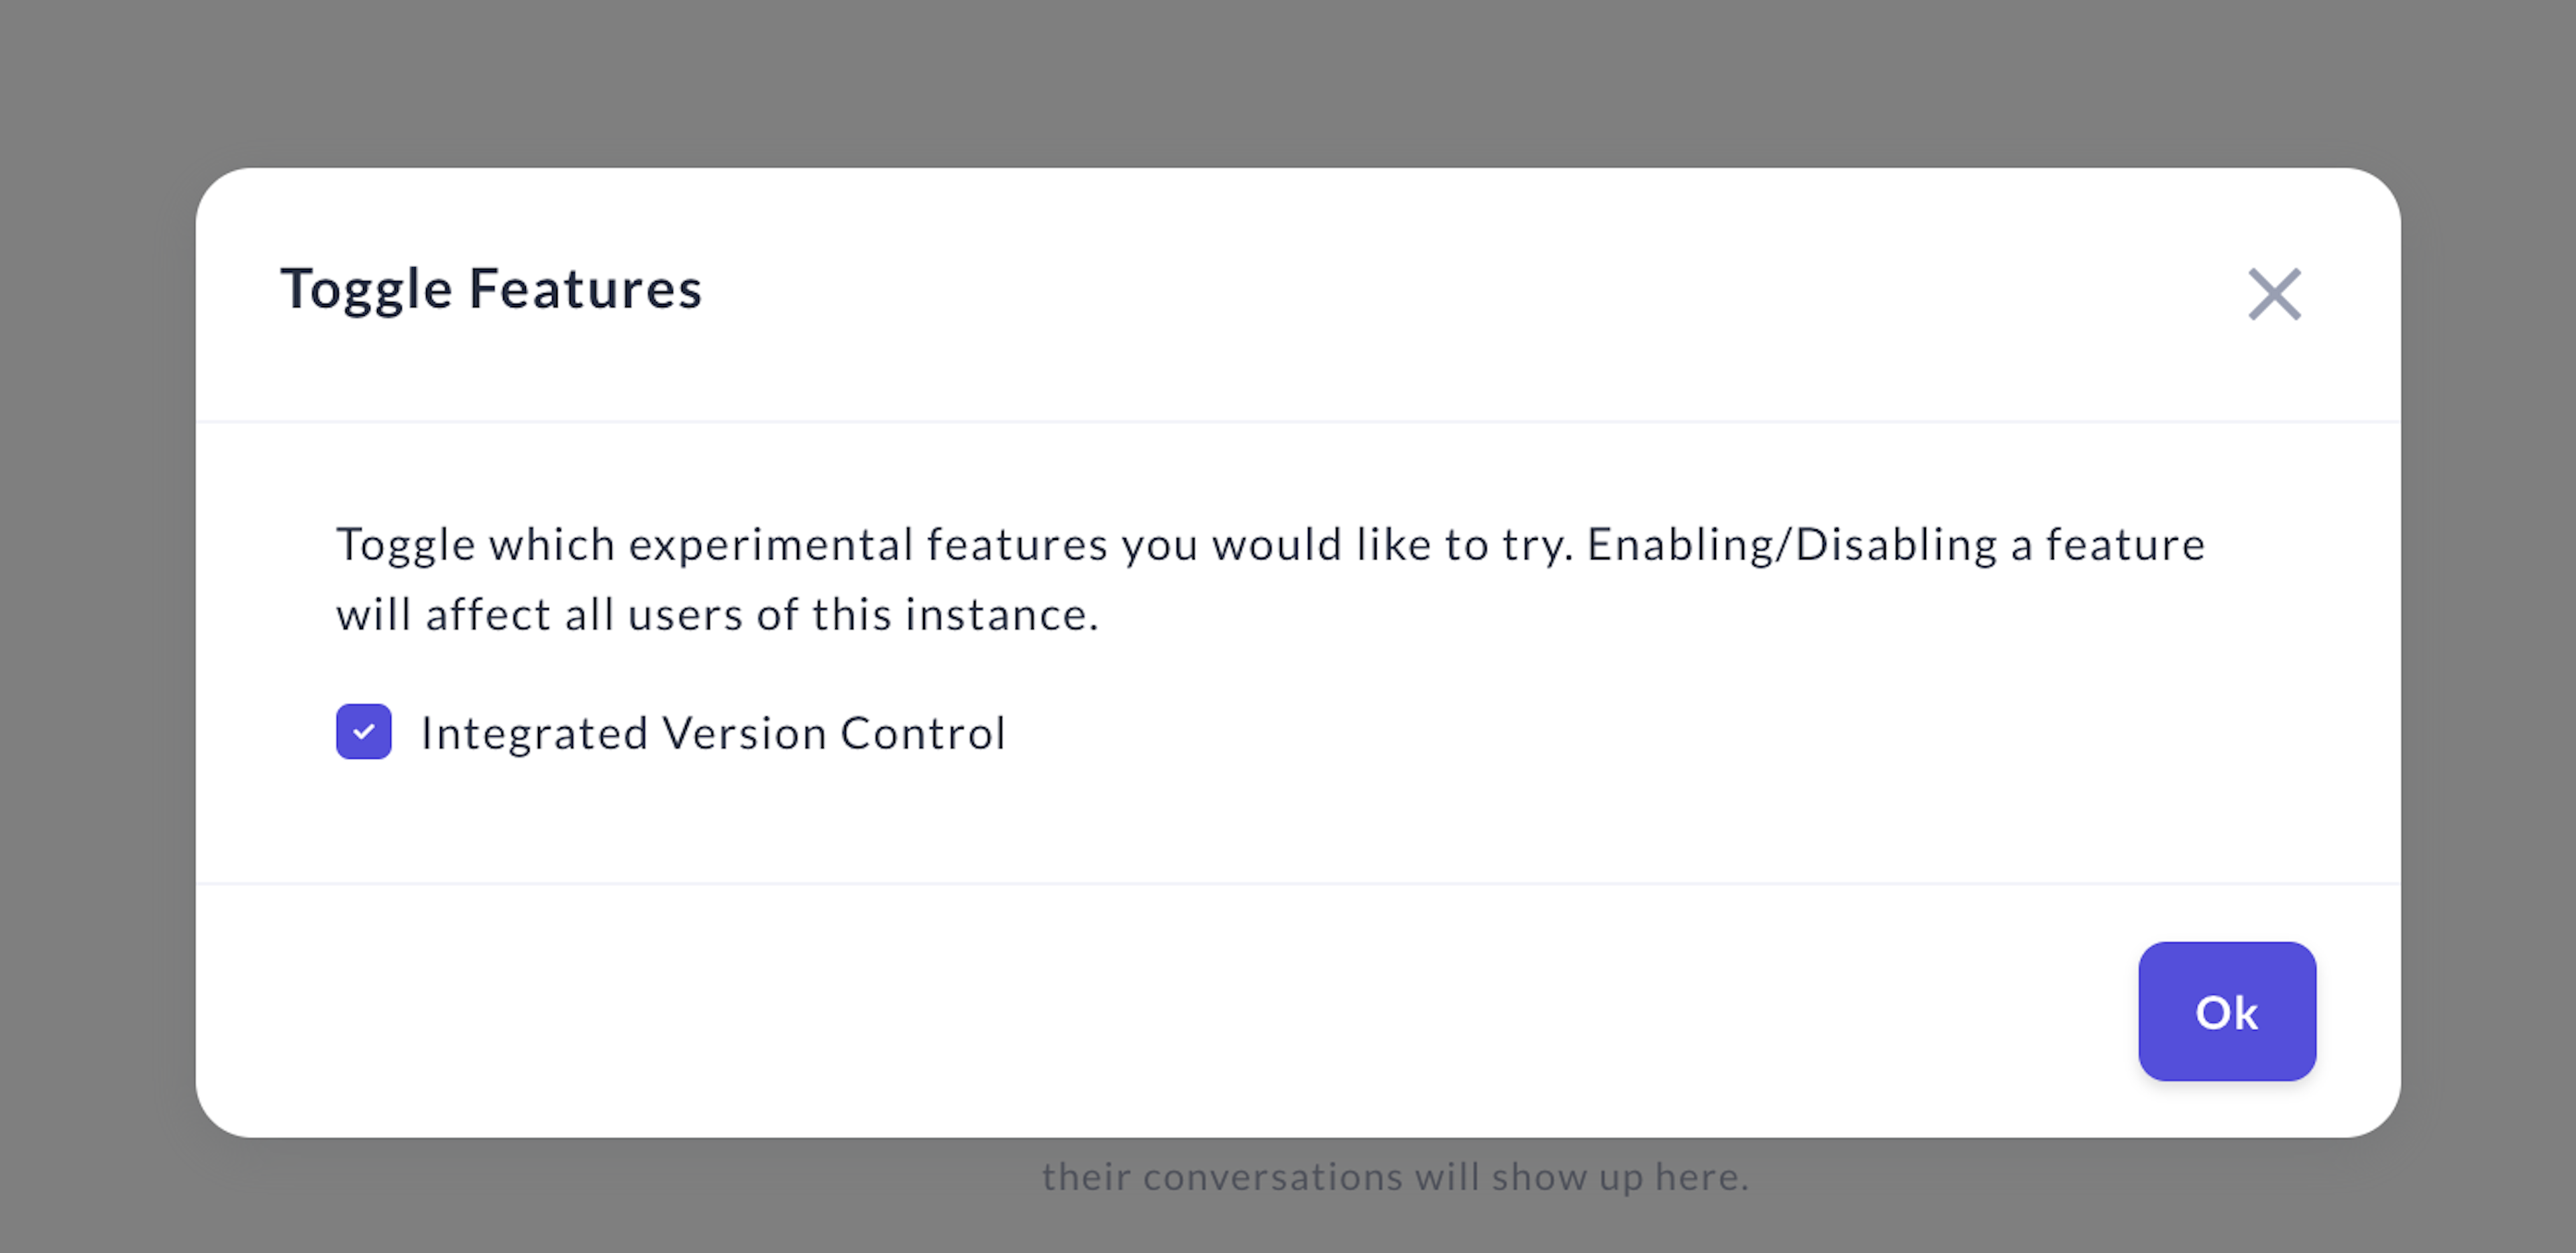
At the time this video was released, Integrated Version Control is an experimental feature that must be manually toggled on. Let's go ahead and activate it.
In the Rasa X dashboard, click on the user icon in the lower left hand corner and select Experimental. Check the box next to Integrated Version Control.
Once Integrated Version Control has been activated, you will see a git icon appear in the bottom left corner, just above your user icon, with a message indicating the feature is not connected.

Next, we'll authenticate our server with GitHub to establish the connection, by generating an SSH key on the server, saving the public key in our GitHub repository settings, and sending the private key to Rasa X via an API call.
Generate SSH keys
Navigate back to your terminal. If you've closed the connection to your VM instance, log back in.
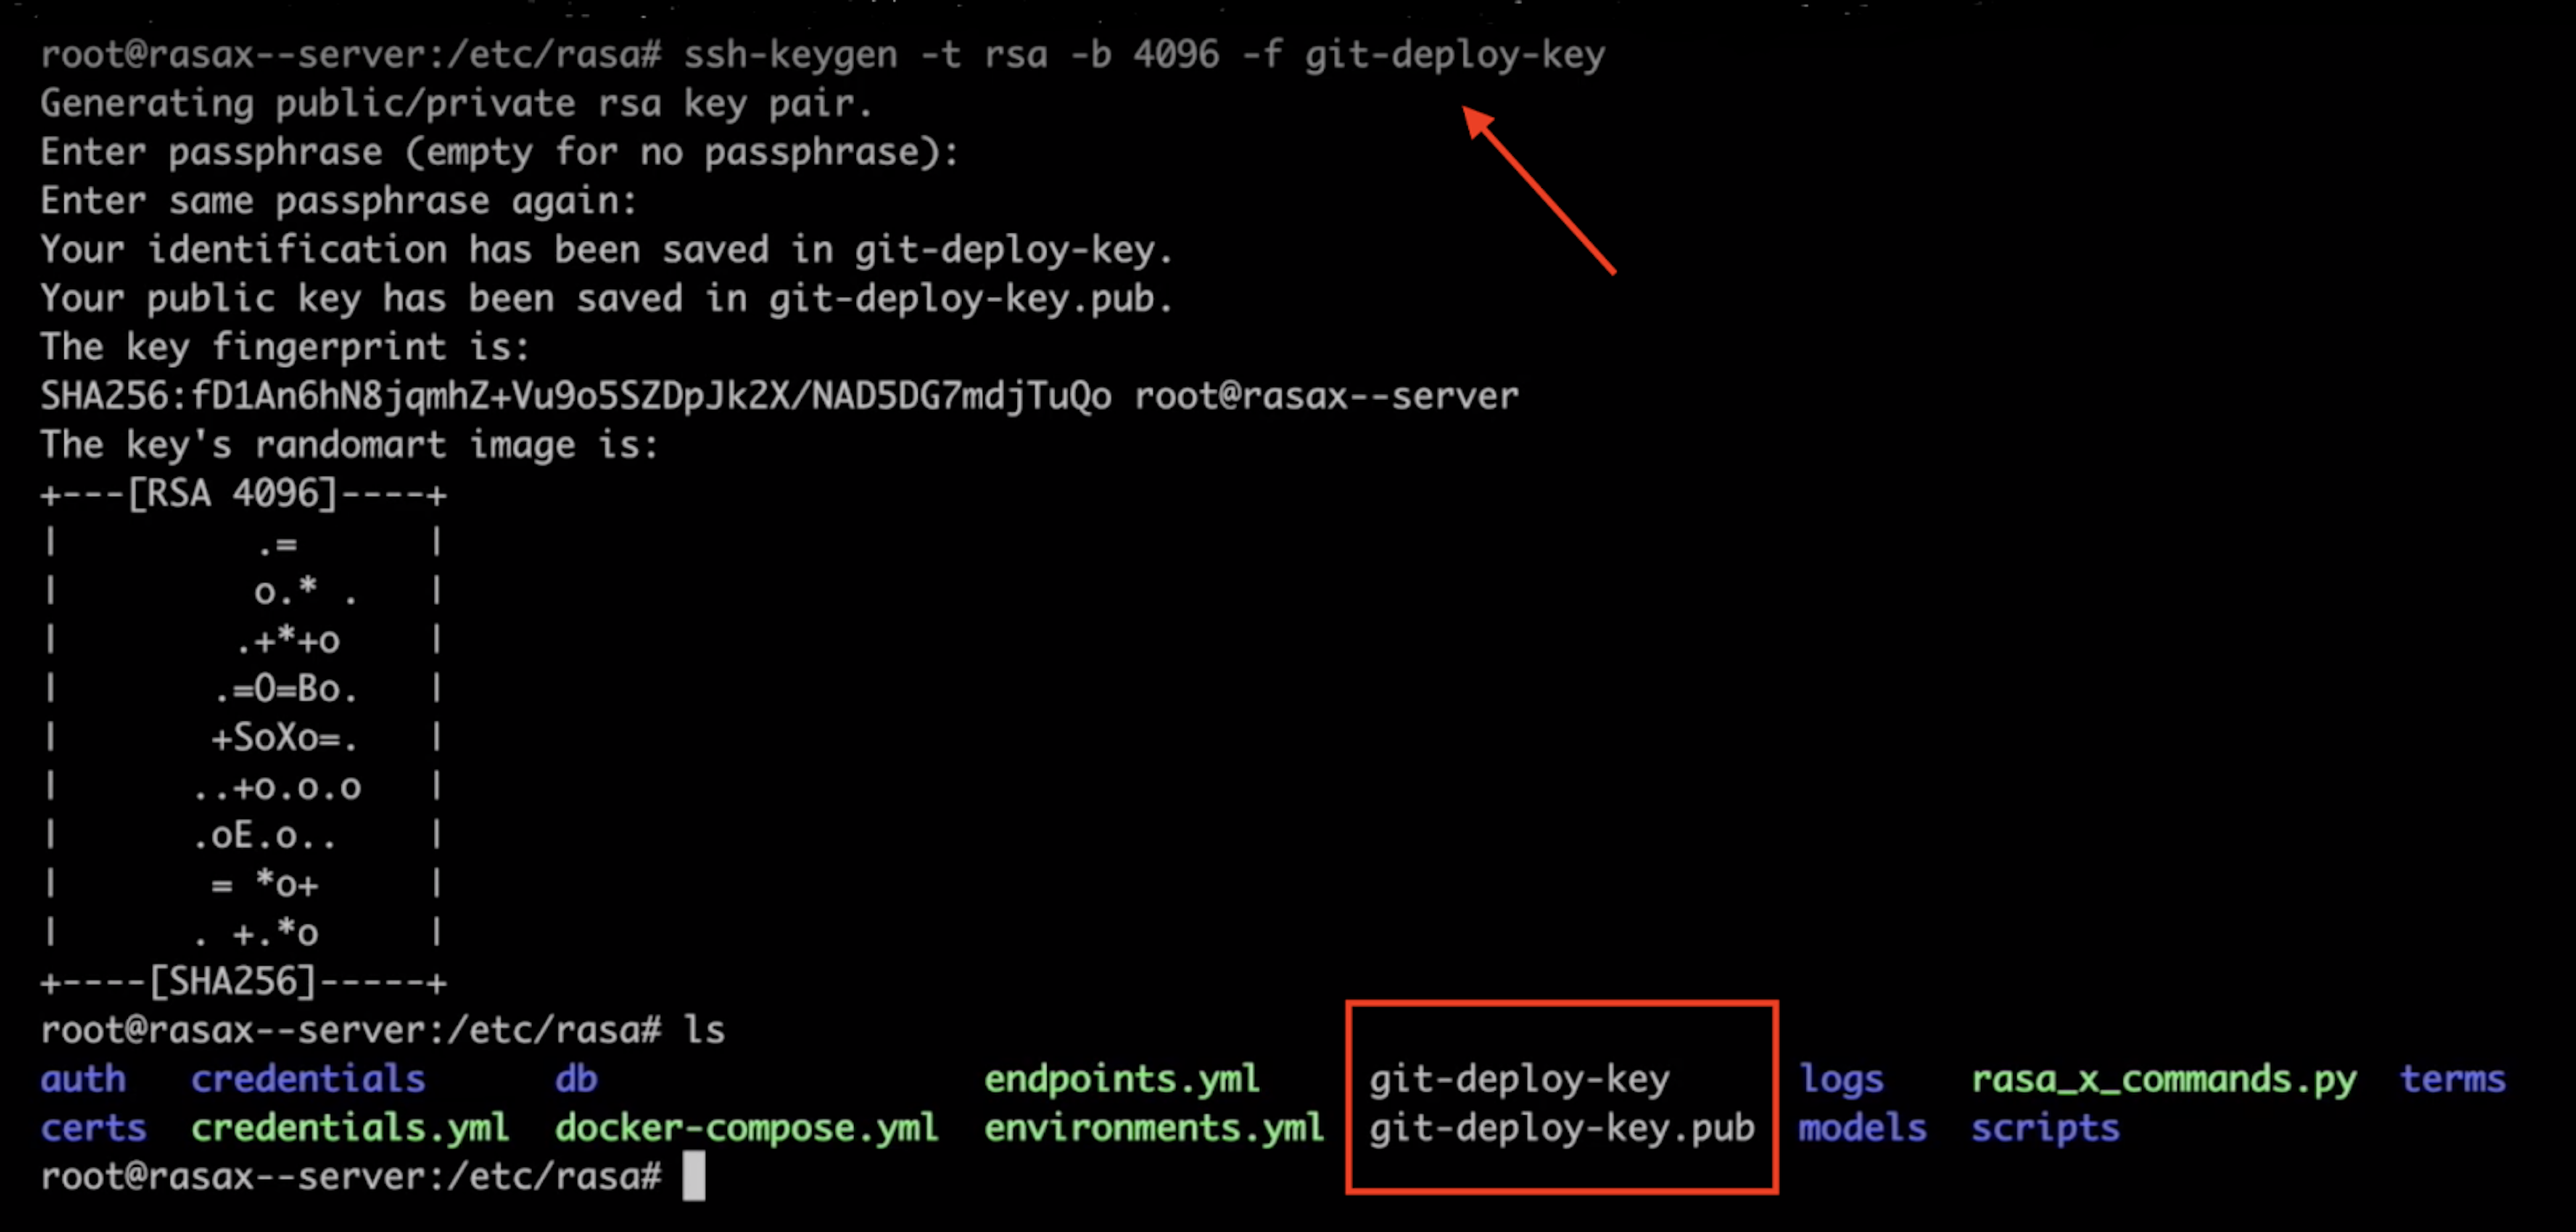
Make sure you're in the /etc/rasa directory, where Rasa X is installed on your server. Then, run the following command to generate a public and private SSH key.
ssh-keygen -t rsa -b 4096 -f git-deploy-key
When prompted, do not set a passphrase. After the key has finished generating, you can run the ls command in the /rasa/etc directory to see the newly created keys: git-deploy-key (the private key) and git-deploy-key.pub (the public key).
Save the public key in GitHub
We'll print the public key to the terminal so we can copy and save it in our GitHub settings.
Run the following command to view the public key:
cat git-deploy-key.pub
Copy the entire contents.

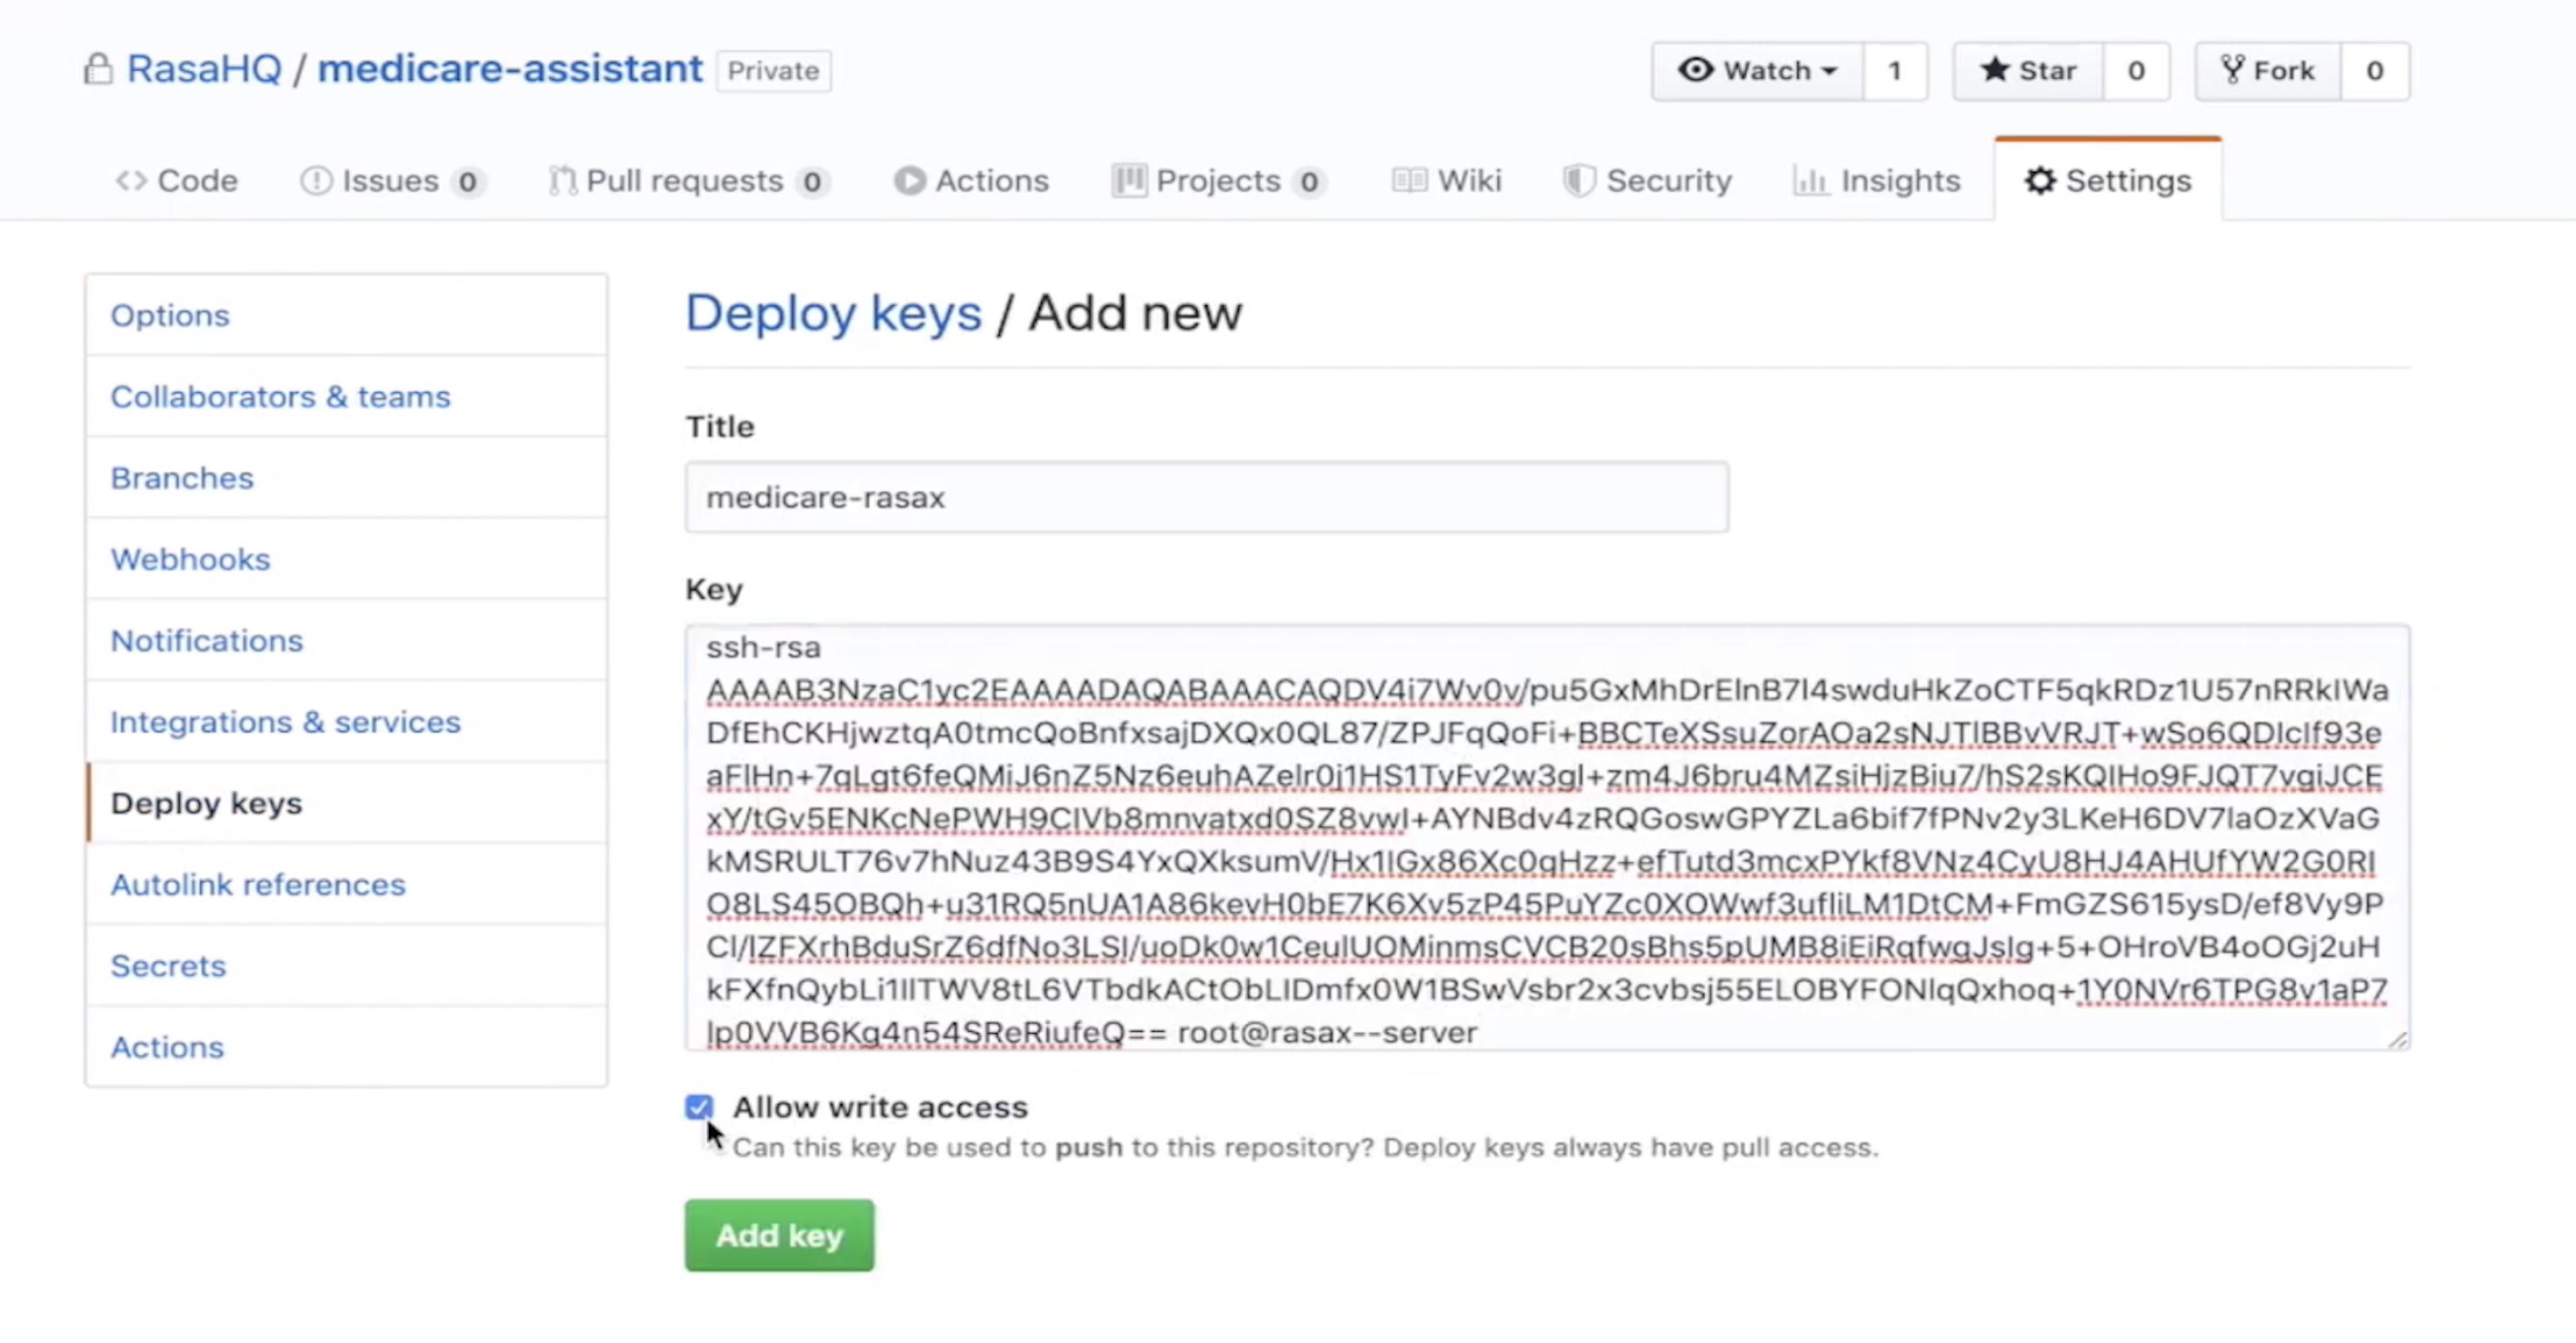
In your GitHub repository, navigate to Settings>Deploy keys. Click the Add deploy key button and paste your public key into the Key box. Give the key a title to identify it, like medicare-rasax, and be sure to check the box to Allow write access. Click Add key.
Connect the repository to Rasa X
We'll establish the connection between the Rasa X instance and GitHub repository by making a POST request to this Rasa X API endpoint:
https://<Rasa X server host>/api/projects/default/git_repositories?api_token=<your api token>
The JSON request body contains three pieces of information:
-
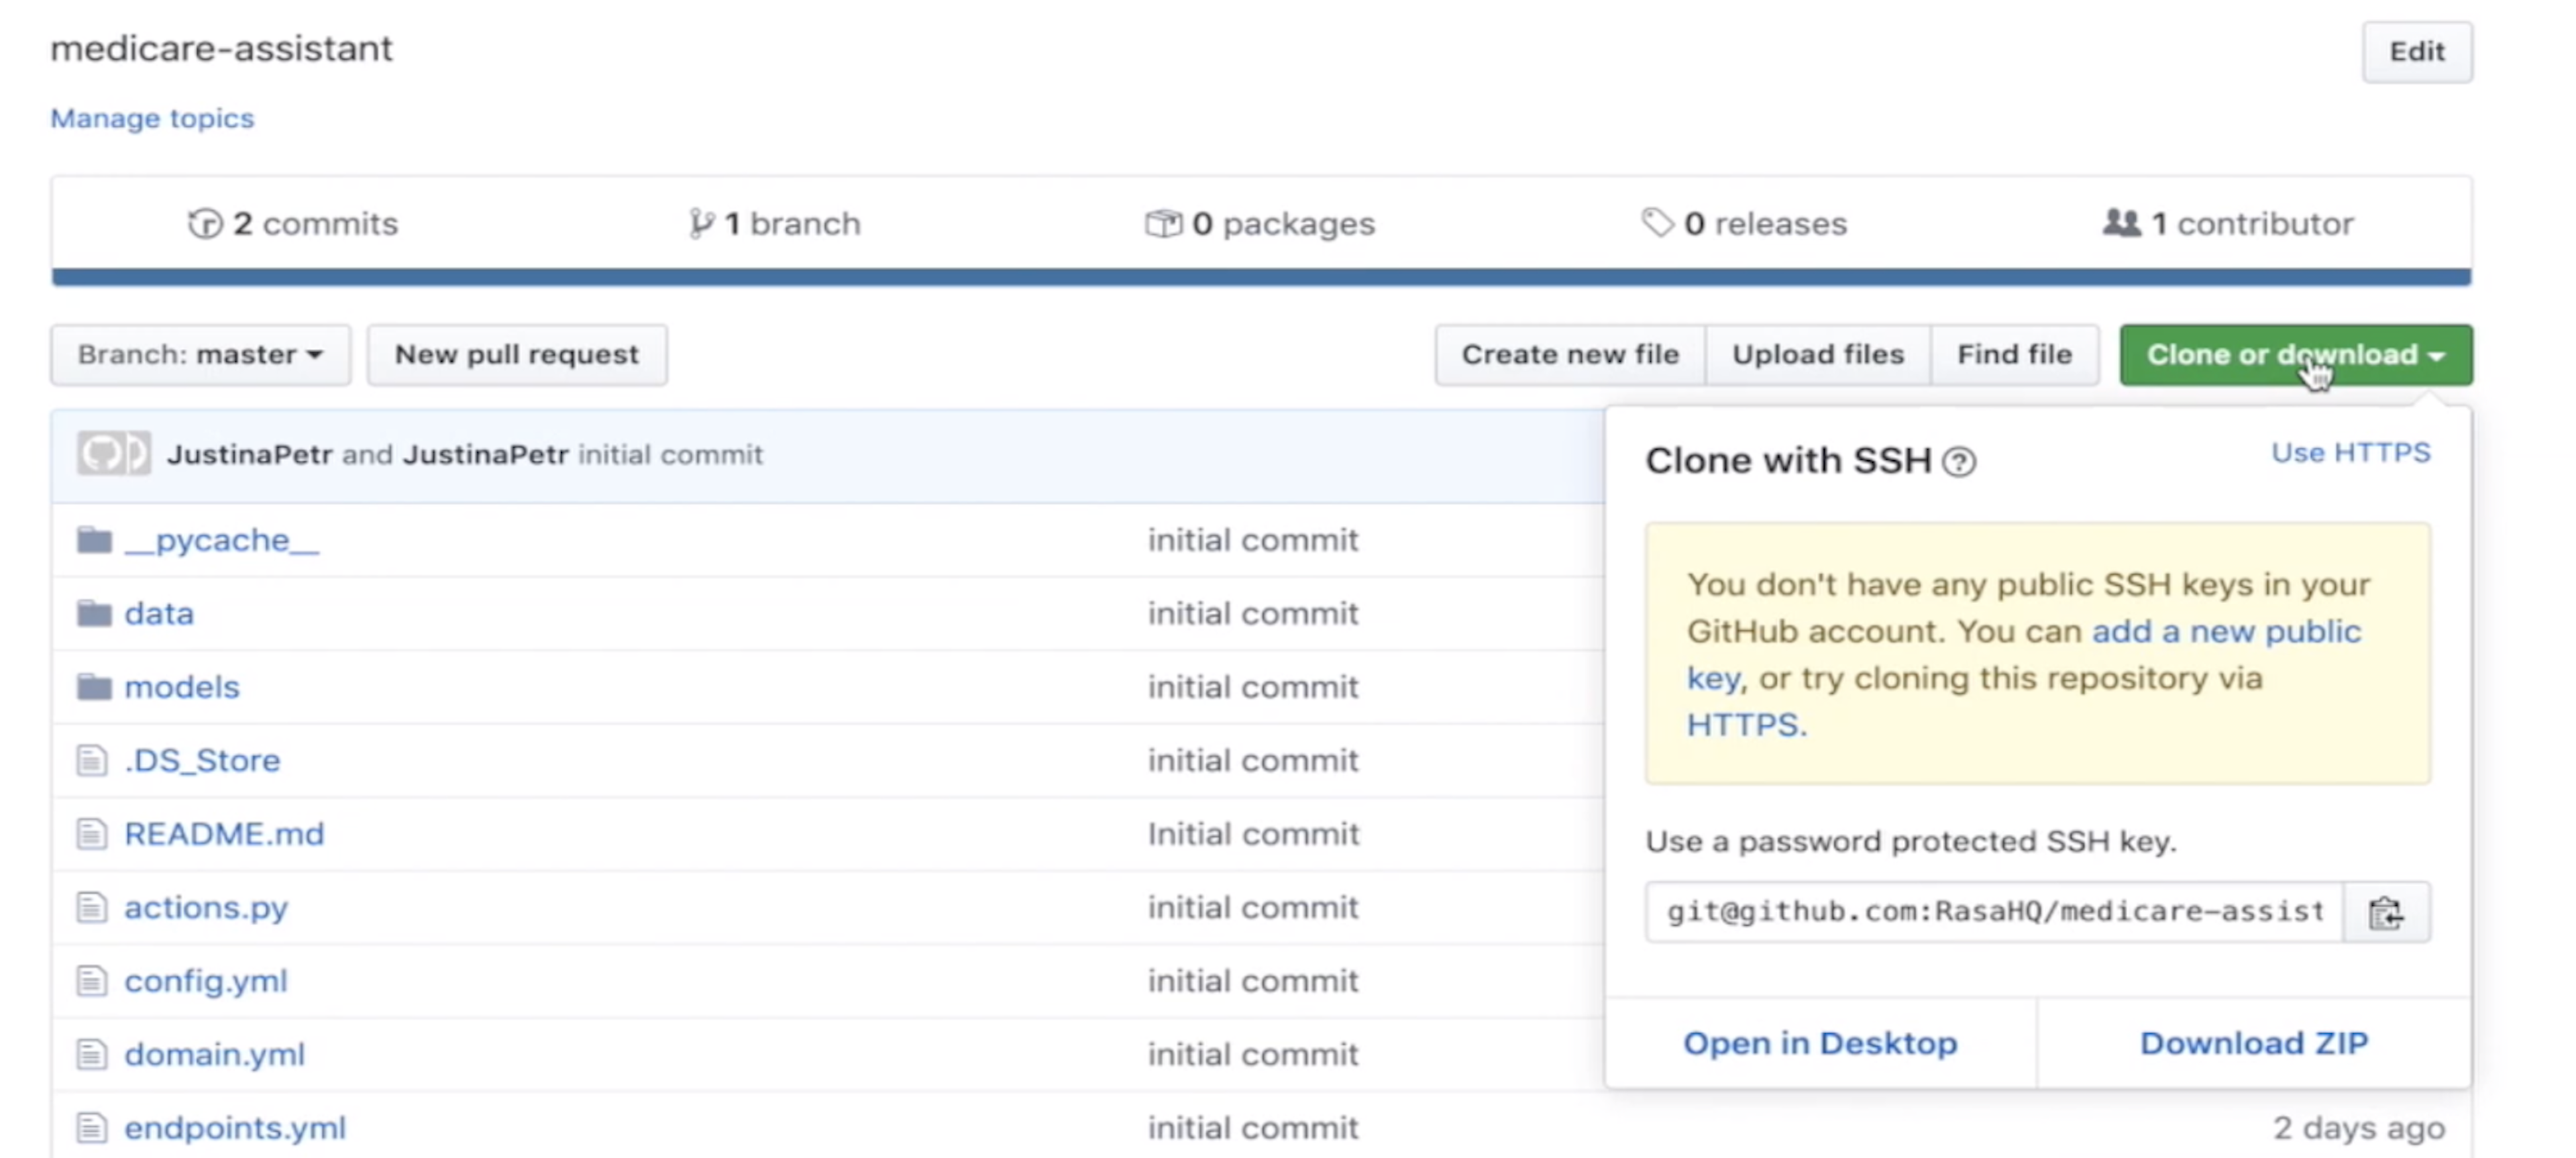
repository_url - The SSH URL for your GitHub repository, e.g.
[git@github.com](mailto:git@github.com):RasaHQ/rasa-demo.gitTo get the URL for your repo, click the Clone or download button on your GitHub repository and select the Use SSH link.
-
target_branch - The GitHub repository branch where Rasa X should push and pull changes, e.g.
master -
ssh_key - The private SSH key generated on your server.
To copy the private key, run the following command in the /etc/rasa folder on your server:
cat git-deploy-keyCopy the entire contents of the key, including the lines -----BEGIN RSA PRIVATE KEY----- and -----END RSA PRIVATE KEY-----
Once you've assembled the JSON object, you'll have something like this:
{
"repository_url": "git@github.com:RasaHQ/rasa-demo.git",
"target_branch": "master",
"ssh_key": "-----BEGIN RSA PRIVATE KEY-----
b3BlbnNzaC1rZXktdjEAAAAABG5vbmUAAAAEbm9uZQAAAAAAAAABAAACFwAAAAdzc2gtcn
NhAAAAAwEAAQAAAgEAu/Giin7t8DFMxsaTbyy1To2EQpLIAhpAIgpyC/e45NYVTwKRGCB1
mxHzt5IWoh7GSWry3pKFBM74UpXxrRPBdCmFeUIiJoslAukNkRSckAUj0VEfOIZLf2SSPg
...
CDHniFksE1SjkAAAEBANJacZeM2Qdk/vditmBQV97Ac2VJL/Btt8Rks2Vb3CORyXQn3Bpb
+5ZONhmPEoCg4FcZbAm02gYw3dSoBBWz2i8mmAv71mVsNoddWKpDngRFv4PUaITnYYxrZ4
-----END RSA PRIVATE KEY-----"
}
We'll save this JSON object in a file called repository.json, in the /rasa/etc folder on the server. First, let's create that file:
touch repository.json
Open the file to edit it:
nano repository.json
Paste the JSON object into the file. Press Control + X to exit the editor, and confirm Y to save your changes when prompted.
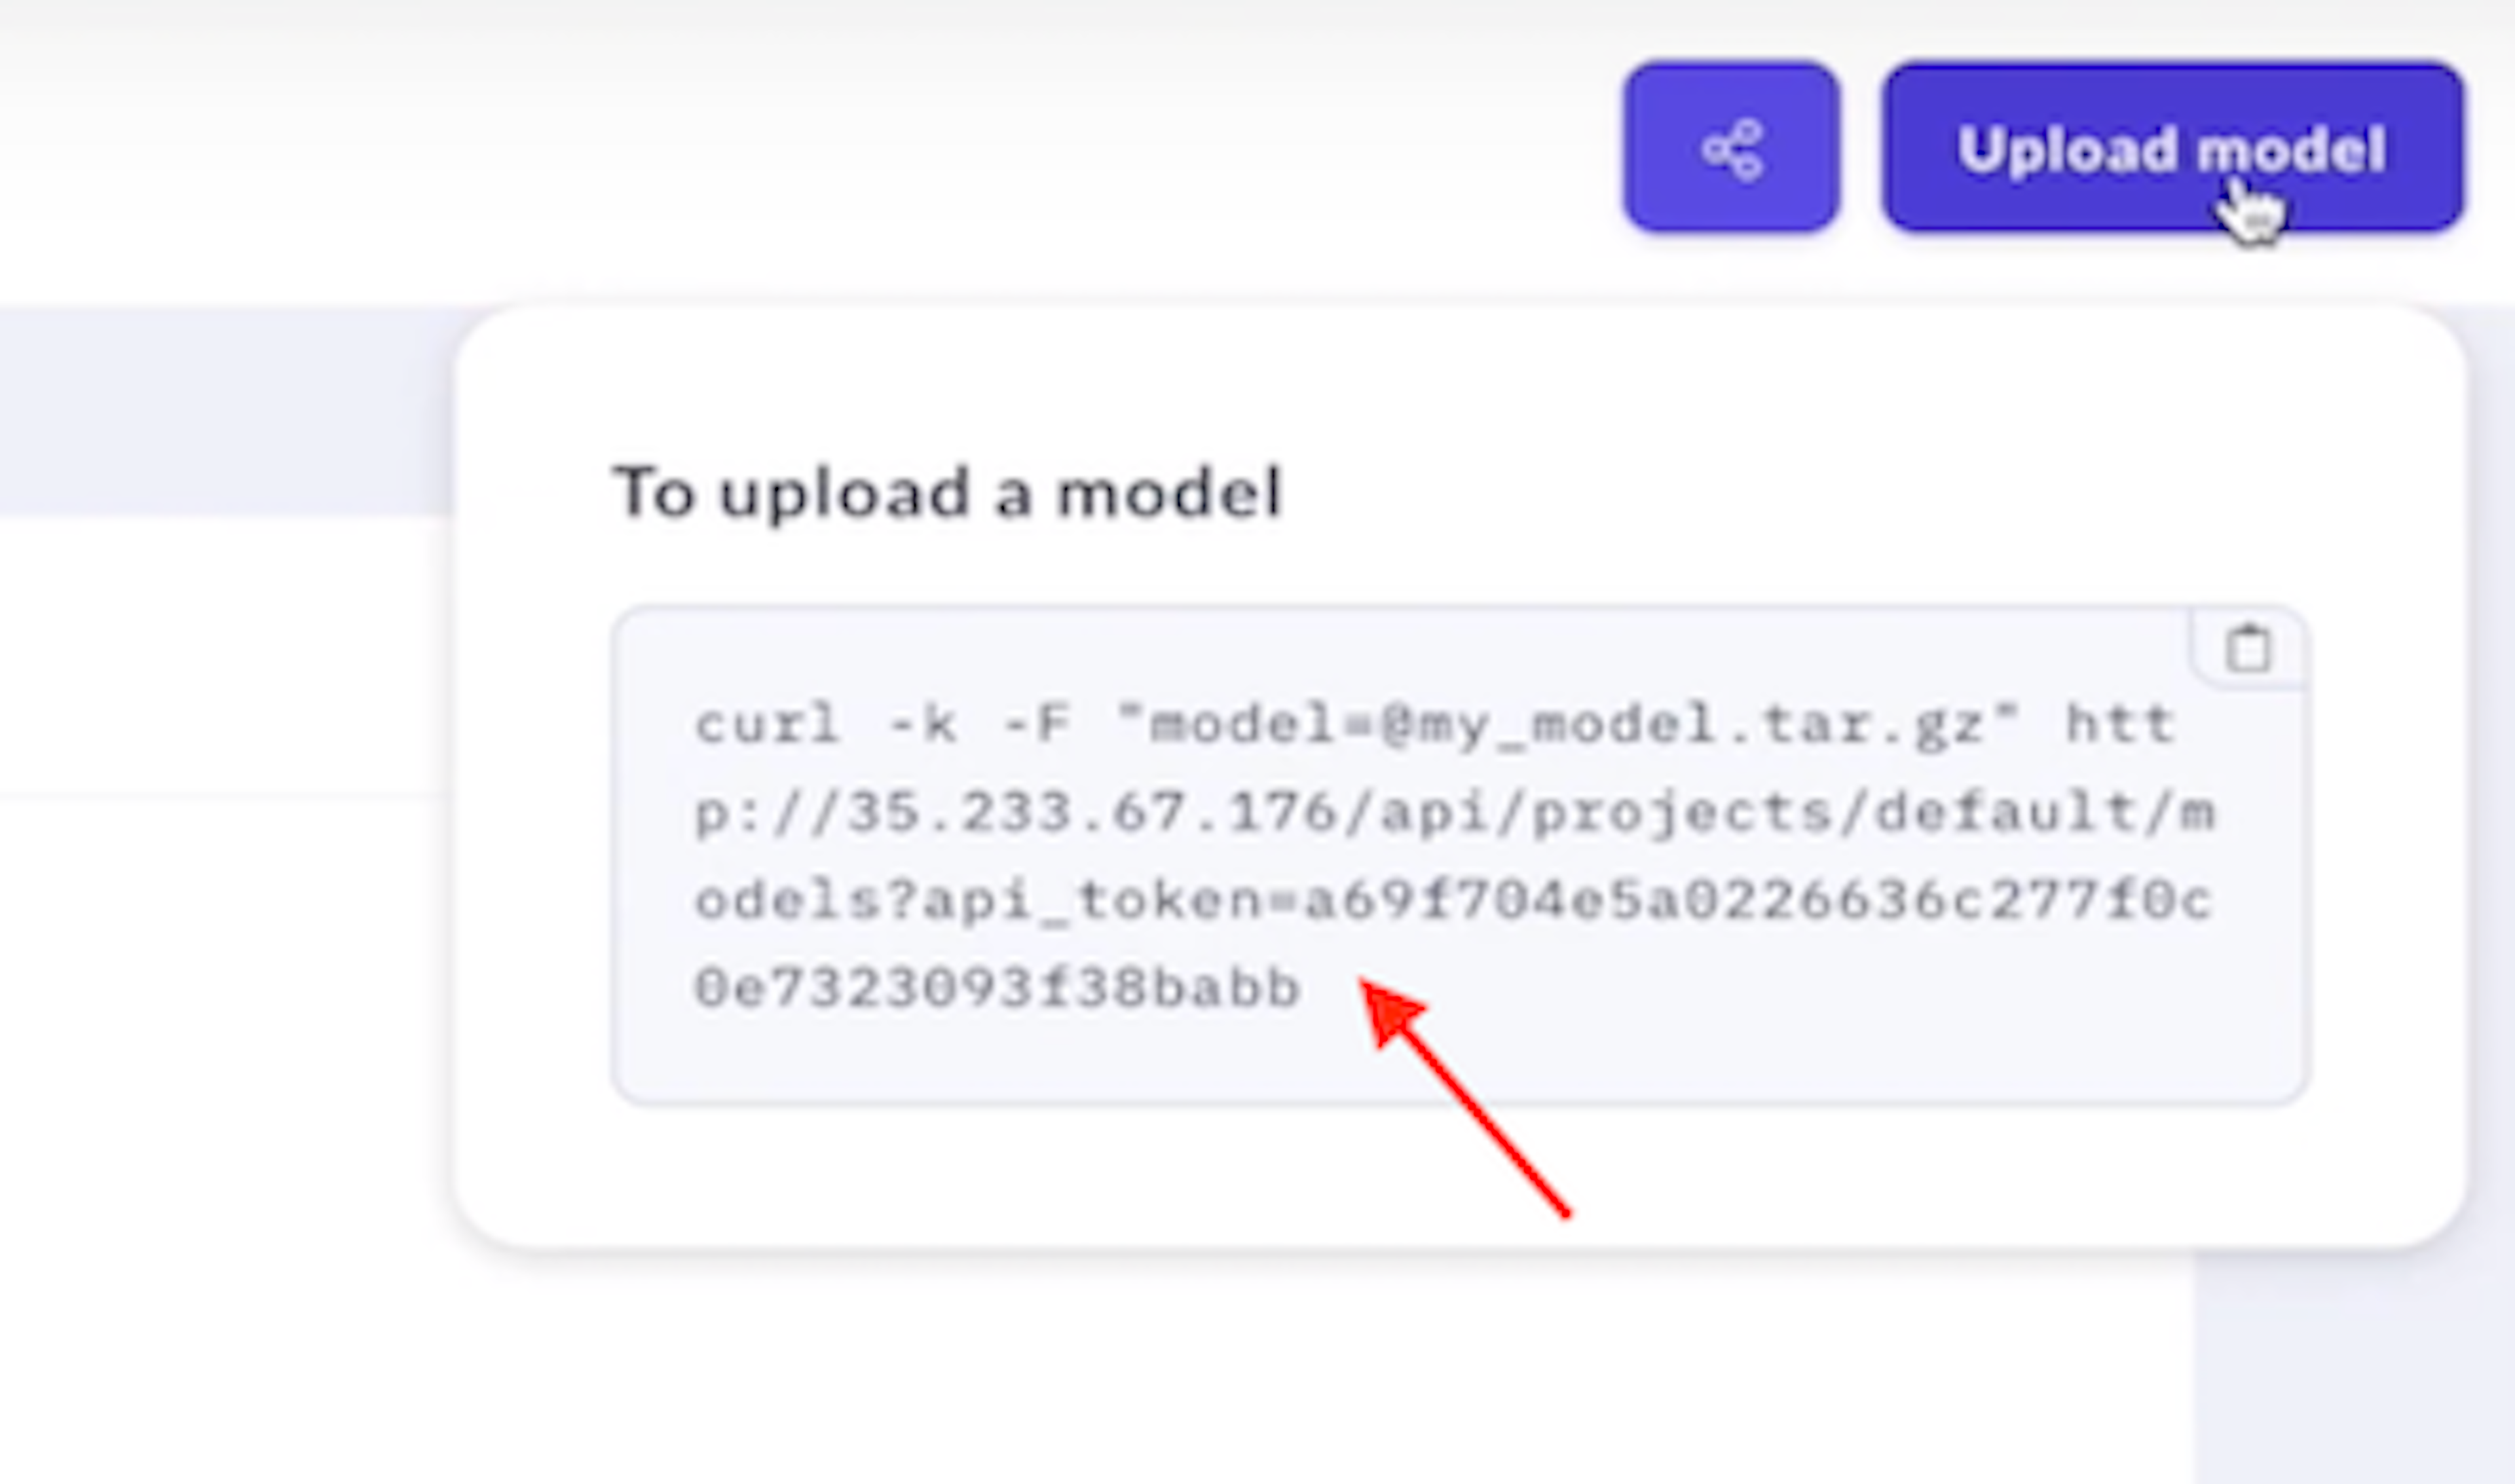
We need one more thing before we can send the cURL request: the Rasa X API token. The easiest way to get the token is to launch Rasa X in the browser and navigate to the Models screen. Click the Upload model button and copy the api_token from the URL.
Head back to the terminal. Still in the /etc/rasa directory, run the following cURL command, replacing the Rasa X server URL and API key values with your own:
curl --request POST \
--url http://<Rasa X server host>/api/projects/default/git_repositories?api_token=<your api token> \
--header 'content-type: application/json' \
--data-binary @repository.json

Check the connection by navigating back to the Rasa X dashboard in your browser and checking the Integrated Version Control icon in the bottom left corner. If the connection was successful, you'll see either a green indicator, meaning Rasa X is up to date with the GitHub repository, or a yellow indicator, meaning Rasa X has changes that need to be pushed to GitHub.

Set up the Actions Server
We have one more thing to configure: the assistant's custom action server. To do this, we'll place the assistant's custom action code within an actions directory on the server.
Connect to your server and make sure you're in the /etc/rasa directory. In your terminal, run the following commands to create the actions directory and two files inside it: __init__.py and actions.py

Run nano actions/actions.py to edit the newly-created actions.py file. Paste the code from your assistant's actions.py file into the blank file, save, and close the editor.
Then, we need to create a docker-compose.override.yml file. This file instructs docker-compose to spin up a custom action server when the Rasa X server starts up. Let's create that file:
touch docker-compose.override.yml
Open the file editor:
nano docker-compose.override.yml
And add the following contents:
version: '3.4'
services:
  app:
    image: 'rasa/rasa-sdk:latest'
    volumes:
      - './actions:/app/actions'
    expose:
      - '5055'
    depends_on:
      - rasa-production
Here, we're using the rasa-sdk image to run our custom actions, and we're specifying that the actions server will listen on port 5055. The actions server depends on the rasa-production service, which is responsible for running the trained model, parsing intent messages, and predicting actions.
Once you've saved the file, you can restart the Rasa X docker container and the assistant will be fully functional on Rasa X.
sudo docker-compose up -d
Let's head back to the Rasa X dashboard where we can have a look and try it out!
The Rasa X Dashboard
When you log in to Rasa X, you'll see four tabs on the left side of the screen: Models, Talk to your bot, Training, and Conversations. In this section, we'll take a tour of each area.
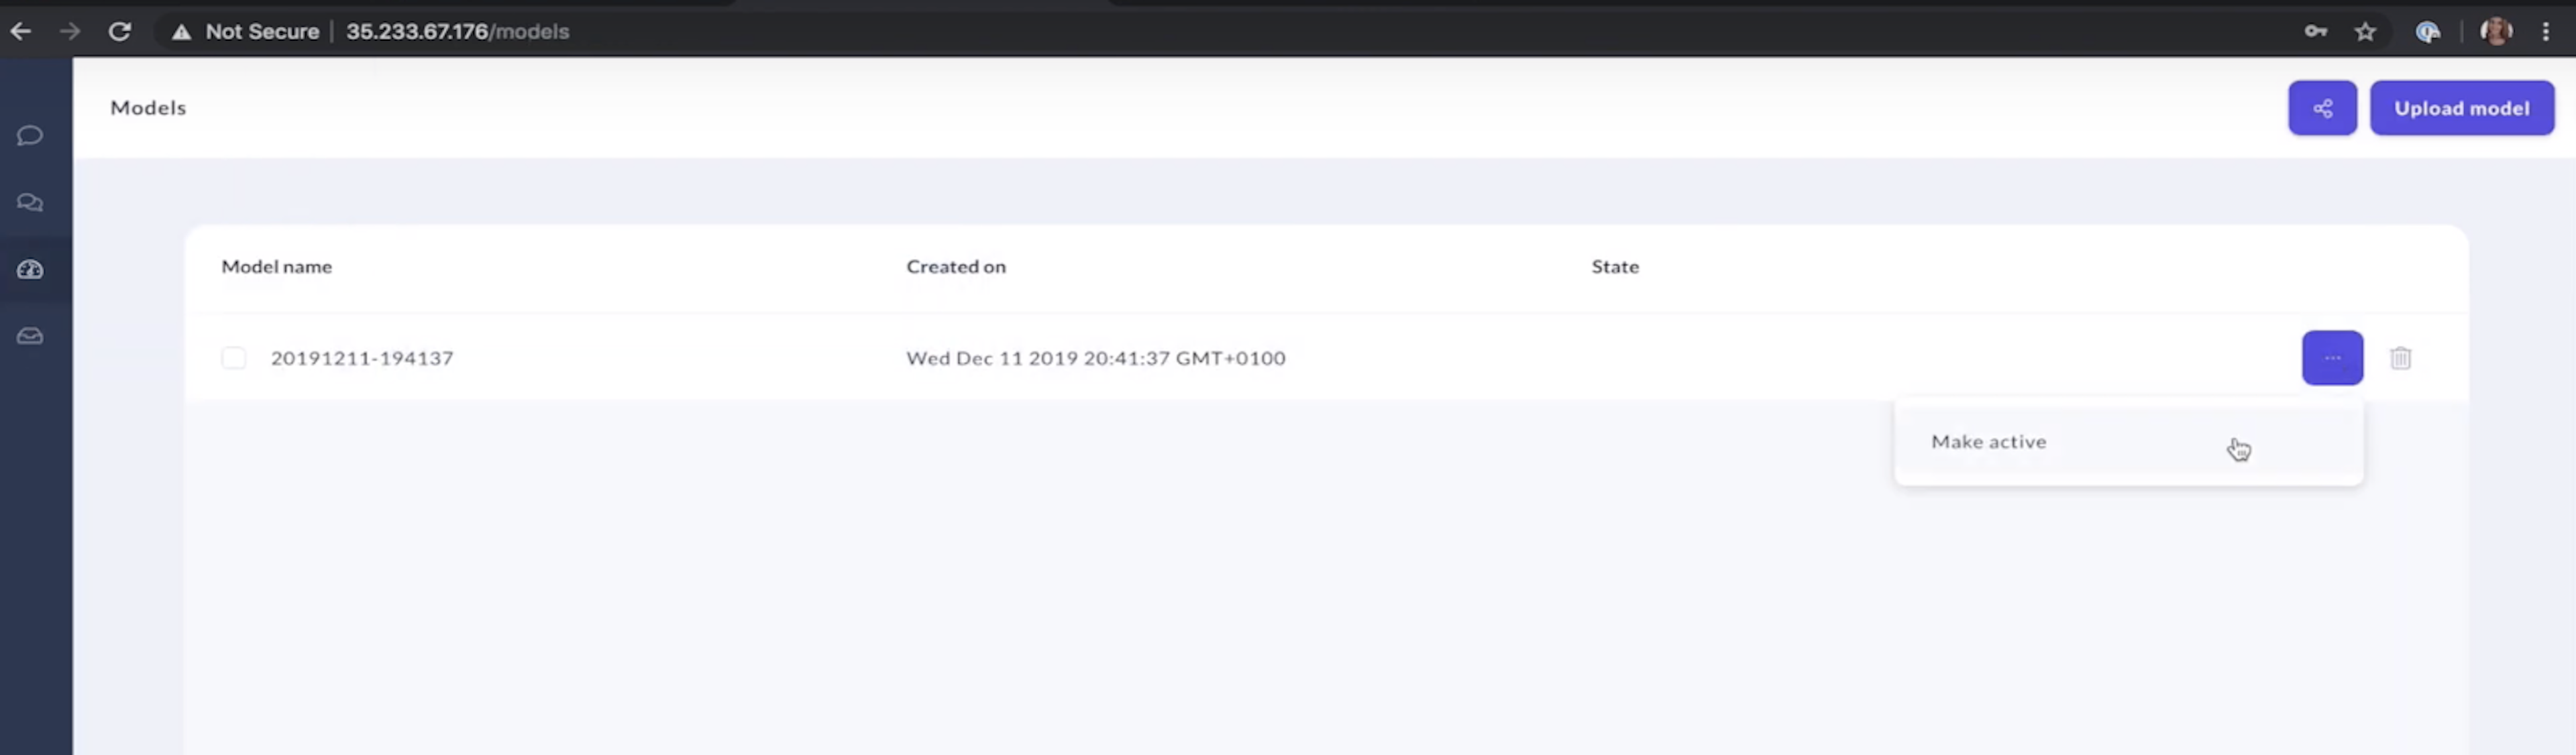
Models
The Models screen is where you view and manage your models. Now that we've connected Integrated Version Control, all of the files from the GitHub repository have been pulled into the Rasa X instance. Let's hit the Train button on the sidebar to train a new model on the latest training data and file configurations.
Once the model has finished training, we can make it active on the Models screen.
Talk to your bot
The Talk to your bot screen allows you to test and improve your assistant by talking to it. You can use the Talk to your bot screen in two modes:
- Simple chat - Allows you to test the performance of the assistant by having a conversation. This is a nice way to test your assistant and generate new training examples at the same time.
- Interactive learning - As you chat with your assistant, you'll be asked to validate the intent classification and action prediction at each step of the conversation. This allows you to finely tune and correct your assistant's behavior.
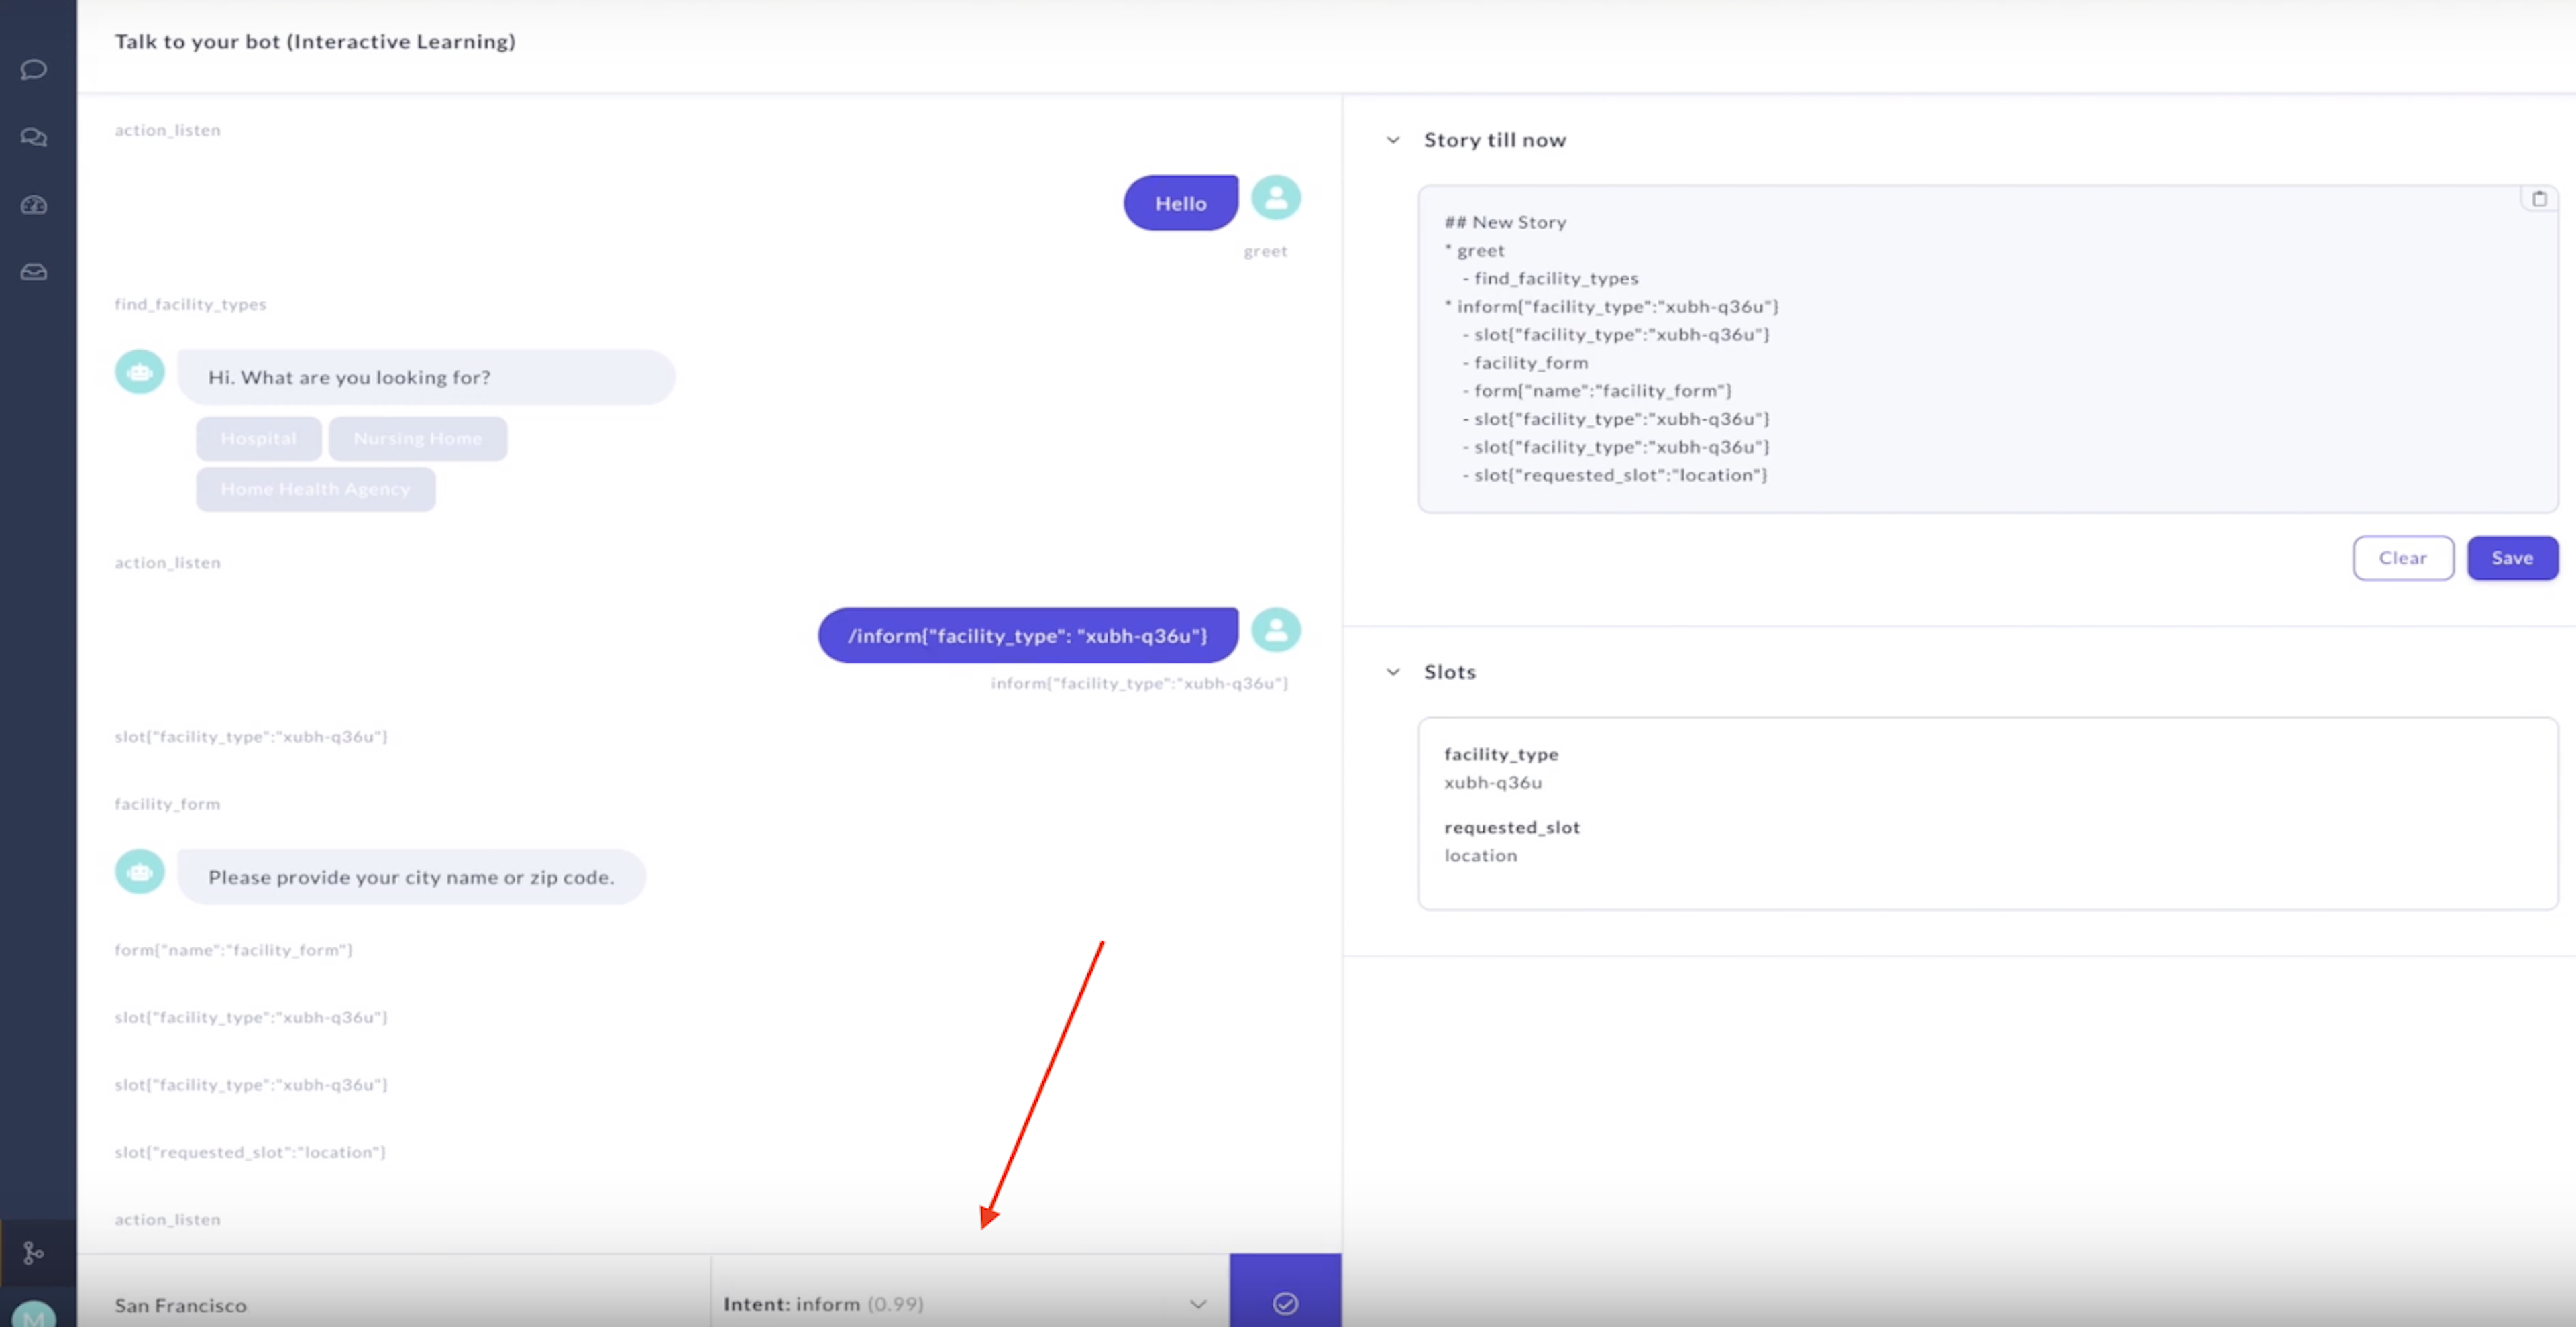
As you chat with your assistant, you can save new stories and example utterances to your training files. When you've accumulated a few of these changes, you can then retrain the model on the new data.
Training
The Training tab is where you can manage your assistant's training and configuration files, annotate new training examples, and train new models after making changes. Let's look at two important subsections:
NLU Training
This screen contains the assistant's NLU training examples. If you navigate to this screen, you'll see all of the example utterances we added when we first created the assistant, plus the examples we generated during our interactive learning session on the Talk to your bot screen.
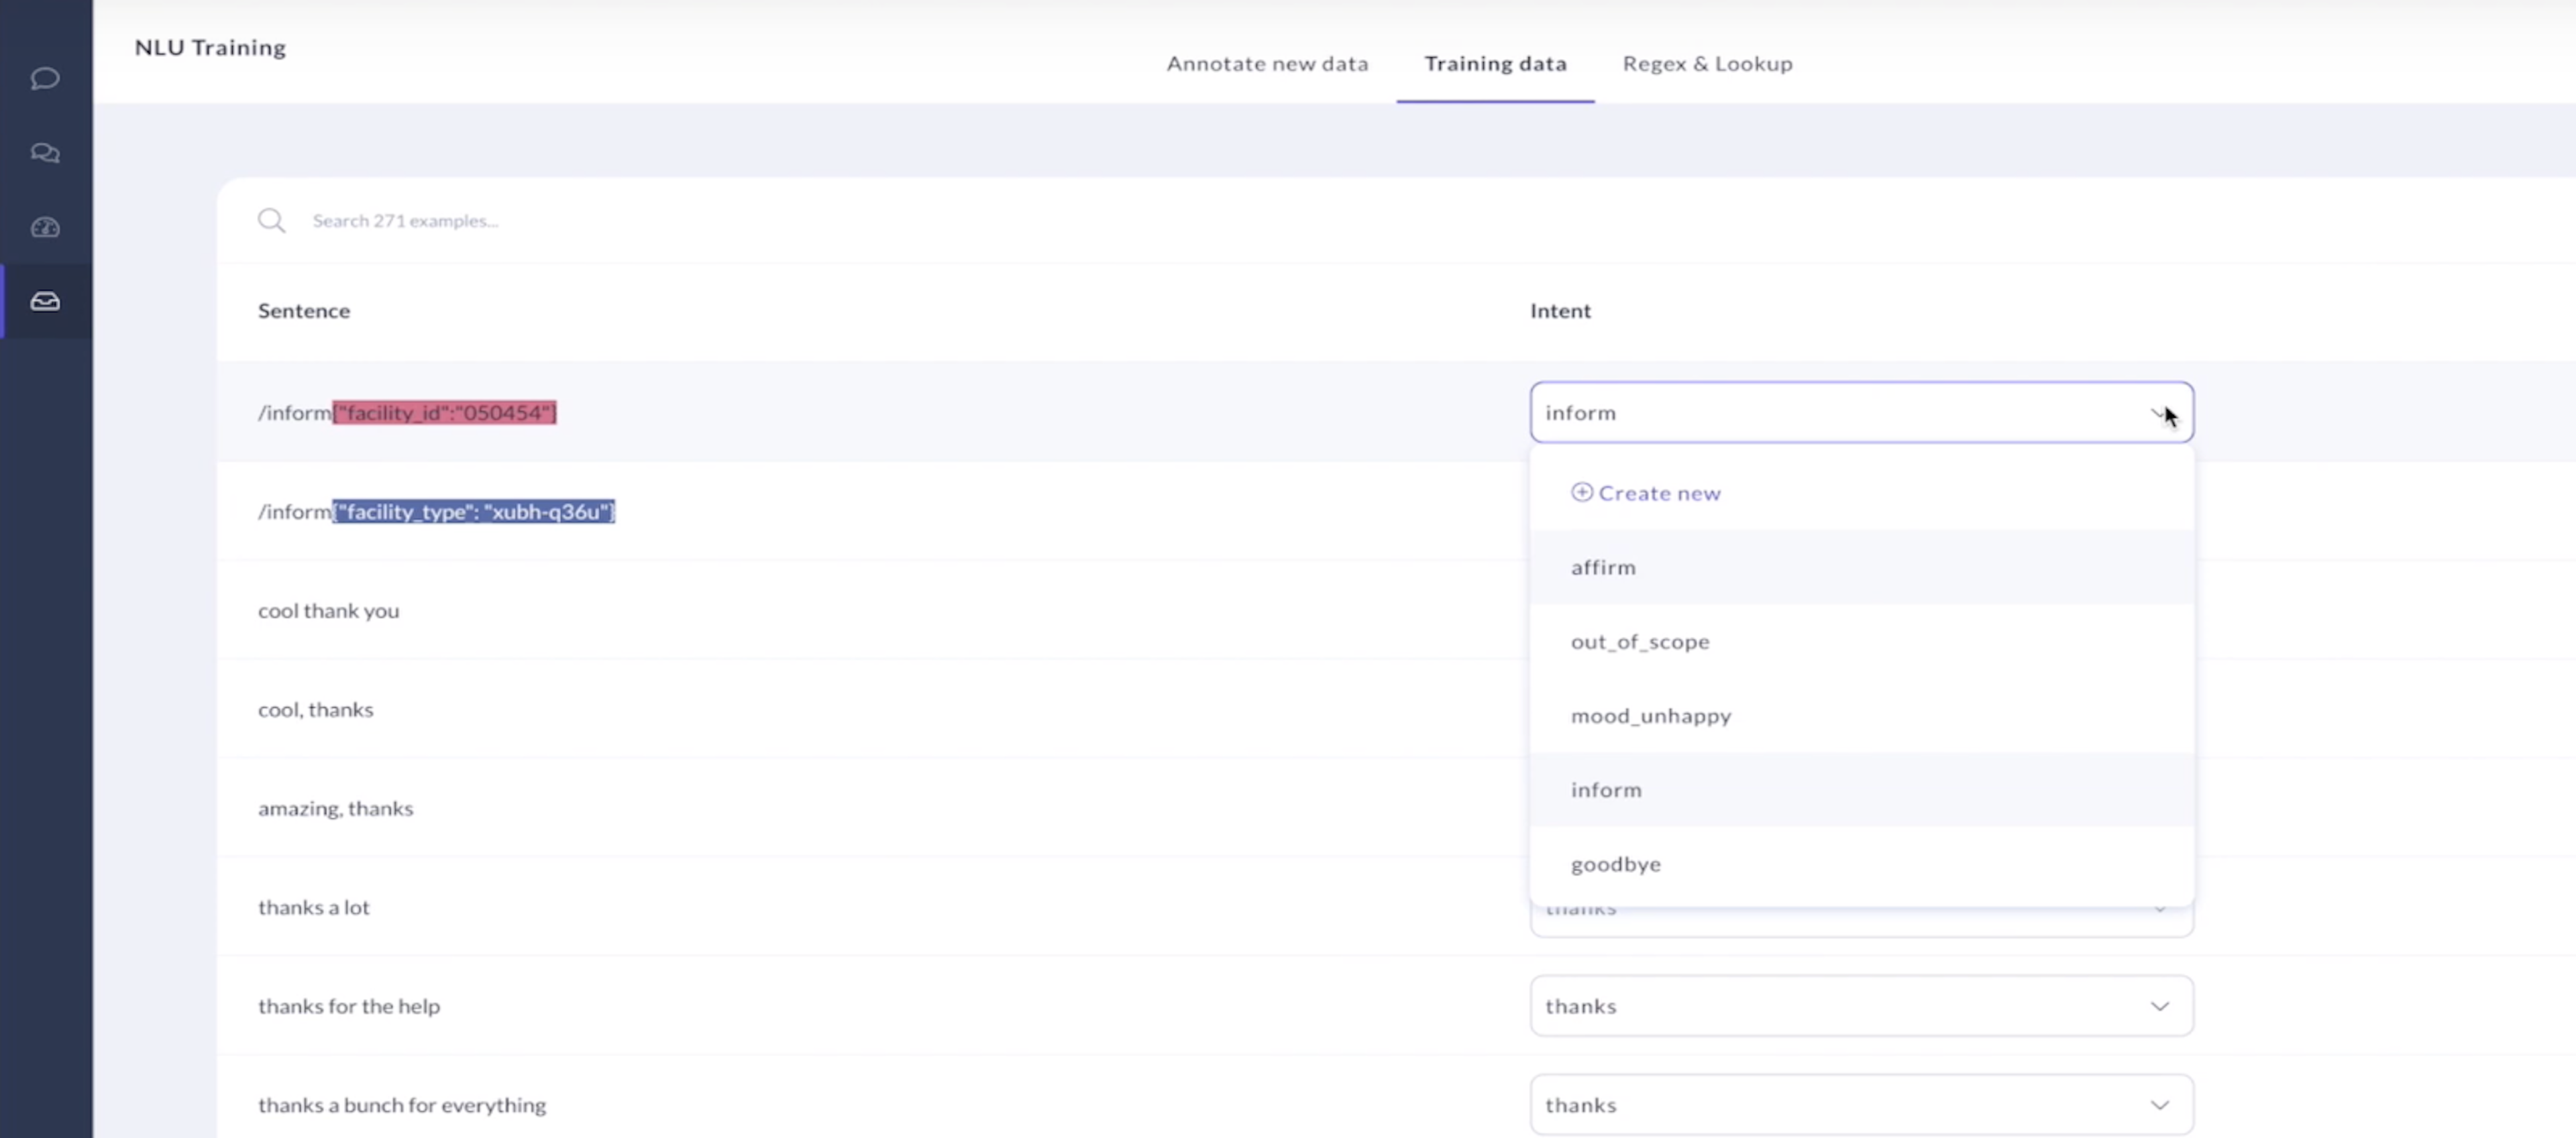
On the Training data tab, you can see the intent predicted for each utterance. If there's another intent that would be a better match for the utterance, you can change it here.
Finally, under the Annotate new data tab, you'll see the user inputs that were entered during the Talk to your bot session. You can label the entities and intent predictions for each input and add the annotated data to your training files.
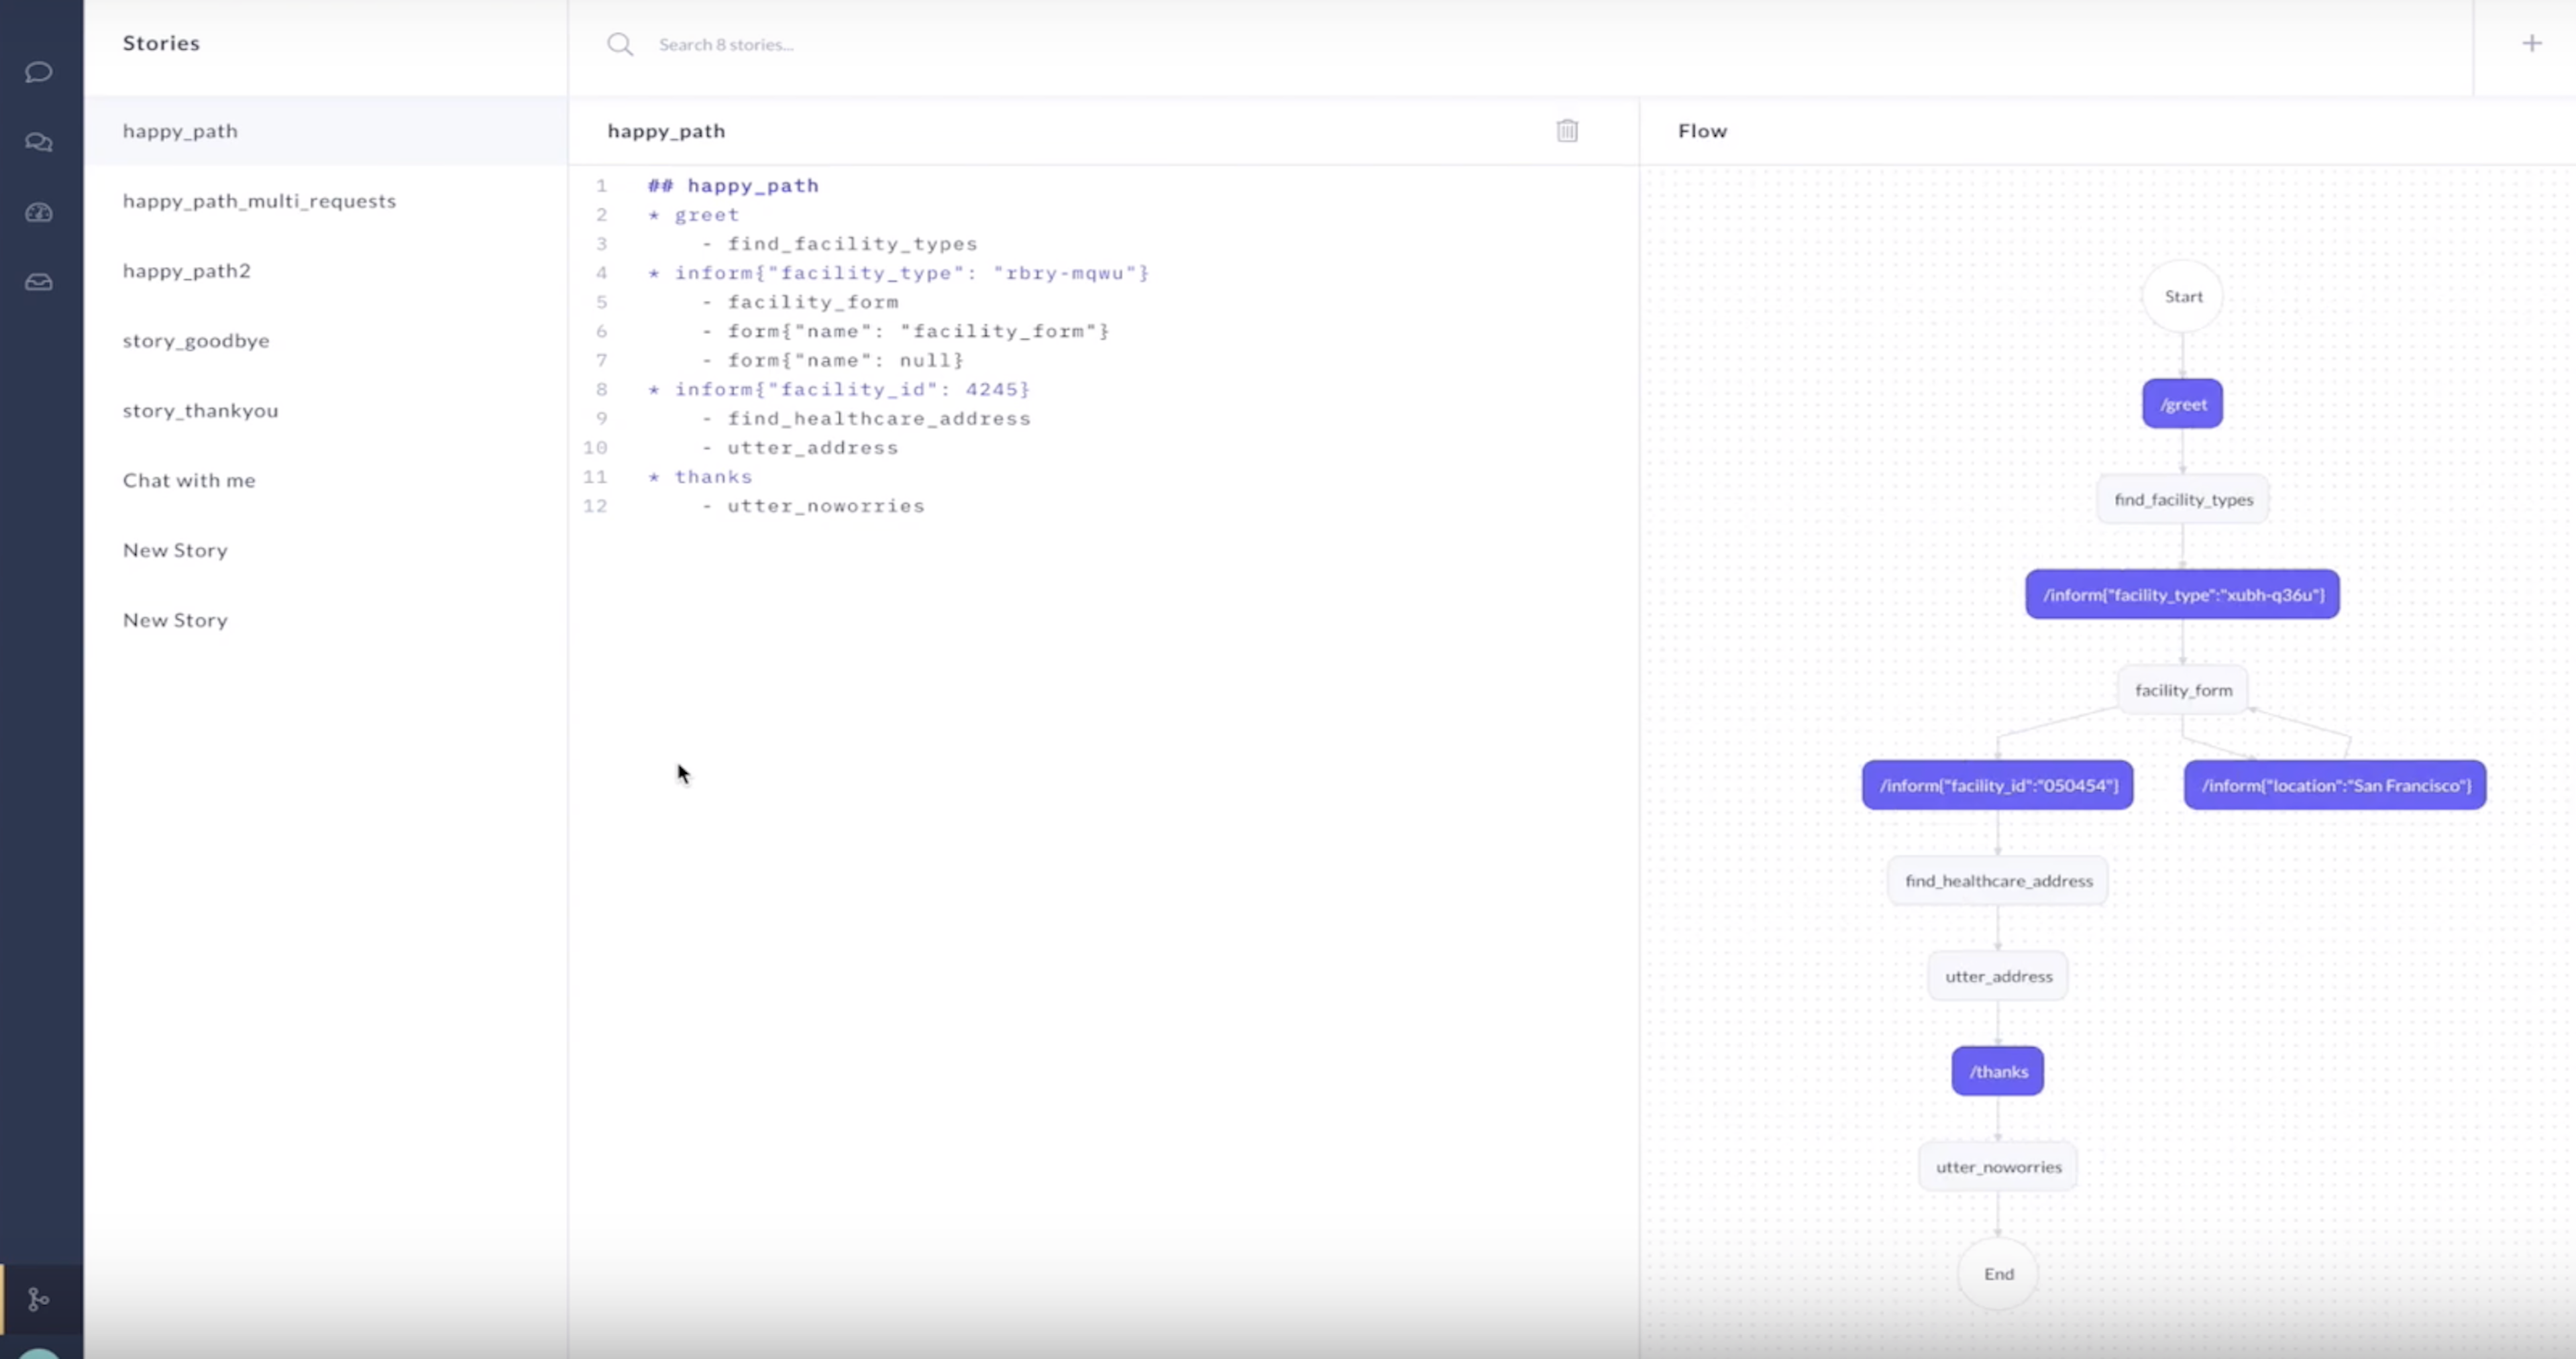
Stories
On the Stories screen, you can select each story in your training data to see a visual representation of the conversation. You can also write new stories, edit existing stories, import stories in bulk, or generate training stories by talking to your assistant in interactive learning mode.
Conversations
When you navigate to the Conversations screen, you'll notice something: it's empty! That's because we haven't yet shared our assistant with any testers. When we do, those conversations will show up here.
In our next episode, we focus on the process of improving AI assistants, by sharing your assistant with testers and real users.
Conclusion
In this episode of the Rasa Masterclass, we covered quite a bit of ground: we deployed Rasa X to a server, connected the assistant using Integrated Version Control, and took a tour of the Rasa X dashboard. This sets us up to cover our next topic: further improving your assistant using Rasa X.
Keep up the momentum, and if you get stuck, ask us a question in the Community forum.
Additional Resources
- Ep #9 Rasa Masterclass - Improving the assistant: Setting up Rasa X (YouTube)
- Rasa X - Docker-compose Quick Install (Rasa docs)
- Integrated Version Control (Rasa docs)
- Integrated Version Control: Linking Rasa X with Git-based Development Workflows (Rasa blog)
- Rasa Open Source + Rasa X: Better Together (Rasa blog)