


January 22nd, 2021
webkitSpeechRecognition and Rasa
Vincent Warmerdam

You can do a lot in a modern browser these days. You can, for example, detect speech via the Web Speech API. It's an experimental feature, but as-is you can already use this technology as a preprocessing step to get from speech to text to Rasa. You can see a demonstration of this in the video below.
You can do a lot in a modern browser these days. You can, for example, detect speech via the Web Speech API. It's an experimental feature, but as-is you can already use this technology as a preprocessing step to get from speech to text to Rasa. You can see a demonstration of this in the video below.
In this blog post we will explain how to make this yourself. It will be a minimum viable demo that you can run locally on your own machine. You can follow along, or you can skip ahead and use the ready-made project here.
SpeechRecognition via JavaScript?
We will be using a browser API to turn spoken text into speech. The API is experimental, but it might someday become a standard. At the time of writing, only Chrome and Edge support this feature. We will be using Chrome in this tutorial, but it deserves mentioning that Chrome does not run speech recognition locally on your machine. If you turn off the wifi on your laptop, you'll no longer be able to send and receive data from the API. It's important to be aware of this; data is shared with a 3rd party. You can read more details on this in Google's privacy whitepaper.
Web Speech API
To get started, let's first make a simple web application (it won't be connected to Rasa just yet). We'll just make an HTML page with a single button. Once you press the button the browser will start listening to your microphone. The browser will transcribe what you've said when it detects that you're done speaking. After this is done we'll print the results to the console to confirm that everything works.
<button id="record">Record Voice</button><script>// Set up a new Speech Recognizerconst recognition = new webkitSpeechRecognition();// Set the new language setting.recognition.lang = "en-US";recognition.continuous = false;recognition.interimResults = false;
// Start recognizing after the button is clicked.document.getElementById("record").onclick = function() {  recognition.start();  console.log('Listening...');}
// Once a result is parsed, send the parsed text to a Rasa server// Note that all of this is asynchronous, we update on responserecognition.onresult = function(event) {  var transcript = event.results[0][0].transcript;  // Log the transcript   console.log(transcript)  console.log('Confidence: ' + event.results[0][0].confidence);	}</script>
You can now host this file locally from the command line to get a small preview. The simplest way to do this is via;
python3 -m http.server --port 8000
This will start a small web server, and you can now point your browser to localhost:8000 to view the page. The page probably won't work immediately though. Your browser will, rightfully, be suspicious of a file running from localhost that is listening on your microphone. That means that you'll need to explicitly tell Chrome that your localhost is allowed to listen before you can expect the webkitSpeechRecognition to recognise any speech.
To get this to work, head to chrome://flags/#unsafely-treat-insecure-origin-as-secure in your address bar and flag localhost:8000 as an allowed source. Once this is set you'll need to restart your browser, and now you should be able to allow your microphone to be used by the API. Depending on your OS you might need to restart the operating system too unless you're using incognito mode. More details can be found here.
Once you're all set, you should be to repeat the steps shown in this video;
You'll notice that the speech recognition API doesn't just need to figure out what is being said. It also needs to figure out when to start transcribing and stop listening. It's certainly quick and does a reasonable job at it but you may notice an unnatural delay. This is especially true if there is background noise.
Connecting JavaScript and Rasa
We will use the starter bot produced by `rasa init` in this demo. Assuming Rasa is installed in your virtual environment you can get it running locally via:
rasa run --enable-api
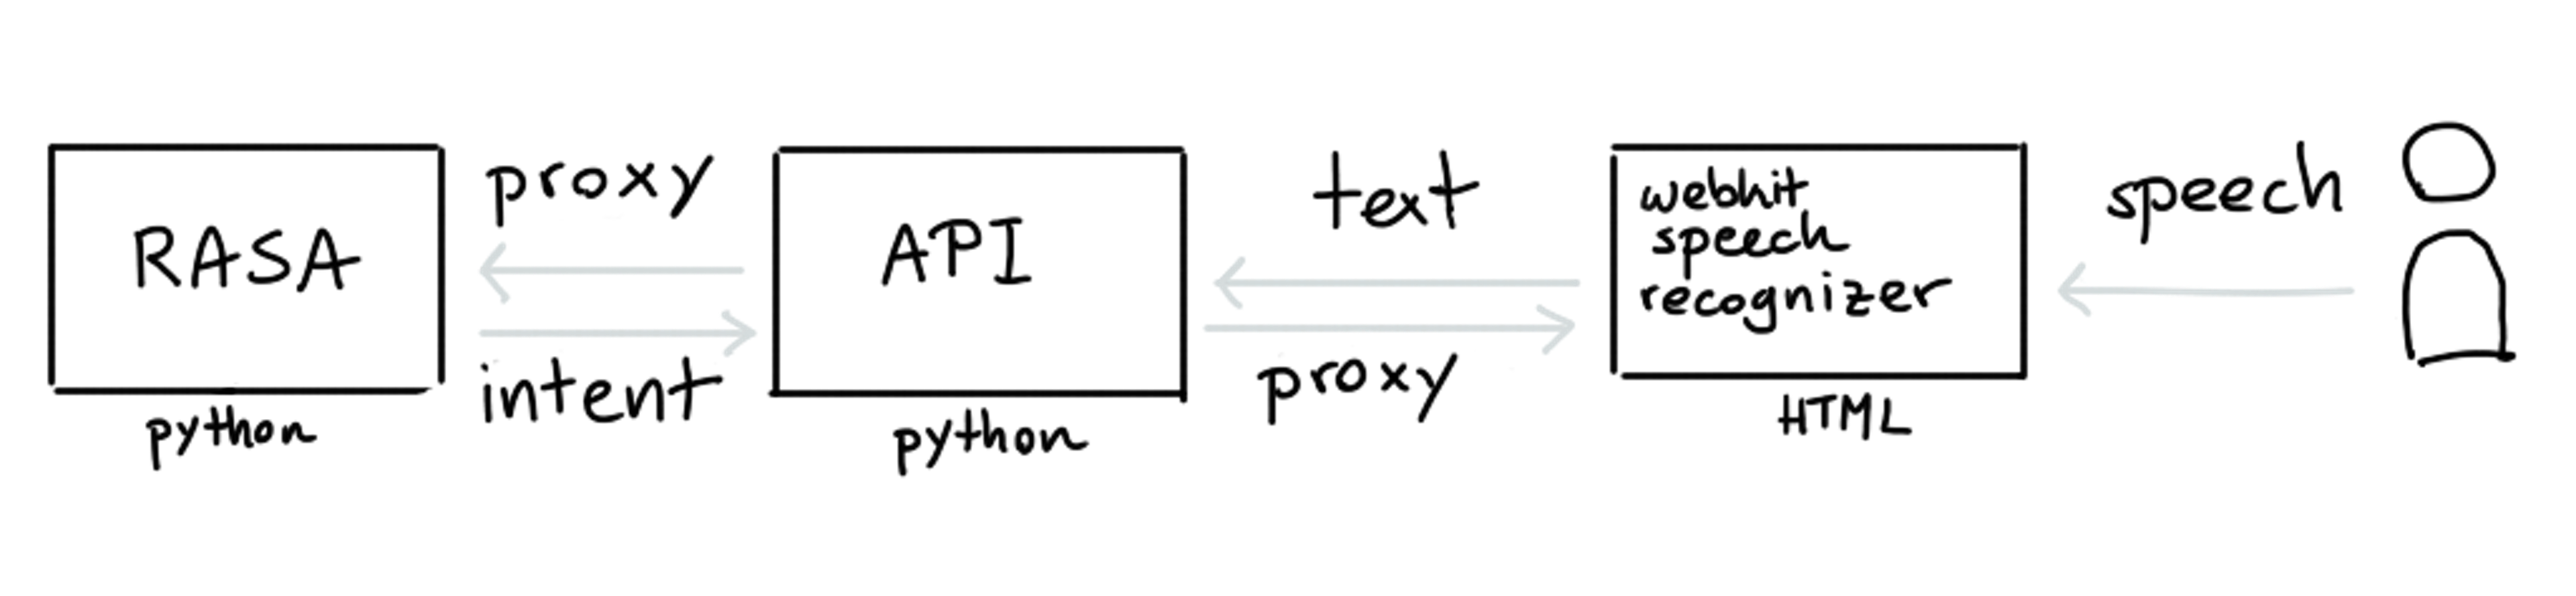
This will start up a server that can parse incoming text messages. It won't be able to serve files on our behalf though so that means that we'll need to create another server to do this. We'll call this server the "API" and the goal of this server is to act as a proxy between Rasa and the JavaScript that contains the speech recognizer.

The idea is that when the user talks, the web speech API is able to turn it into written text. This written text is then proxied via our API service to Rasa. After that, Rasa turns this into a detected intent which our API then proxies forward to our HTML again.
This setup allows us to link Rasa to a front-end and also allows us to be flexible. For our demo, we'll only have the API send text to Rasa's /model/parse endpoint, but the API could also be used to do more. It could fetch data from other sources or talk to databases.
Python API
We'll use FastAPI to implement the proxy. You can see the full implementation here, but the two most important endpoints are highlighted below. The first endpoint serves our front-end while the second endpoint is able to proxy transcribed text between Rasa and our front-end.
# This endpoint returns our HTML page.@app.get("/", response_class=HTMLResponse)def index():    html = pathlib.Path("index.html").read_text()    return HTMLResponse(content=html, status_code=200)
# This endpoint will receive texts, proxy to Rasa and return parsed results.# Note that we assume that Rasa is hosted at localhost:5005@app.post("/api/")def post_attempt(text: Text):    body = {      "text": text.text,      "message_id": str(uuid.uuid4())    }    url = "http://localhost:5005/model/parse"    return rq.post(url, json=body).json()
With this API in place, we can now add the new functionality to our HTML page. This allows us to update the page whenever we get a response back from Rasa. The full implementation can be found here but the main change is that we now perform an extra action when we generate a transcript.
// Once a result is parsed, send the parsed text to a Rasa server and update HTMLrecognition.onresult = function(event) {  // Log the transcript to the console.  var transcript = event.results[0][0].transcript;  console.log(transcript)  console.log('Confidence: ' + event.results[0][0].confidence);
  // Generate the Json that we want to send to Rasa.  var payload = {  	 method:"POST",    body: JSON.stringify({text: transcript})  }
  // Send the Payload and update page when we get a response  fetch("/api/", payload)  .then(result => {  	 result.json().then(b => {          // Log the result from Rasa          console.log(b);          // Create a new h2 element that highlights the parsed intent          var textnode = document.createElement("h2");          textnode.innerHTML = `<code>{text: ${transcript}, intent: ${b.intent.name}}</code>`;          // Add this element to the HTML page          document.getElementById("output").appendChild(textnode)   })  })  .catch(error => {  	 console.log(error);  });}
With this change in our HTML file we will now be able to "talk" to a webpage and have Rasa parse the intents from what we say. To run the entire setup, we will need to start both our API and the Rasa service.
# The rasa backend that we'll communicate to.rasa run --verbose --enable-api# The FastApi front-end service that relays requests.uvicorn app:app --reload --port 8000With all of this set up, we are now able to speak and have the transcribed text handled by Rasa. Simply go to localhost:8000 and start talking.
When you're playing with the tool, you'll notice that the webkitSpeechRecognition API isn't perfect. At times it will misinterpret a word, and we've noticed that names especially don't always get picked up correctly. The video below lists a clear example of a classification.
We should also remember that the Rasa backend used in this project is fairly basic. We're using the `rasa init` assistant which is limited in what it can detect. We're also only using Rasa to parse the NLU data. It serves as a starting point but we'd need to iterate further to have this resemble an actual conversation between a user and an assistant.
Conclusion
The great thing about open source is that you don't need permission to try something out. If there's a new technology you'd like to play with, it really only takes an afternoon to give it a spin.
After experimenting with this set up ourselves though, there are a few things that deserve mentioning.
- The speech API currently only works on browsers based on Chromium. It's possible that the future Firefox implementation won't be the same as Chrome, so our demo project isn't representative of what every user might experience. We should also remember that it won't be feasible for many projects to send the audio data to a 3rd party, which is what the Chrome implementation currently does.
- We're currently working with an English demo but the API does allow for more languages. For more information on what languages are supported check out the resource listed here. Since Rasa also allows for multiple languages, you should be able to try this setup for every language that's listed.
- The speech API isn't open-source and you will be depending on a 3rd party by using it. There are open-source alternatives that you might want to consider instead. If this is a concern for your use-case you might want to try out the open tools from Mozilla.
That said, it's been a fun experiment to implement and we hope our example repo will be used as a starting point for more experiments with Rasa.
Happy hacking!